Discover the real power of Exteryo Safety 4.0

Everything you need is here.

Smartphone, tablet or pc?

Exteryo Safety 4.0 platform can be used via a smartphone or tablet as well as a computer.
Mobile’s app
 available for both Apple and Android.

Click on the icon of your choice to get access to our Exteryo Safety 4.0 app.

Chip or unique code?

The Exteryo Safety 4.0 system can be used either in “smart” mode, through the use of special NFC technology chips, or in analog mode with manual entry of PPE unique codes.

The functionality of the software is identical with both methods, although the use of the chips allows for quick association and reading of information related to individual PPE.

To be able to read NFC chips you must first have a smartphone with this technology (click here to get the full list) or a special NFC reader that can be connected to your computer via USB port or to your tablet via a reduction from standard USB to USB type B or type C.

If you have an ANDROID smartphone, to read an NFC chip through the smartphone you must activate the NFC feature on the smartphone (settings > connectivity > NFC) and after unlocking the smartphone, simply place the back on the chip to activate the communication.

If, on the other hand, you have an APPLE smartphone, the NFC functionality is active by default and therefore within the application you just have to click on the read button and then place the back of the smartphone on the chip.

NFC chips, where to find them?

NFC chips are available in different solutions to be used according to the type of PPE on which it has to be inserted.

The manufacturing partner companies of the system, such as KONG Spa or IRUDEK SL, already mount within a wide range of products the NFC chips uniquely linked to the PPE.

If your PPE is not equipped with an NFC chip, you can easily insert it choosing among the various solutions proposed by Exteryo and its resellers.

Contact your reseller for the NFC chip catalog or write to customer@exteryo-safety.com

Our "Wikipedia" system

Exteryo Safety 4.0 system is developed on a Cloud platform, i.e. on a structure that allows the sharing of part of the data between PPE manufacturers, user companies and inspectors using the software.

The vision of Exteryo Safety 4.0 is to develop a system that is not only a support to the work of individual inspectors or individual companies, but that allow to create a real network between professionals in the same field, able to collaborate and have as focus the safety of workers.

For this reason we decided to develop a common database system for the management of product sheets related to the different models of PPE.

In order to promote the universality of the system and the possibility to manage the highest number of models and brands, the system foresees both the insertion of product sheets by the partner manufacturers and also by inspectors and companies.

These sheets can be shared among all users of the software and, as in the logic of Wikipedia, it will be the users themselves to verify the accuracy of the information, indicating to Exteryo Safety 4.0 any errors through the function “REPORT ISSUE“.

First step in the software

Login and register in the software

Software Access

When you have activated your license, you will receive the credentials to access the system at the e-mail address you provided.

If you have not received any e-mails, please check your SPAM or junk mail folder.

ACCESS VIA SMARTPHONE
To access via smartphone simply activate the application Exteryo Safety 4.0 and you will immediately see the login page.

The credentials required for access are three: LICENSE CODE, USER NAME and PASSWORD

ACCESS VIA PC
To access via PC, connect to the site www.exteryo-safety.com and click on the ACCESS button on the menù bar.

The access page will then appear and you can follow the instructions above to access.

Company data configuration

The first time you log in with your credentials, you will need to associate your company information to use the software.

The required information are mandatory.

Once you have filled in your data, click on the SAVE button.

N.B. Before proceeding to the next page, please read our Privacy Policy and the terms of use of the system, which will be automatically accepted once you have confirmed your company data.

For any further problem, we please ask you to write an email at customer@exteryo-safety.com

User data configuration

Always at the first access you will be asked to create the personal data of your user, entering the data indicated.

In the same page you can also change the password generated for the first access with the one you prefer.

To change the password click CHANGE PASSWORD, enter the password in use and then, twice, the new one.

To confirm the data entered, click on the SAVE button..

Home Page

Once you have logged in you can access the HOME PAGE of the program.

On the left side of the screen is the menu of all the features that can be used with your license or plug-in purchased.

In the upper part of your PC (or lower part of your smartphone) is the management bar, through which you can manage certain actions such as changing plug-in, the administration panel, opening an error ticket or accessing support.

On the main screen, you can view statistics on your use of the software, as well as shortcuts to the main functions.

By clicking on the button at the top, next to the logo, you can reduce the functionality menu to improve the display of the software management pages.

General Settings

Manage your data into the platform

User data

To access the management of your user data just click on the arrow next to the user icon at the top of the screen.

In the drop-down menu you can access the user settings by clicking on the USER SETTINGS button.

In this section you will find the data entered at the first access, that you can modify according to your needs.

The management data are the following:
– USER NAME and LAST NAME
– Access PASSWORD
– EMAIL of reference
– TELEPHONE NUMBER of reference
– TIME ZONE of management (select the English name of the capital of your state or the reference city of your time zone).
– DATE VIEW layout

As a last activity you can select among the active privileges for your user, which ones you want to visualize inside the general menu.

Once you have modified the data, click on the SEND button to store it in the system.

Company data

To access your company data you must click on the ADMINISTRATION button on the management bar and, in the drop-down menu, select the item COMPANY DATA.

In the master data, you will notice the presence of the ACTIVATION CODE generated by the system, which you will need to be enabled by a final company, if it also uses its own license of Exteryo Safety 4.0 (see appropriate page).

To modify the information, click on the CHANGE COMPANY INFORMATION button and enter the new data.

If you have purchased a FULL license of ES4.0 you will find the possibility to upload in the platform also the company logo, for the customization of the inspection reports.

After updating the data, click on the EDIT button to save the new settings.

User management

Only multi-user licence

With the USER MANAGEMENT function you can set the main system functions related to the single user.

If you have enabled a license for 2 or more inspectors, you will be able to manage also the new users who will use the system for inspections.

To add a new user, click on the appropriate button in the options bar and fill in the user registration form, entering the various items required.

In the PRIVILEGES section you can decide which features the new user will be able to see with his access.

Select the checkbox related to the desired feature to activate it for the new user.

Once you have defined the data of the new user, click the SEND button to carry out the creation of the user.

Then provide the access data to the new user to let him use the platform.

Using the EDIT USER button you can modify the data of each user whenever you want.

Using the REMOVE USER button you can delete that user, removing him from the use of the platform.

For each user created it is possible to associate a BADGE to enable the ELECTRONIC SIGNATURE of the inspection reports (See page INSPECT PPE). To associate the badge click on the appropriate button and read a new badge with your smartphone or NFC reader. Once associated, it will be possible to visualize “YES” in the appropriate column..

Automatic email settings

Receipt of automatic e-mails from the Exteryo Safety 4.0 system will allow you to keep up to date with future PPE management activities.

You can activate and manage the sending of these emails by clicking on the small arrow next to the user icon and then selecting the item EMAIL SETTINGS.

Once the Email settings page is open, enter the email address to which the notifications should be sent.

Then select which type of notifications you want to send to the given user and the time interval with which the messages will be received.

Once all the parameters have been set, click on the SAVE button.

Inspector electronic signature badge management

Within the USER MANAGEMENT functionality, you will also have the possibility to associate the badge dedicated to the electronic signature of the inspections by the inspector (see also page INSPECT PPE).

This action is necessary to guarantee an adequate level of security when signing an official and legally valid document.

Inside the table of users, on the line of the single user there is a special button to link the badge to the inspector.

After clicking the appropriate button you have to place the NFC badge on the smartphone or on the appropriate reader to enable it.

Once a badge is enabled to an inspector it will no longer be possible to associate that badge to another user.

Visit our store for buy the badges for the electronic signature or contact one of ours distributors.

License status

Always within the ADMINISTRATION menu you can find the LICENSE STATUS function to check the type of license activated and the date of expiration or possible renewal of your license.

We remind you that your license plan is activated for a maximum number of users (inspectors) manageable within the platform and for a chronological period of 1, 3 or 5 years.

If you need to upgrade the number of workers you can contact us at customer@exteryo-safety.com to evaluate the new license plan.

General Settings

In the GENERAL SETTINGS function are inserted the main settings for the use of the system, applicable to each user who will have access through this license.

To date, the general settings to be defined within the page are the following:

INSERTED PPE PUBLIC MANAGEMENT

Decide if each inspector operating within the license will have to manage a part of the PPE or this management is shared among the various inspectors.

If the management is separate, select the PRIVATE option, so that each inspector will only be able to view the PPE managed by him in the PPE archive.

If management is shared, select the PUBLIC option, so that PPE management is shared between all inspectors.

Once the preferred option has been selected, click on the SAVE button.

Data Synchronization

Make your platform ready to use

Creation of company register

In order to use the platform correctly, you must first create the master data of the client companies for which you need to carry out the inspections.

In the DATABASE section, click on the feature COMPANIES REGISTRY to access the dedicated page. Inside you will find the register of all the client companies you manage.

To add a new company, click the PLUS BUTTON at the top of the page.

Once you have entered the correct company data, click on the SEND button to save it in the database.

Once the company has been created, it will be viewable in the appropriate register.

At any time it will be possible to modify the company data or to eliminate the company (if it does not have an active ES 4.0 end company license), if the management of its PPE is no longer your responsibility.

ATTENTION: When you delete the company, the PPE associated with it will no longer be displayed in the registers.

Insertion of the employees for the companies clients

For each client company it is possible to add also the workers to whom the different PPE that you are going to inspect have been supplied.

In order to add the workers, first of all you have to enter the registry card of the company by clicking on the button COMPANY INFORMATION, inside the function COMPANIES REGISTRY.

Inside this page, click the button ADD EMPLOYEE, placed in the options bar and then insert the data of the worker and click SEND.

You can also upload the worker list in bulk, via Excel file, by clicking on the IMPORT EMPLOYEES button and following the compilation instructions provided

Worker data can be edited at any time from the COMPANY INFORMATION page.

In the same way, a worker can be deleted from the company register.

When a worker is deleted, the PPE associated with him/her will remain registered for the client company, but will be displayed without the user.

Insertion of PPE in management

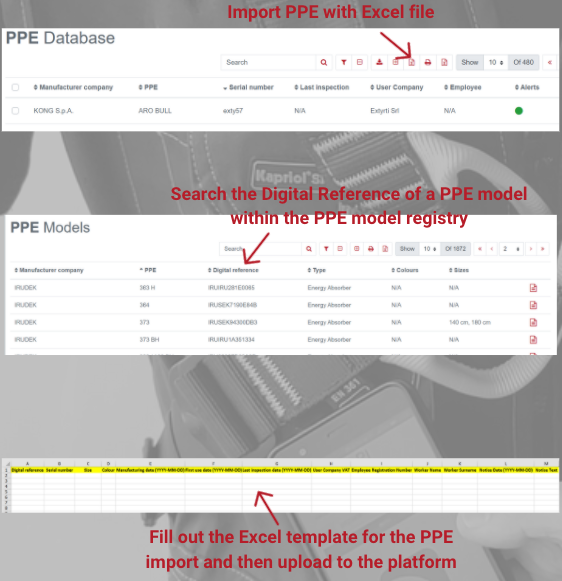
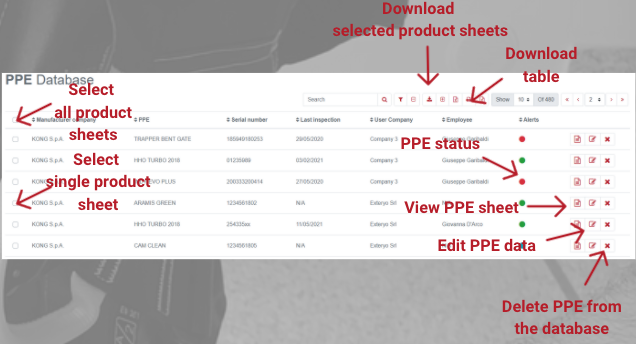
In order to import the PPE already managed and/or inspected by your company, you must go to the feature PPE DATABASE, inside the ARCHIVES menu.

By clicking on the IMPORT PPE button, located at the top of the page, you will be able to access the section for importing PPE via Excel file.

To carry out the import, download and fill in the appropriate import template.

The data required in the template are the following:

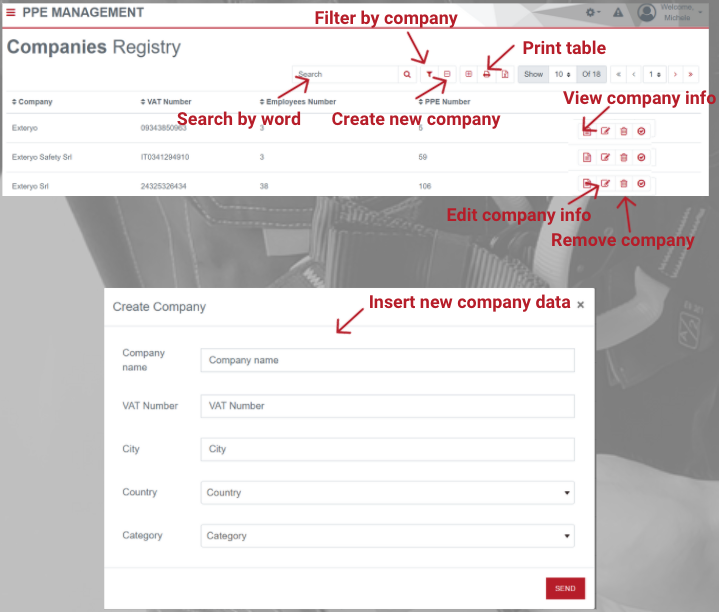
DIGITAL REFERENCE and SERIAL NUMBER (required): the digital reference is the identification code of a specific PPE model within the ES4.0 platform. You can find the digital reference of each model inside the function PPE MODELS REGISTER, in the third column of the table.

SIZE AND COLOR (not mandatory): The insertion of these data must faithfully respect the indication present in the PPE model card (e.g. if it says color “WHITE” or size “L/XL”, report exactly this writing including capitals, spaces and special characters and not “white” or “white”, or “L-XL” or “l-xl”.

DATE OF PRODUCTION (not mandatory): Inclusion of the production date is not mandatory at this time but will be required prior to PPE inspection if the product has an expiration date.

DATE OF FIRST USE AND LAST INSPECTION (not mandatory): If not associated during this import, the date of first use will be requested during the PPE inspection.

COMPANY VAT NUMBER (mandatory): Identifier to associate the PPE with a specific client company.

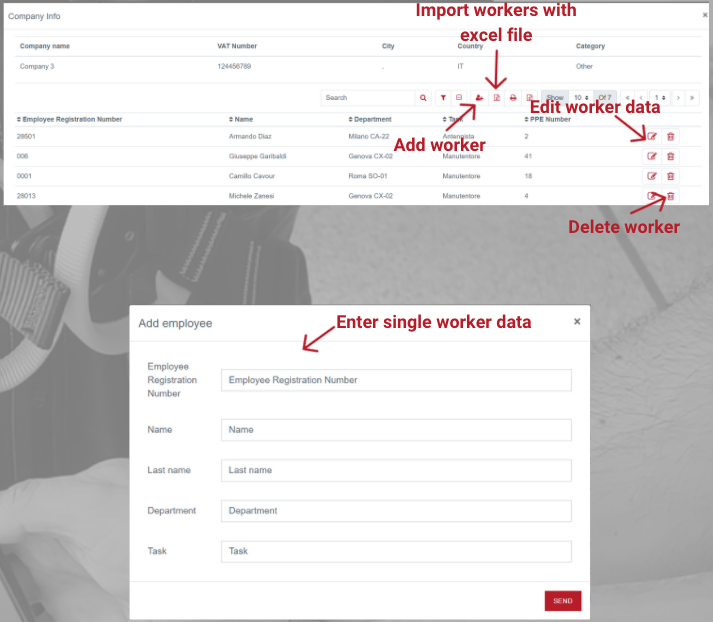
EMPLOYEE DATA (not mandatory): Data for the correct association of an IPD to a specific worker of one of the client companies.

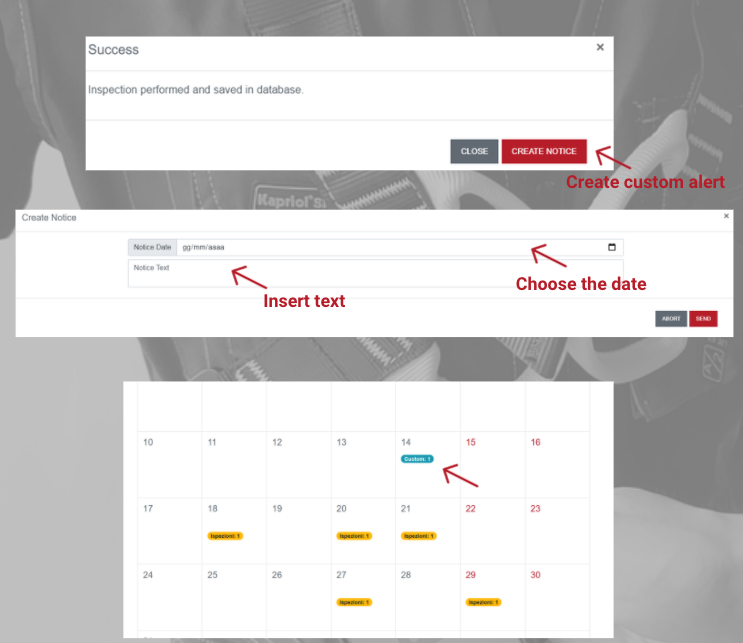
DATE AND TEXT OF NOTICE (not mandatory): Optional alerts created in case of need or reminder.

Create new PPE model sheet

If an PPE model you manage is not present in the ES4.0 database, it can be created directly by you in the PPE MODELS DATABASE feature in the DATABASE menu.

To create a new PPE model click on the appropriate button located at the top of the page.

To create a new product, first select the name of the manufacturer. If a manufacturer is not already present in the ES4.0 database you can add it to the system by typing its name and then selecting it.

ATTENTION: Products from partner companies (Kong Spa and Irudek SL) and other companies with which Exteryo has special agreements cannot be added by inspectors.

Exteryo works to ensure that the presence of the products of these companies is always up to date and on time. In the event of any deficiencies, you can notify Exteryo using the REPORT ISSUE button.

The creation of a product sheet is divided into two phases:

PRODUCT DATA
Input of all characteristic data of a specific PPE model. Only the data indicated with an asterisk are mandatory.

INSPECTION REPORT
Insertion of a text indicating the different activities to be carried out for a correct inspection of the device. These activities are usually provided by the manufacturer in the device instructions.

The text of the report will be inserted in the language used for the software.

Once all the data have been entered, click on ADD NEW PRODUCT to save it in the database.

ATTENTION: the product sheets created by the various inspectors will be shared within the universal database, so that any inspector using the software can benefit from them in the future. We therefore recommend that you carefully check your data entry.

PPE management for multi-user licenses

If you are using a multi-user license, you will have the possibility of managing with the appropriate privilege all the PPE controlled and inspected by the various users, as well as the list of all the inspections carried out by these users.

To manage these operations, select the section MANAGE COMPANY to access the feature COMPANY PPE REGISTRY and COMPANY INSPECTION REGISTRY.

Through the function COMPANY PPE REGISTRY it is possible to view all the PPE of the client companies managed by the different users.

In the table, in the column “MANAGED BY” is shown the number of inspectors who have access to the management of a certain PPE and who will therefore see the information in their PPE DATABASE, INSPECTION DATABASE and in their CALENDAR AND NOTICES.

N.B. If in the general settings you have selected the public management of the PPE inserted, the column MANAGED BY will indicate all the users of the platform.

By clicking on the appropriate button in the shape of a wrench, it is possible to manage the PPE assignments to the various users, i.e. define which user/inspector will have the management of a given device.

To modify the assignments, just add or remove the red tick on the appropriate button near the user’s name.

You can also manage the assignment in multiple mode, by selecting more than one PPE and then clicking the appropriate button (always in the shape of a wrench) at the top of the page.

In the section COMPANY INSPECTIONS DATABASE you will have access to the history of all the inspections carried out, including the possibility of downloading every single inspection report.

Work with software

Associate products and perform inspections in smart mode

View the information of the PPE to be inspected

Now that you have completed the data synchronization phase, you are finally ready to use the ES4.0 platform to perform your PPE inspections.

To start the inspection phase, select the function INSPECT PPE from the digital menu.

Once this page is open, you will have to enter the data of the PPE to be inspected.

You can perform this activity through the NFC CHIP associated to the product or through the serial code.

To read the data via NFC chip just bring the back of your smartphone or the appropriate reader for PC to the NFC chip.

To read data through the serial code, you must type it in the space provided.

N.B. if you need to inspect an PPE not yet present in your PPE database, you can insert it directly at this moment by reading the blank NFC chip you have associated to the PPE or by inserting the serial code. Once you have done this, associate the PPE data as required by the platform.

After having inserted the data of the new PPE or after having read the data of a PPE already in the archive, the PRODUCT SHEET of that exact PPE will open, including all the management data of the same.

Add or modify an NFC chip to a PPE already in the database

If you have already inserted one or more devices in the system through the serial code, you can add an NFC chip later.

You can in fact make this action through the appropriate button at the bottom of the product card of the PPE in question, displayed in the function INSPECT PPE located in the main menu.

Clicking on the ADD/EDIT NFC CHIP button will open the page that will allow you to read a new NFC chip and automatically associate it to the relative PPE.

With the same function you can also replace an old NFC chip associated with a product (in case of malfunction) with a new chip.

Remember that once replaced, you can no longer use the old NFC chip.

Inspect PPE

Once the product has been inserted in the database and associated to the relative NFC chip, you will be ready to inspect the product.

Always from the INSPECT DPI section you will have to read the chip by smartphone or PC reader, or manually enter in the space provided the serial number of the product to be inspected.

Automatically the card of the exact product you need to inspect will open, complete with data on the user, the status of the PPE and any history of past inspections (if they have already been made with the software).

At the bottom of this tab you will find the START INSPECTION button.

Clicking on this button will open the PPE inspection form already pre-filled with the product and inspection data.

At this point you will simply have to follow the inspection report provided by the manufacturer (Exteryo partner) or the text with the check list of the activities to be carried out (not Exteryo partner).

ATTENTION: For models of manufacturers who are not Exteryo partners you can edit the text of the INSPECTION REPORT with your own desired contents. This content will be visible only to you each time you inspect that specific PPE model in the future.

Once the inspection process has been completed, you will have to choose the outcome of the inspection (positive/negative) and add any notes related to the inspection at your discretion.

Once this is done you can save the file in the database by clicking on SEND REPORT, or add your electronic signature (see next page).

Electronic signature

You can sign your inspection reports directly through the ES4.0 platform, using the electronic signature option.

The electronic signature will allow you to manage the entire documentation in digital mode without having to print any more sheets.

To add your electronic signature at the end of the inspection, just click on the ELECTRONIC SIGNATURE button, located at the bottom of the page.

Once you have chosen this option, a page will open where you can add your electronic signature on the screen.

To authorize the insertion of the signature you just have to put your NFC badge associated with the inspector (see section Inspector electronic signature badge management) on the back of your smartphone or on the special reader for PC.

Automatically the signature will be inserted in the document.

At this point click on SEND REPORT to save the inspection..

Custom alert creation

At the end of the inspection you will have the possibility, if you consider it necessary, to generate a customized alert for that specific PPE.

The custom alert can serve as a reminder in case you need to perform an extraordinary inspection on the product, before the natural expiration of the next inspection (usually at 12 months) or the end of product life.

To generate a custom alert, click on the CREATE NOTICE button once the inspection is complete.

Once the appropriate page opens, enter the reminder date and the alert text.

To confirm, click on the SEND button.

Custom alerts will be viewable in both the CALENDAR page and the EVENTS page.

Manage PPE and document

Check your product data and documentation

PPE database

All PPE inserted into the system by means of mass import, by association with the NFC chip, by insertion with serial number as well as after the first inspection carried out, can be viewed in the PPE DATABASE, a feature inserted in the DATABASE section.

In the register certain parameters relating to the product and its use are explained, while a colored indicator highlights the status of the PPE. To the right of the status column there is a button which allows access to the product sheet.

Using the search bar or the parameters setting it will be possible to filter the PPE according to your needs, so that only certain products can be displayed.

Thanks to the appropriate buttons it is possible to modify the product information (with the exception of the serial code) and delete the PPE from the archive. When a PPE is deleted, it disappears from the archive but remains active in the system and can be consulted by reading the NFC chip or entering the serial code.

It is also possible to download the file relating to the whole table by clicking on the appropriate key at the top of the page.

Finally, it is possible to download a single product sheet or several product sheets by selecting them in the first column and then activating the download with the appropriate button.

All downloads will be downloaded to your PC or smartphone and will be immediately available for consultation.

Inspection database

All the inspections carried out by the system can be viewed in the page INSPECTIONS DATABASE, a feature inserted in the DATABASE section.

In the log certain parameters relating to the inspection carried out are explained, while on the right of the screen, as the last column, there is a button that allows access to the inspection report.

Through the search bar or the parameters setting it will be possible to filter the inspections carried out according to your needs, so that only certain products can be displayed.

It will also be possible to download the file relative to the entire table, by clicking the appropriate button at the top of the page.

Finally, it is possible to download a single inspection report or several inspection reports by selecting them in the first column and then activating the download with the appropriate button.

All downloads will be downloaded to your PC or smartphone and will be immediately available for consultation.

Activate the light license at your customer

In order to facilitate the passage of information between inspector and customer company, the platform offers the possibility to create a special license for the customer, through which it is possible to view the history of all inspections carried out by you on its products.

To activate the light license for your customer, go to the function COMPANIES REGISTRY.

In the row dedicated to the company, select the light license activation button.

At this point, enter and then confirm the email address of your customer and finally select the send button.

The system will automatically send an e-mail to the customer with the access data to his license.

Manage a customer with ES4.0 license

If one of your customers has already activated or would like to activate a license of Exteryo Safety 4.0 for final companies, the platform provides the possibility of automatic synchronization of data between licenses.

In this way, your customer will already have access to a whole series of data entered by you (workers, inspection history, active PPE…).

In the same way, when the client company adds new workers or new PPE, they will also be visible through your license, so that you can have under control the whole management of the client.

In order to be enabled by the client company, you will have to give them your activation code, which can be seen in the section COMPANY DATA.


Don't miss deadlines

Manage due dates and inspections

Calendar

In the CALENDAR AND ALERTS section you will be able to manage all deadlines and dates related to PPE testing and inspection.

The calendar shows the dates of all company PPE due dates. The due dates relate to either the annual inspection or the expiration date of the product.

Click on the relevant due date notice to get more details on the task at hand.

Events

This section shows an agenda of upcoming deadlines related to IPR managed by the inspector. By using the SEARCH PARAMETERS it will be possible to view all the events relating to a specific time period or to a specific company and/or worker.

The column on the right of the table allows you to view the sheet relating to the product.

It is possible to download the whole general table or the filtered table using the search parameters, by clicking on the appropriate button at the top of the screen.

Alert

The ALERT section works like an inbox and allows you to view the automatic alerts generated by the software and related to the expiry dates of the PPE.

Once a month the software will send a general alert, indicating the list of expiry dates for the following month related to the company’s PPE.

In the case of a default related to the expiration of a PPE or the annual inspection, automatically the system will send a daily alert related to these products.