


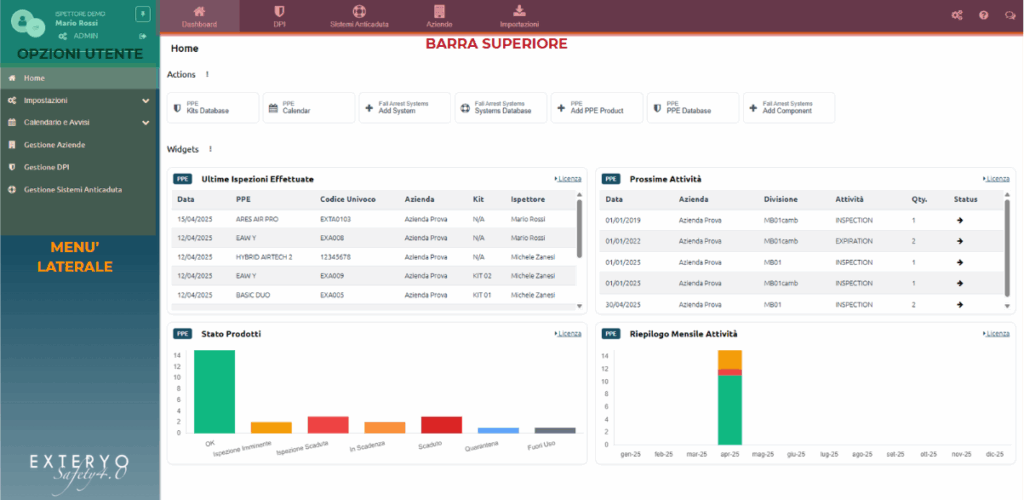
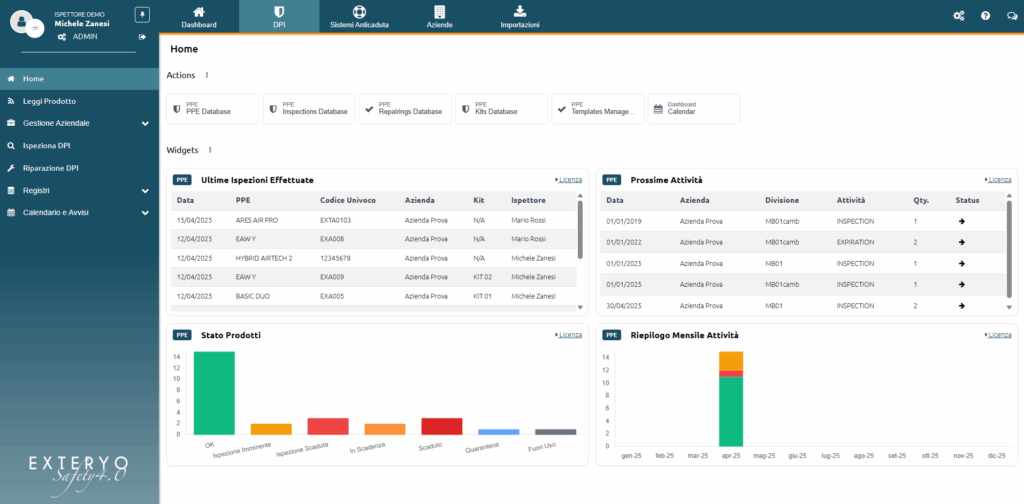
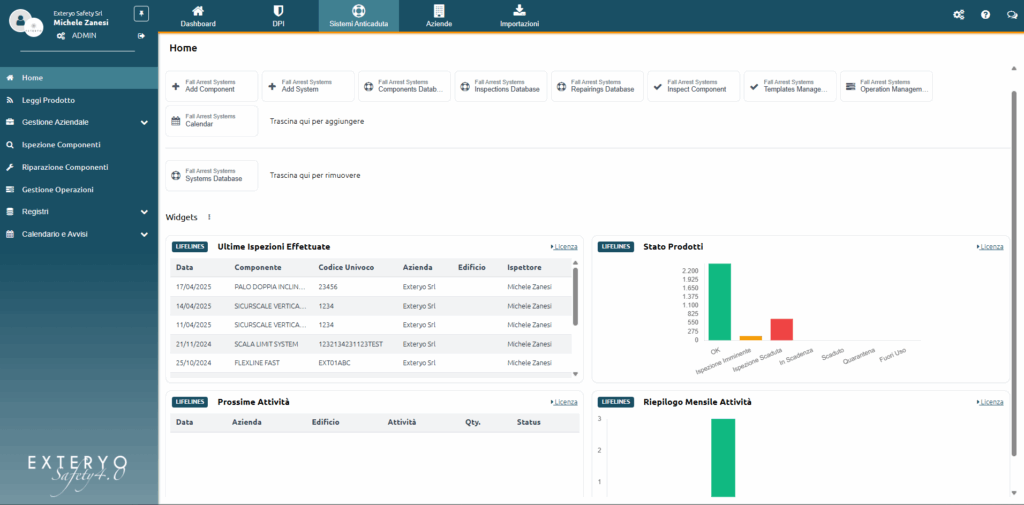
Once logged in, you can access the DASHBOARD of the programme.
The structure of the platform is organised into two main sections that can be defined as follows
TOP BAR: this is the menu in which the macro-areas of operation of the platform (Dashboard, PPE, Fall arrest Systems, etc.) are presented.
The right-hand side of the manage board also contains the GENERAL SETTINGS, TUTORIAL access and SUPPORT buttons.
SIDE MENU: this is the platform menu where it is possible to select the functions for using the platform.
The functions of the side menu vary depending on the macro-area selected within the manage board.
At the top of the SIDE MENU’ it is possible to access the USER OPTIONS by clicking the ![]() button positioned below your user name.
button positioned below your user name.
Instead, by clicking the ![]() button it is possible to log out of the platform.
button it is possible to log out of the platform.
Finally, by clicking ![]() the button you can fix or hide the SIDE MENU’ according to your needs.
the button you can fix or hide the SIDE MENU’ according to your needs.
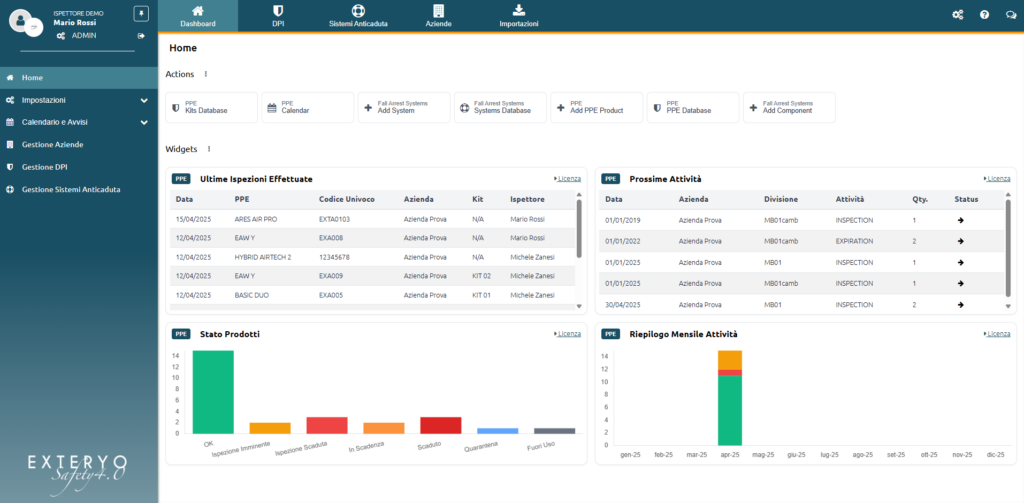
Actions and Widgets are platform tools that help you improve your experience of using the platform.
These tools are available in the DASHBOARD section, as well as in the PPE and WIDGET sections.
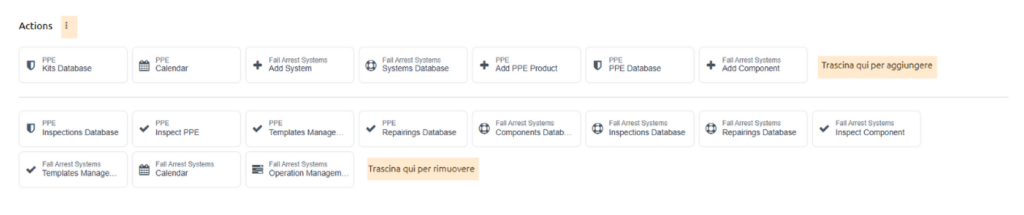
ACTIONS:
ACTIONS are shortcut keys that can be set to speed up access to certain functions of the application.
To select the desired ACTIONS, click on the ![]() button to display all available options.
button to display all available options.
Once you have located the desired option, simply drag it above the separator line.
Similarly, should you wish to remove one of the previously selected options, you can drag it below the separation line.
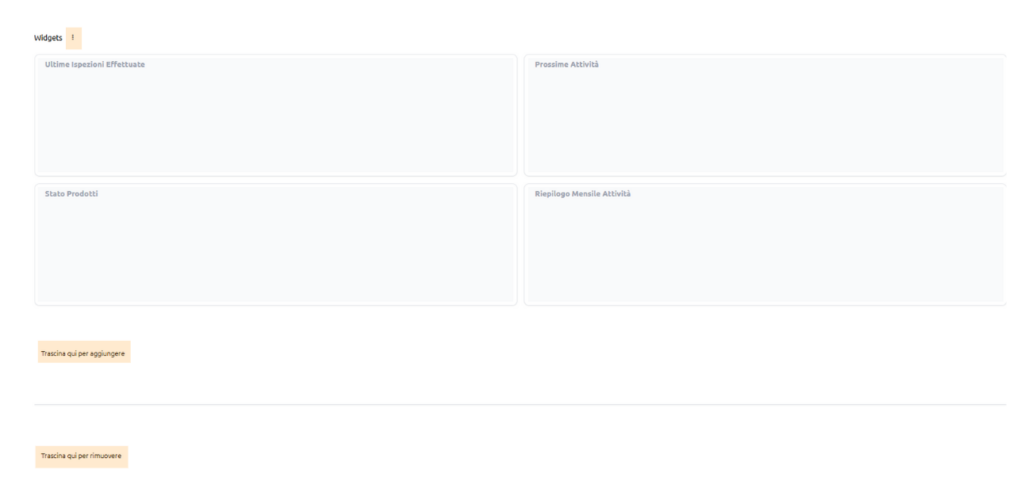
WIDGETS:
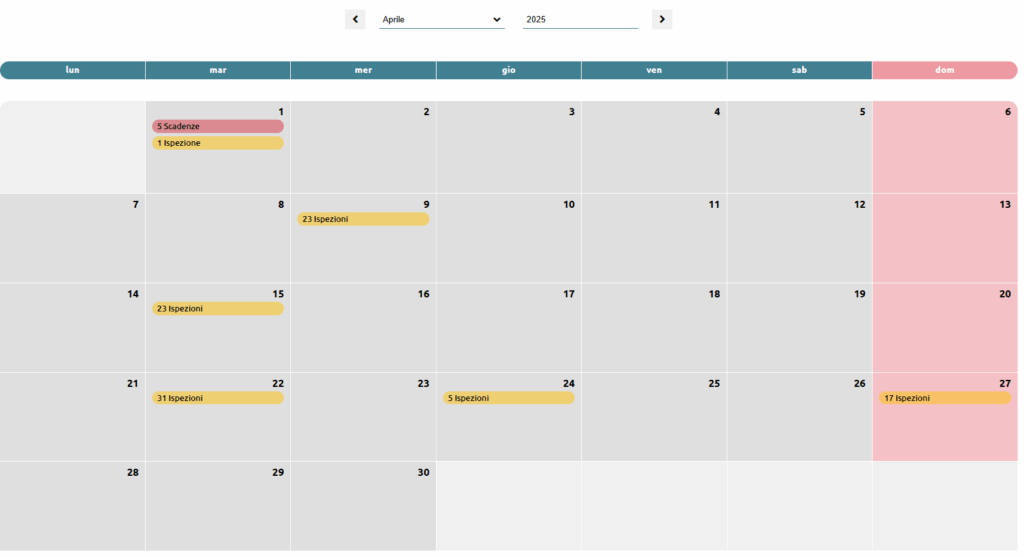
WIDGETS are graphs supporting your activity as an INSPECTOR that allow you to view the following types of activity:
– Last Inspections performed
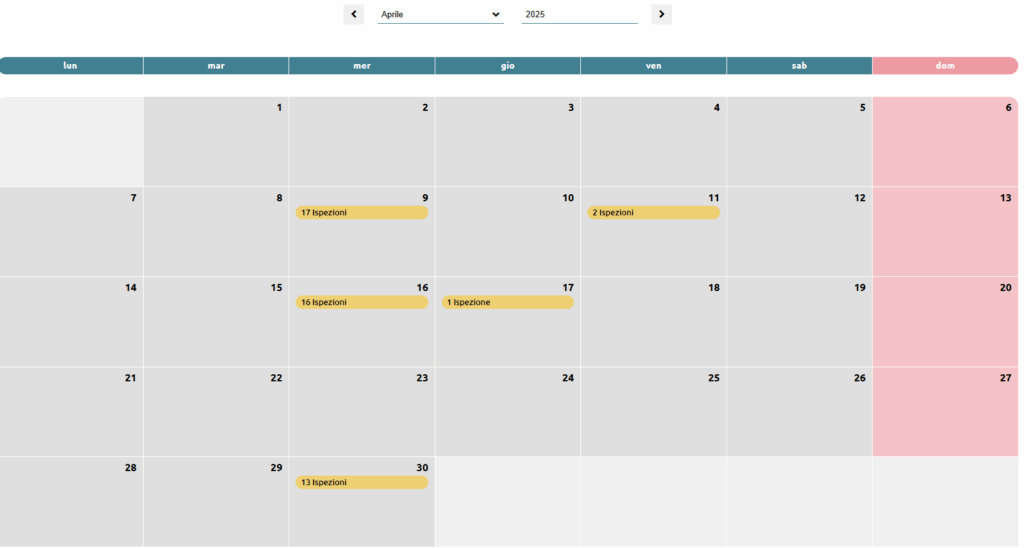
– Upcoming Calendar Activities
– Status of managed products
– Summary of activities carried out month by month.
To select the desired WIDGETS, click on the ![]() button to display all available options.
button to display all available options.
Once you have located the desired option, simply drag it above the separator line.
Similarly, should you wish to remove one of the previously selected options, you can drag it below the separation line.
Within the DASHBOARD section, it is possible to display for each widget the activities related to both PPE and FALL ARREST SYSTEMS.
To change the display from PPE to Fall arrest Systems, click on the button to the left of the widget description.
In all Sections you can view data on the general activity of the licence or of the individual inspector.
To change the view from LICENCE to USER, simply click on the appropriate button to the right of the individual WIDGET description.
By clicking on the ![]() button on the right-hand side of the TOP MENU, you can access the GENERAL SETTINGS of your platform.
button on the right-hand side of the TOP MENU, you can access the GENERAL SETTINGS of your platform.
Within this menu there are various options which will allow you to customise and manage your activity with Exteryo Safety 4.0.
Let us see below the different options within the general settings.

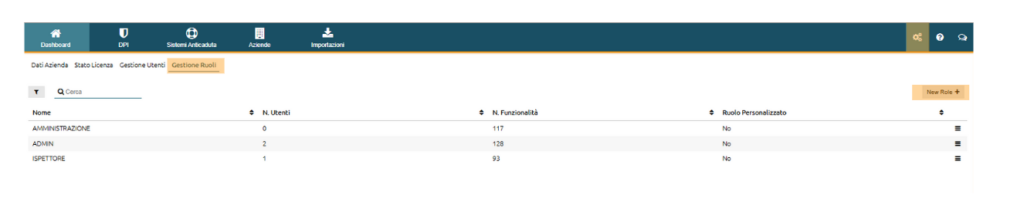
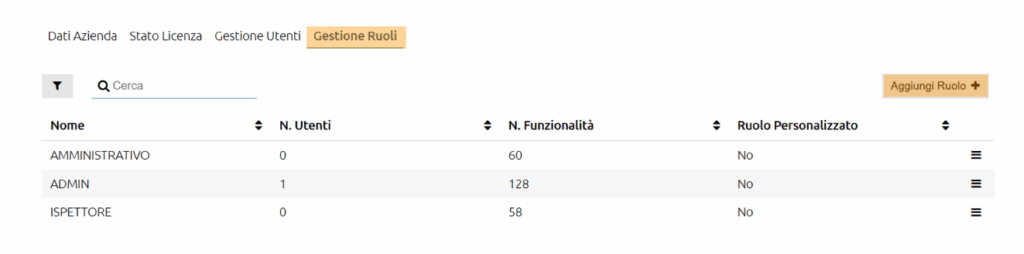
In the Users Management section you have a view of all active users/inspectors within your licence.
Please note that the number of users/inspectors that can be activated depends on the type of licence package purchased.
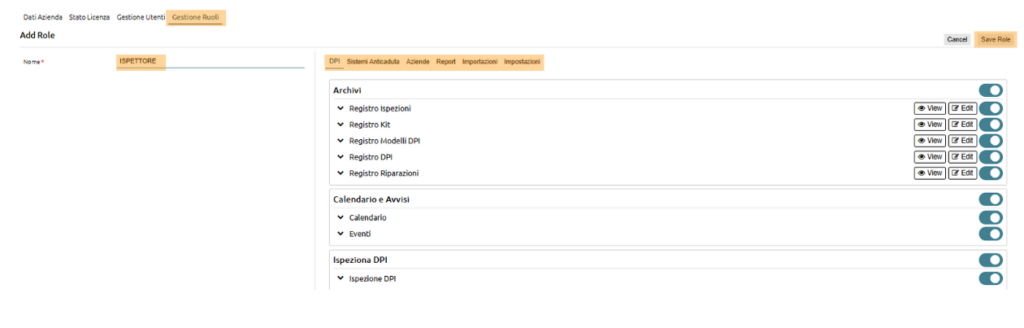
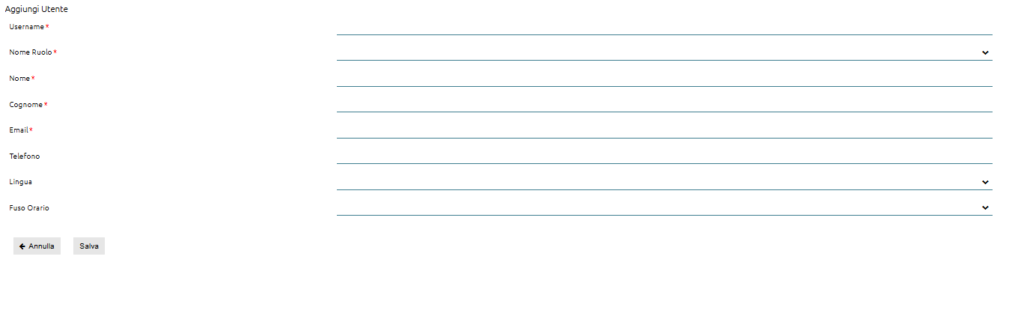
If your licence package allows this, you can add a NEW USER by clicking on the appropriate button at the top right of the table.
Once the registration form has been filled in and the SAVE button has been clicked, the new user will be generated.
An automatic e-mail will be sent to the address entered in the form to notify the new user of the creation of the user account and to provide him/her with access credentials.
It is possible to edit a user’s information or delete the user by clicking the ![]() button at the end of the line with the specific user’s data.
button at the end of the line with the specific user’s data.
Should the user be deleted, the inspection or repair reports produced by him will still be stored in the database.


Each user/inspector can be associated with an NFC technology badge.
Associating the badge with a user allows the following activities to be carried out:
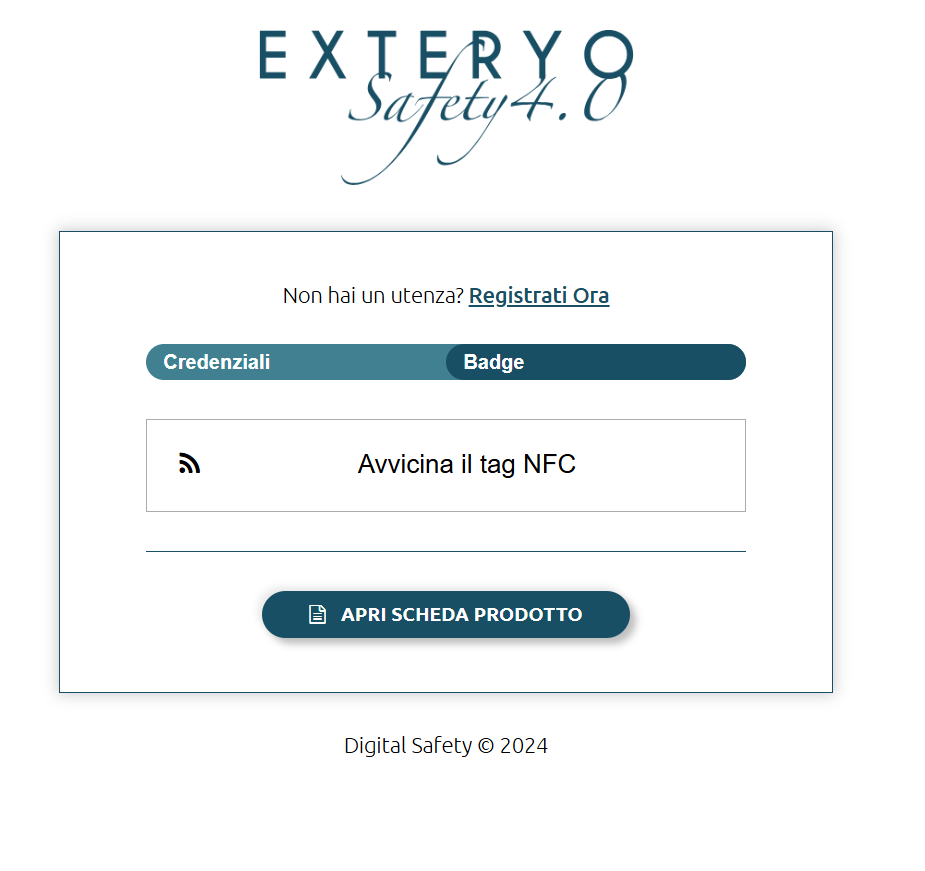
– LOGIN THROUGH BADGE: once the badge is associated, the user can access the platform by simply scanning his or her badge on the Log-In page and thus avoiding having to enter credentials.
– FAST SIGNATURE OF INSPECTION AND REPAIR REPORTS: By associating a signature within the user’s settings, the use of the badge will speed up the activity of signing inspection and repair reports, thus avoiding the need to have to sign each report calligraphically.
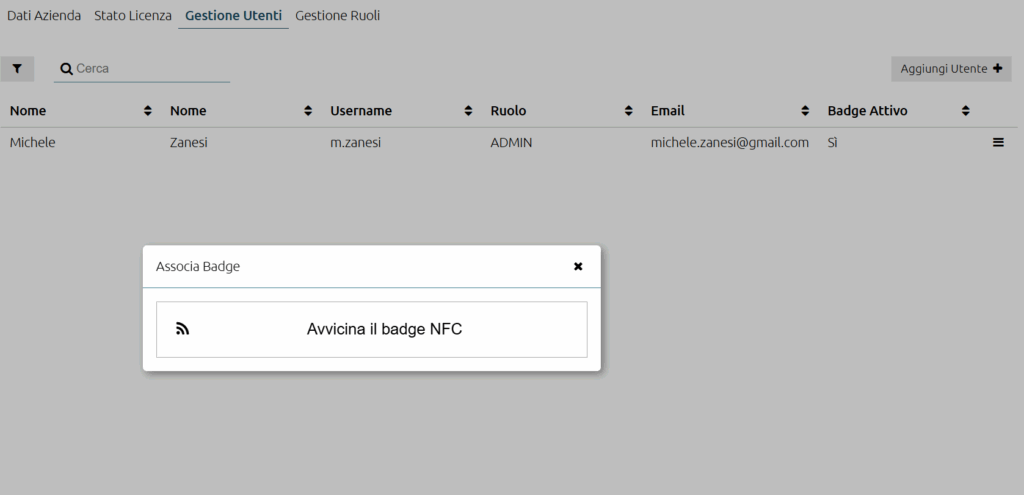
To associate a badge with a user you must click on the ![]() button at the end of the line with the specific user’s data and select the ASSOCIATE BADGE option.
button at the end of the line with the specific user’s data and select the ASSOCIATE BADGE option.
Then bring the badge close to the smartphone/tablet or PC reader to make the specific association.
In this option it is possible to manage synchronisation with any inspectors dedicated to inspecting company PPE or company fall arrest systems.
For both the PPE and fall arrest sections, there are two tables, one for licensed inspectors and one for inspectors who have applied for a licence for at least one division or branch.
When an inspector is synchronised with the company, data on devices, workers or buildings and components are shared within the inspector’s dedicated licence.
By clicking on the ![]() button at the end of the line of one of the active inspectors, it is possible to manage the sharing mode, i.e. to define the DIVISIONS (or branches) for which the inspector is authorised to manage inspection activities.
button at the end of the line of one of the active inspectors, it is possible to manage the sharing mode, i.e. to define the DIVISIONS (or branches) for which the inspector is authorised to manage inspection activities.
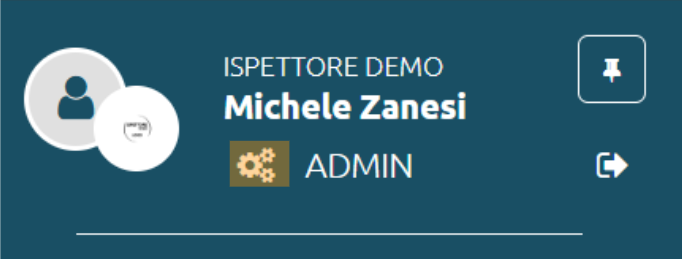
The USER OPTIONS function allows you to customise data related to your specific user.
To access the function, click the button ![]() at the top of the SIDE MENU.
at the top of the SIDE MENU.
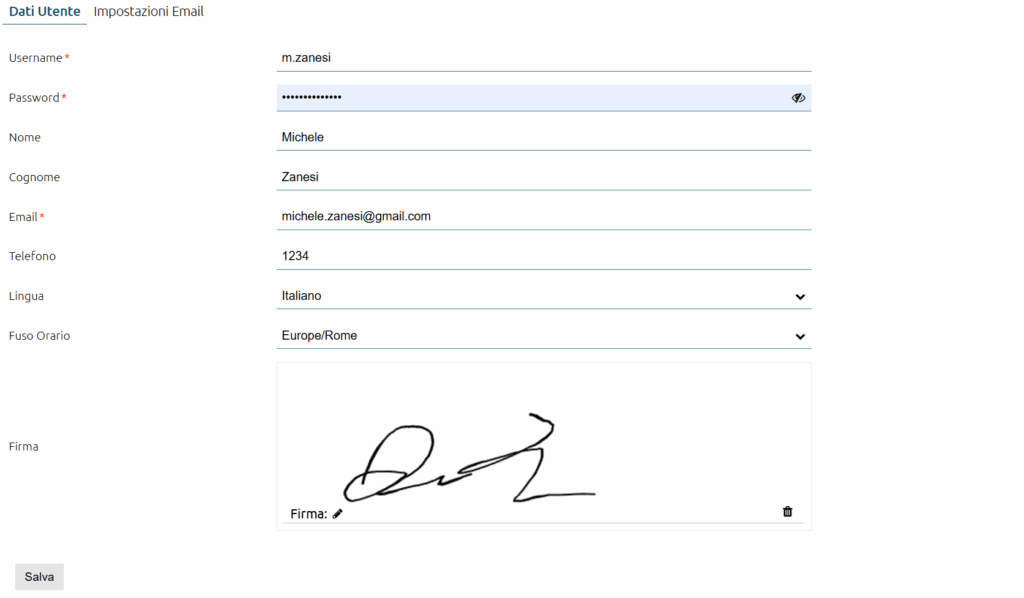
Under USER DATA you can change personal data such as username, password or platform language.
The last available item is the automatic signature. By entering your calligraphic signature in the appropriate box, you can use it to sign inspection or repair reports using the BADGE.
To find out how to take advantage of this option, read the paragraph ASSIGNING BADGE TO USER.
In the EMAIL SETTINGS section, on the other hand, you can set the type and timing for receiving certain summary e-mails of your activities as an inspector within the platform.
By entering the e-mail address to which you wish to receive the e-mails, you can then decide to activate the following options:
LICENCE EXPIRATION: You will receive reminders regarding the expiry of your EXTERYO SAFETY 4.0 licence.
PPE NOTICE: You will receive e-mails with indications of activities related to the PPE you manage over the next 30 days. You can set the periodicity of receipt of this mail by selecting from the different options available.
FALL ARREST SYSTEMS NOTICE: You will receive e-mails with information on activities related to the FALL ARREST SYSTEMS you manage over the next 30 days. You can set the frequency of receipt of this mail by selecting from the different options available.
You can access the online version of this tutorial directly from the platform by clicking the ![]() button on the right-hand side of the TOP BAR.
button on the right-hand side of the TOP BAR.

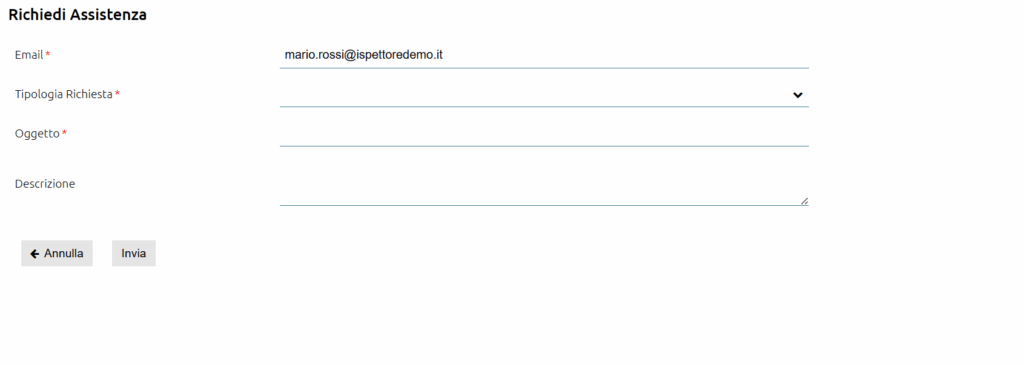
Should you not find the appropriate answers within this tutorial, you can always open a support ticket within the specific function.
To access the function, click the ![]() button on the right-hand side of the TOP BAR.
button on the right-hand side of the TOP BAR.
In the window, fill in the form indicating the e-mail address to which the request will be answered, the type of request (technical or commercial) and then the subject and description of the request.
Our Customer Care service will receive and process your request as soon as possible. Please note that the service is available from Monday to Friday from 9:00 a.m. to 6:00 p.m. (Central European Time- CET) and responds to requests within 4 hours of receipt.
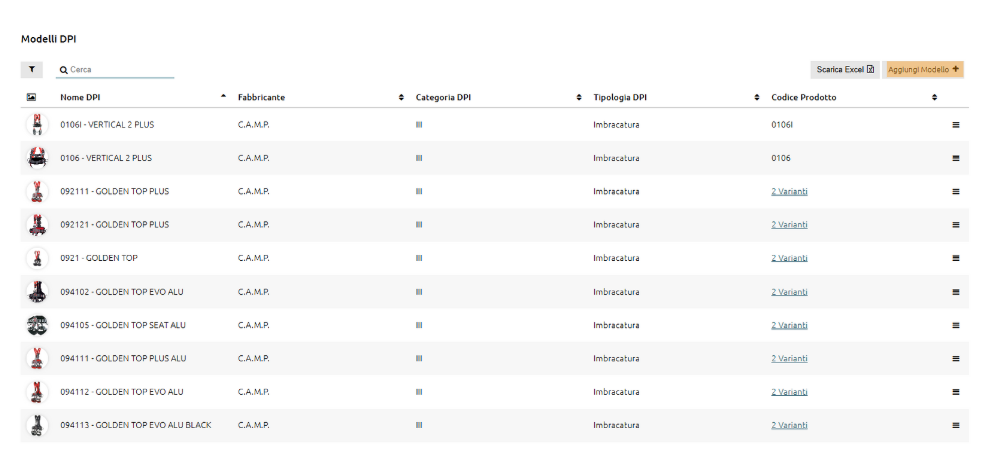
Within the MULTI-USER MANAGEMENT menu, the function GENERAL PPE REGISTRY provides an overview of all PPE managed by the different users of the licence.
For each PPE, the main characteristics are shown in the table, including the data of the company and of the worker, if any, who is using the device.
In the last column of the table, the PPE status is visible in different colours. The options on the PPE status are as follows:
OK (green colour): there are no warnings concerning the PPE
EXPIRY (yellow colour) : an expiry date is found within 30 days (periodic inspection or end of life of the PPE)
EXPIRED (red colour) : an expiry date of the PPE has passed (periodic inspection or end of life of the PPE)
QUARANTINE: The PPE is awaiting inspection or repair
OUT OF USE: The PPE has received a negative result at the last inspection or has been specifically taken out of use.
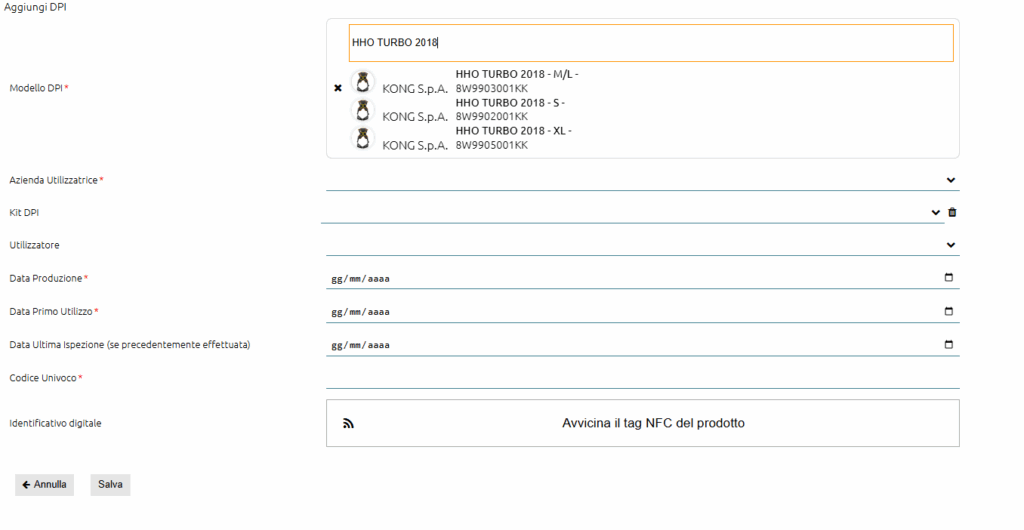
A new PPE can be added to the REGISTRY by clicking the ADD PPE button.
Within the form, enter the required data and click on the SAVE button.
If the PPE models do not include the one you need, you can create the appropriate model card within the PPE MODELS REGISTRY function in the REGISTRY menu.
In order to associate the user company and the possible user, you must first enter this data in the section COMPANY. To find out how to enter this data, please read the appropriate chapters of the tutorial.
In order to associate a specific KIT to the PPE, you will first have to create it via the appropriate KIT GENERAL REGISTRY. To learn how to insert a kit, please read the appropriate chapter of the tutorial.
Once a specific PPE has been created, it is possible to edit its data or delete it via the appropriate options in the product menu, accessible by clicking on the ![]() button.
button.
Within the function it is also possible to make multiple downloads of the cards for specific PPE. To do this, select the PPE using the appropriate button to the left of the PPE MODEL column and then select the DOWNLOAD PDF button.


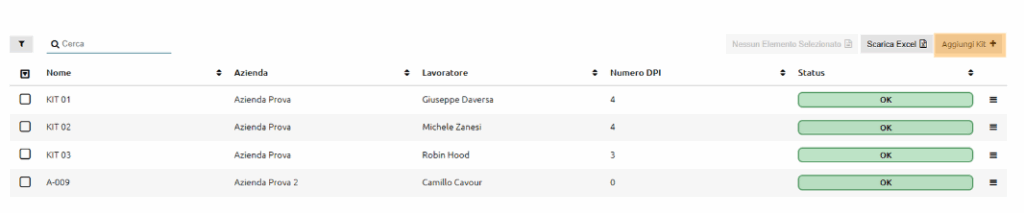
Within the MULTI-USER MANAGEMENT menu, the function KIT GENERAL REGISTRY provides an overview of all kits managed by the different users of the licence.
The KIT function makes it possible to group several PPE within a single identifier and to associate it with a specific company and worker.
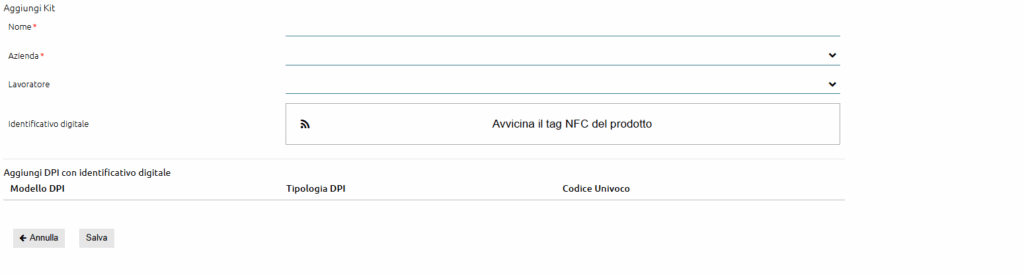
To create a new KIT, click the ADD KIT button and then enter the required data in the appropriate FORM.
In order to insert the PPE within the KIT, you must first have REGISTRYed the PPE within the PPE REGISTRY and then you can read the appropriate digital identifier to associate it.
Alternatively, you can first create the KIT associated with a company and a worker and then create the PPE within the PPE REGISTRY, associating the appropriate KIT created.
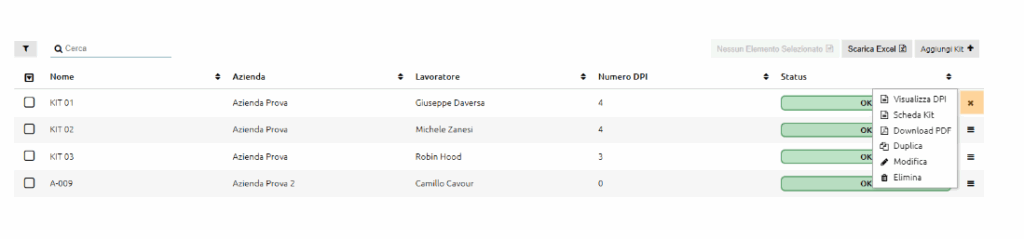
Once a specific KIT has been created, it is possible to edit its data or delete it via the appropriate options in the product menu, accessible by clicking on the ![]() button.
button.
Please note that by deleting the Kit, all PPE contained in it will also be automatically deleted.
Within the function it is also possible to make multiple downloads of the cards for specific KITS. To do this, select the KITS using the appropriate button on the left of the NAME column and then select the DOWNLOAD PDF button.
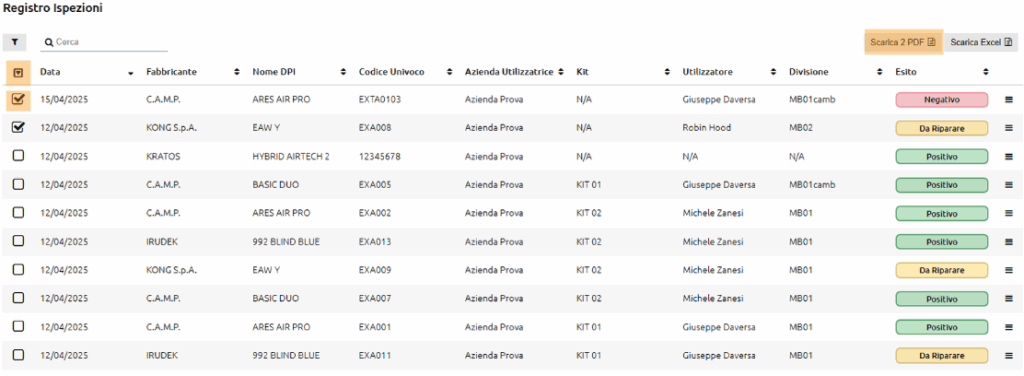
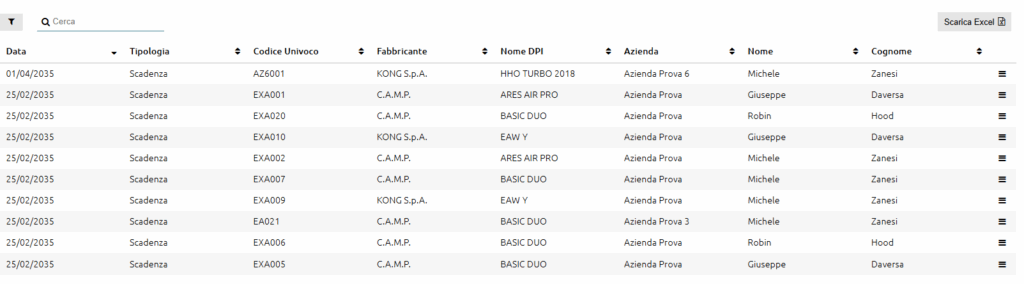
Within the MULTI-USER MANAGEMENT menu, the function GENERAL INSPECTION REGISTRY provides an overview of all inspections performed by the different users of the licence.
If an inspection has been carried out incorrectly, it can be deleted within 24 hours of its creation, by selecting the appropriate DELETE function in the menu accessible with the ![]() button.
button.
After 24 hours, this function will no longer be displayed.
Within the function it is also possible to make multiple downloads of the tabs relating to specific inspection reports. To do this, select the reports using the appropriate button to the left of the DATA column, and then select the DOWNLOAD PDF button.

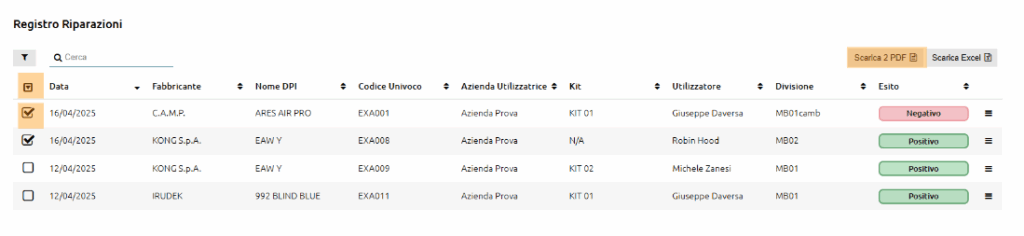

Within the MULTI-USER MANAGEMENT menu, the function GENERAL REPAIRS REGISTRY provides an overview of all repairs carried out by the different users of the licence.
In the event that a repair has been carried out incorrectly, it can be deleted within 24 hours of its creation by selecting the appropriate DELETE function in the menu accessible with the ![]() button.
button.
After 24 hours, this function will no longer be displayed.
Within the function, it is also possible to make multiple downloads of specific repair reports. To do this, select the reports using the appropriate button to the left of the DATA column, and then select the DOWNLOAD PDF button.
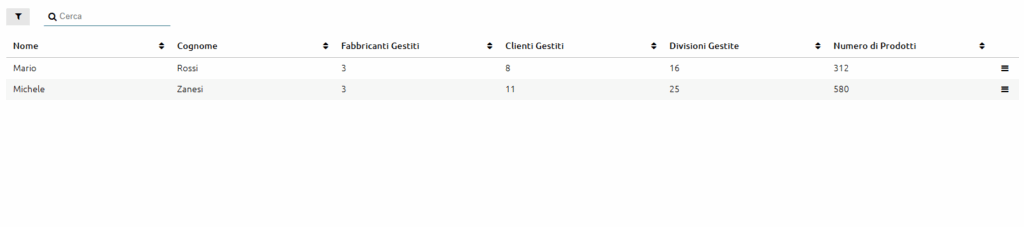
The INSPECTOR MANAGEMENT function, which is located within the MULTI-USER MANAGEMENT menu, allows a user with the following privilege to define the PPE control and management activity among different users, activating or deactivating for each of them certain Manufacturers, Companies or individual company divisions.
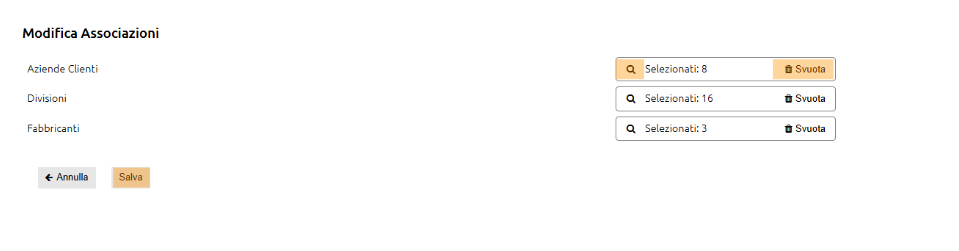
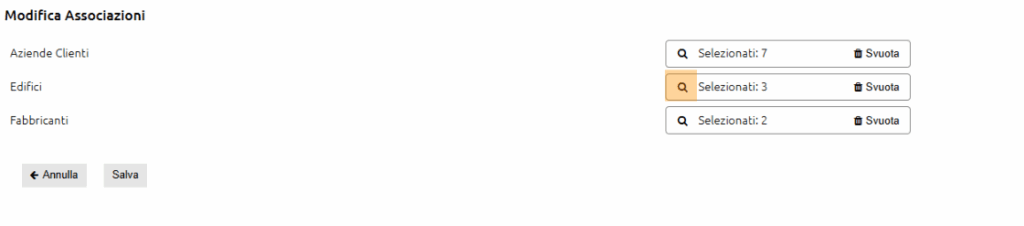
To manage filters for a specific inspector, click the ![]() button at the end of the user’s line and then click the EDIT button.
button at the end of the user’s line and then click the EDIT button.
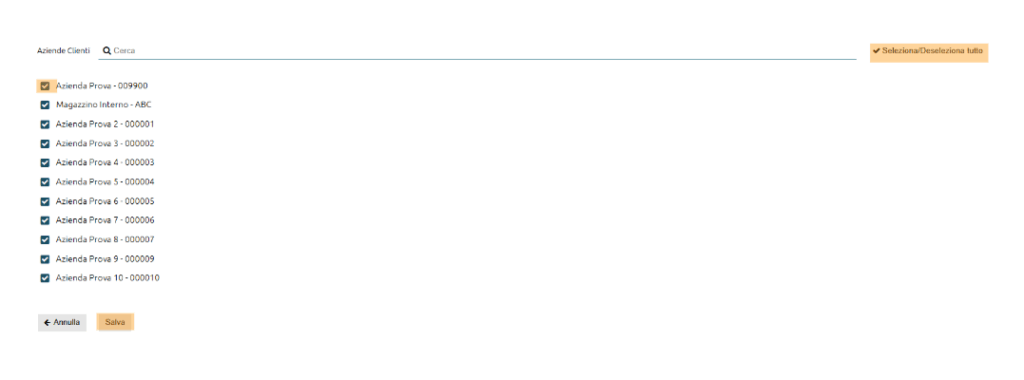
Within the appropriate function you can select the companies, company divisions or manufacturers to be managed by that user.

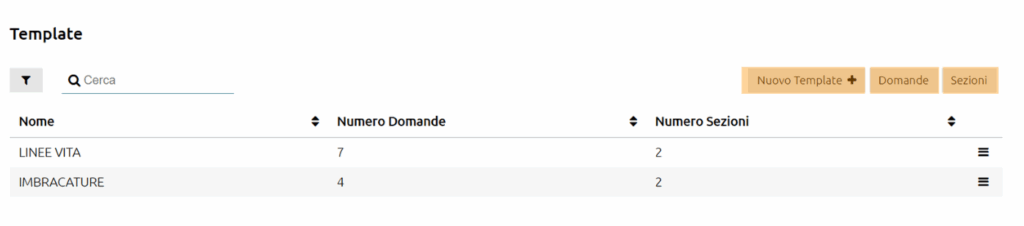

The TEMPLATE MANAGEMENT function allows the creation of PPE inspection templates to be associated with the different PPE models under management of different users.
Each template consists of QUESTIONS, understood as the different points of the check list that the user checks during inspection, and SECTIONS (not compulsory) understood as general areas to which specific questions refer (e.g. textile elements or metal elements).
In order to generate a new template, it is therefore first necessary to generate the various points of the checklist by clicking on the appropriate QUESTIONS button and then on the NEW QUESTION button.
For each question, an activity title and, optionally, a follow-up text must be included.
Once the questions have been created, it is also optionally possible to generate one or more sections by clicking on the SECTIONS button and then on the NEW SECTION button.
For each section, the title must be entered.
Questions and inspections can be edited or deleted via the appropriate options selectable via the ![]() button.
button.
Please note that if you delete or change certain questions or sections, these will no longer be available for future inspections but will remain stored in the inspections already carried out.
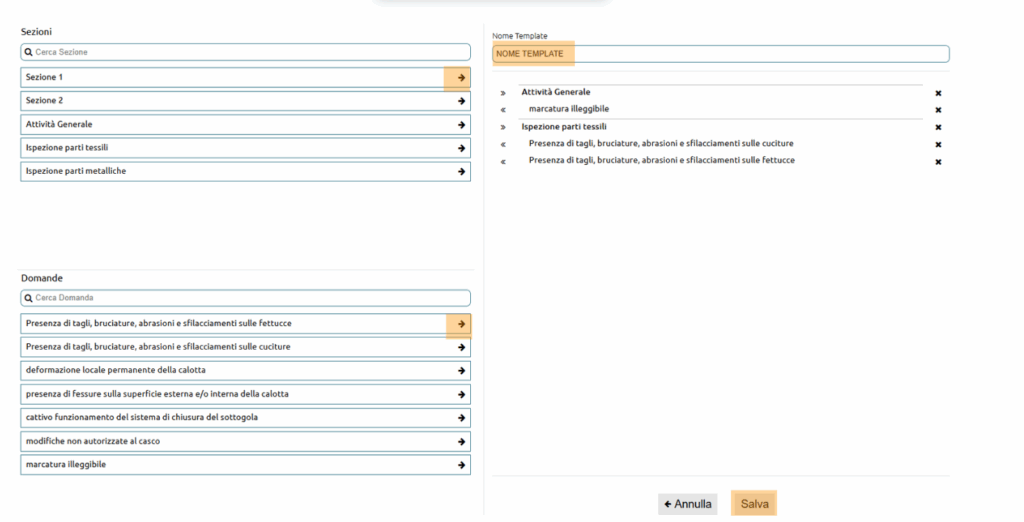
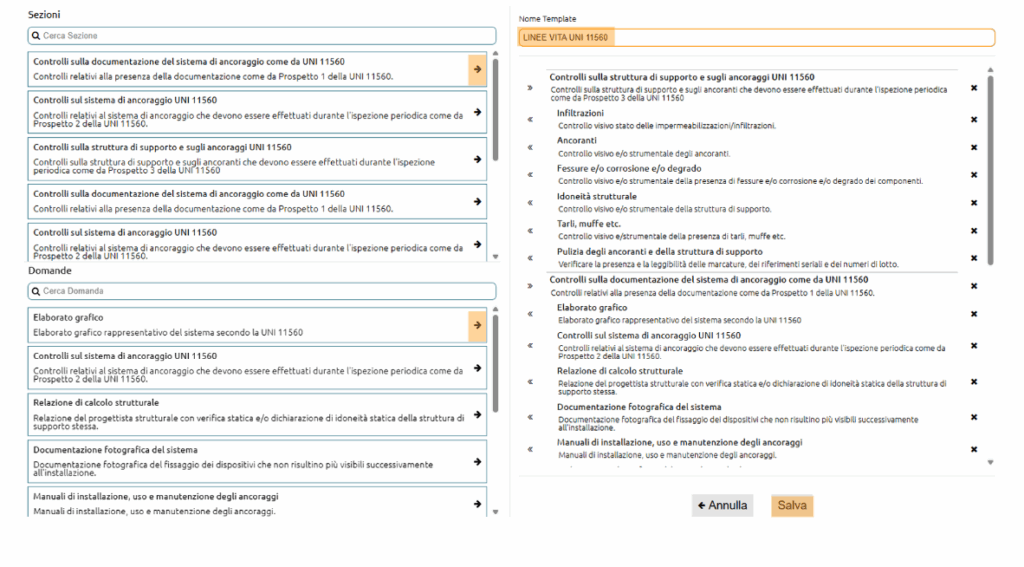
Once you have created the questions and any sections, you can then generate a new template by clicking on the TEMPLATE button and then on the NEW TEMPLATE button.
Within the function, on the right-hand side of the screen, enter the name of the TEMPLATE and then enter Sections and Related Questions in the desired order.
To confirm the generation of the new template, click the SAVE button.
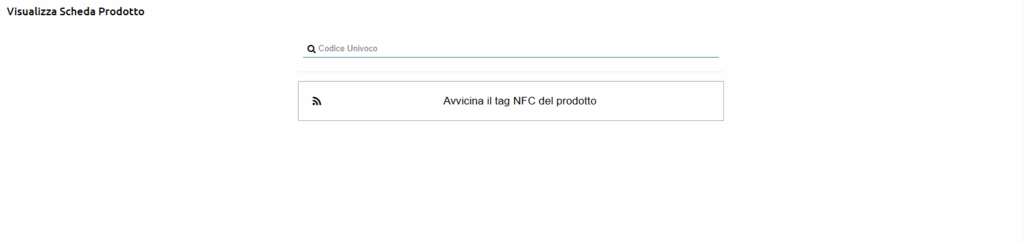
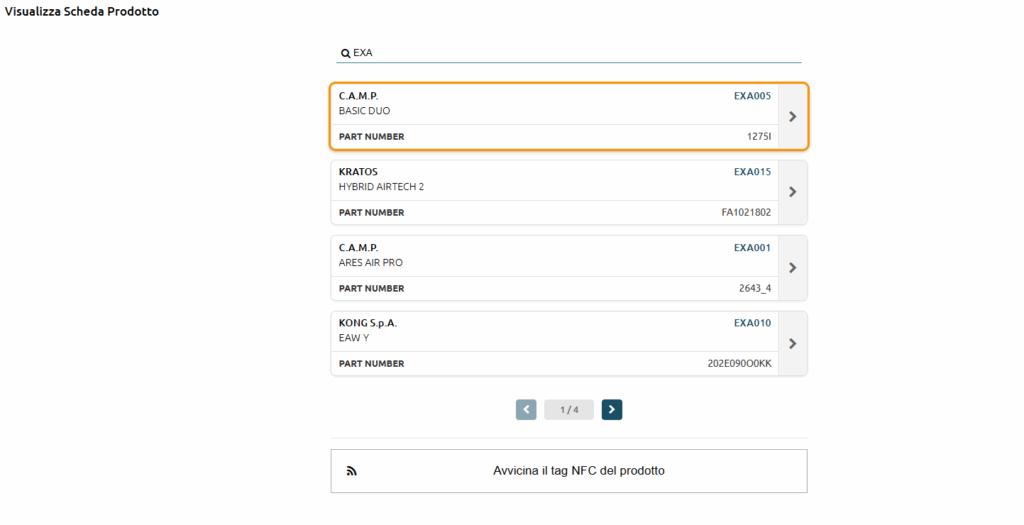
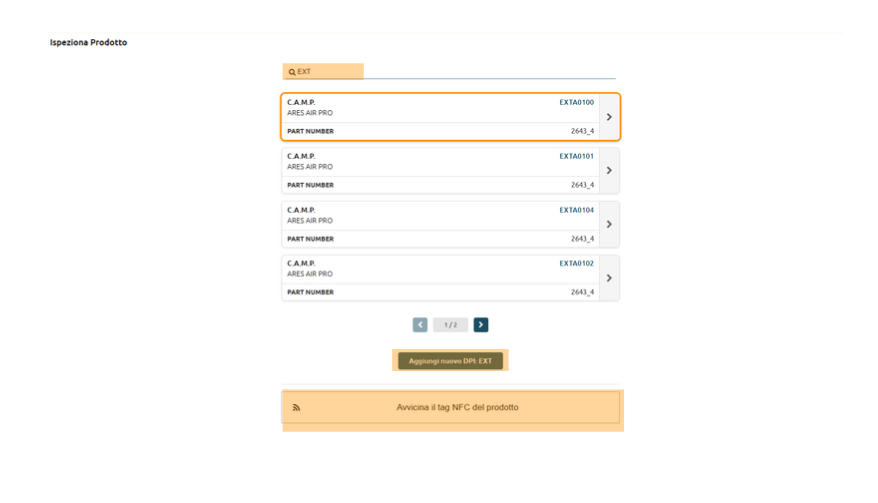
The INSPECT PPE function allows you to start the inspection process of a specific piece of PPE.
First, you must allow the PPE to be recognised by means of the appropriate Digital Identifier (NFC/QRcode) or by entering the unique product code manually.
At this stage it is also possible to REGISTRY a new PPE not yet present in the PPE REGISTRY by reading a digital identifier not yet associated with it or by manually entering the unique code of the product to be REGISTRYed and clicking on ADD NEW PPE.
You will then be able to enter the specific product data and click on the SAVE button to start the inspection.
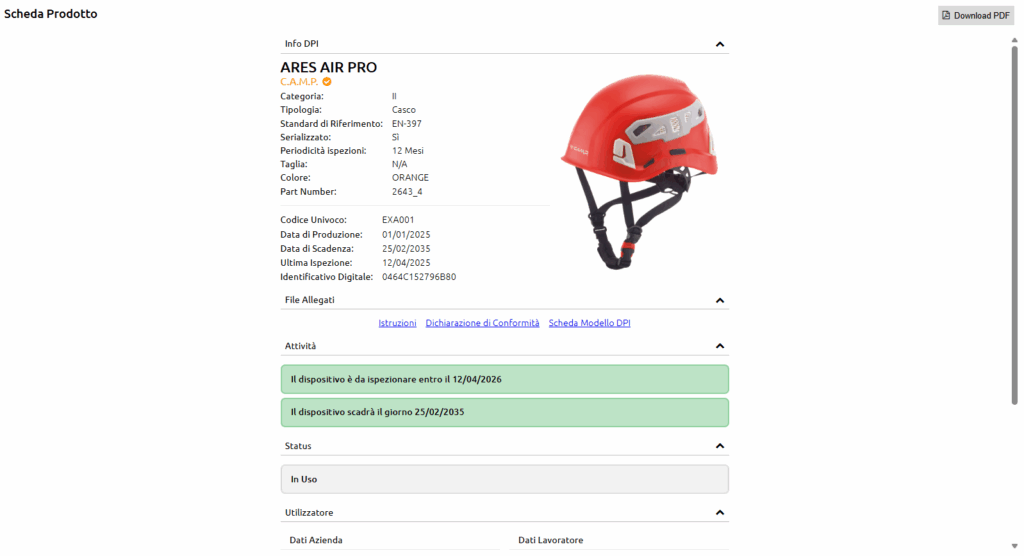
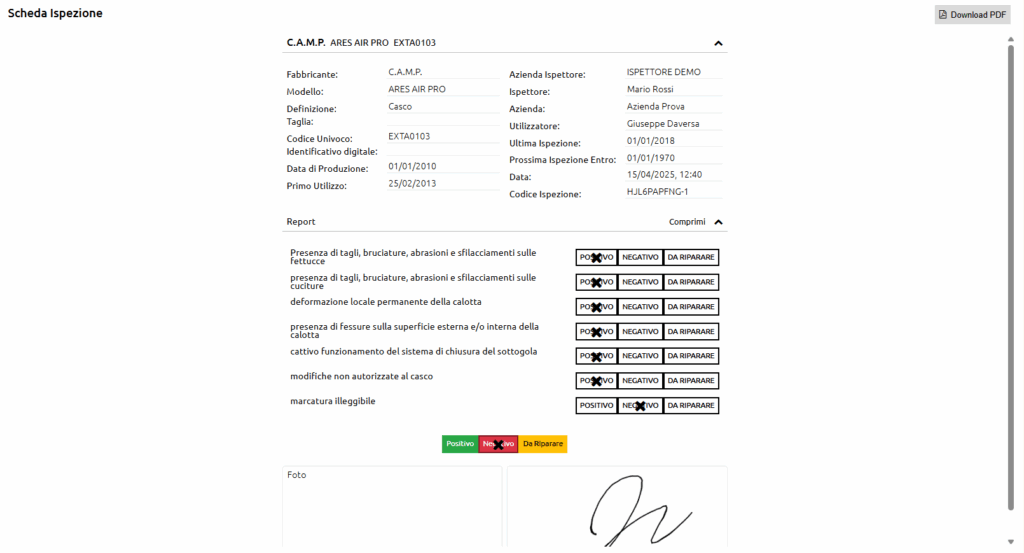
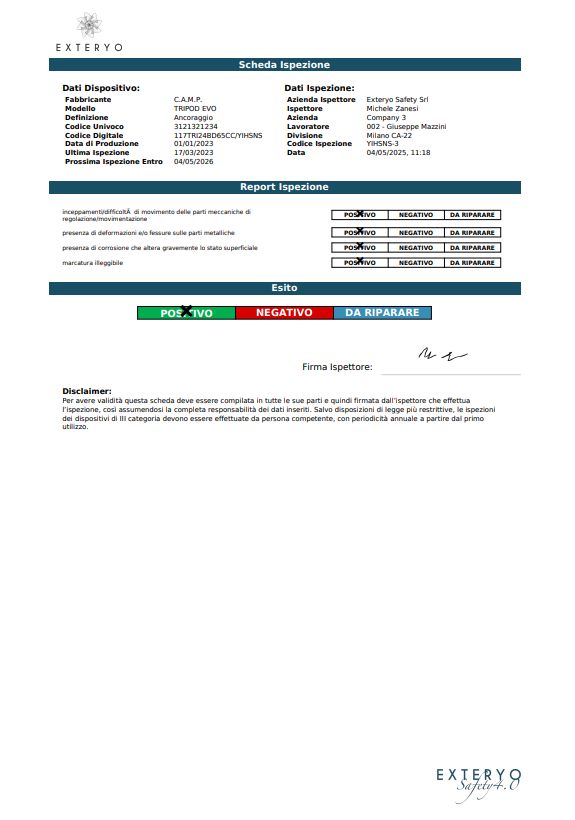
The inspection report consists of three different sections that can be defined as follows:
PPE DATA:
By clicking on the ![]() button next to the PPE name, you can expand the section to display product information.
button next to the PPE name, you can expand the section to display product information.
All information present can be changed before the inspection is saved.
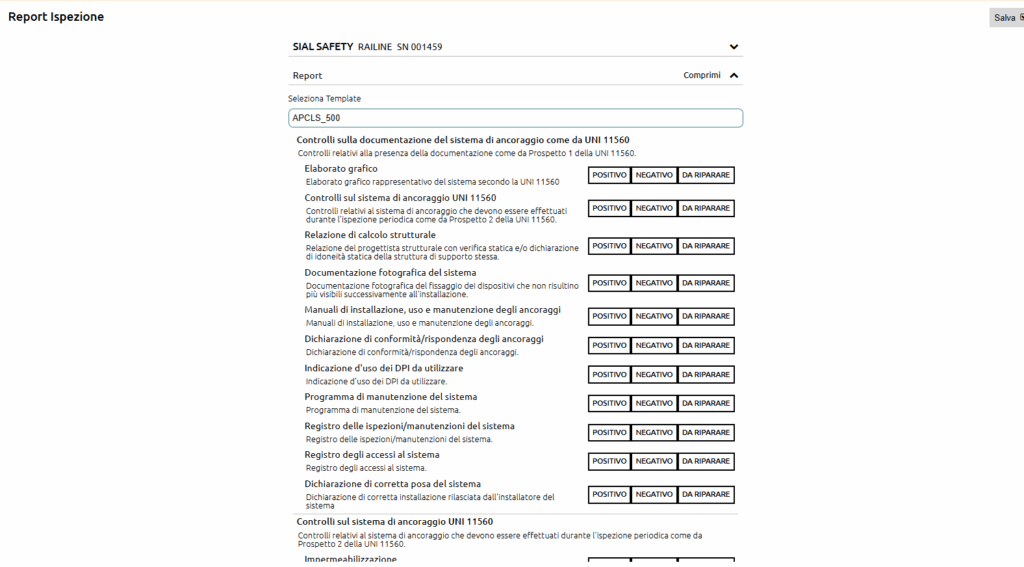
INSPECTION REPORTS:
Within the inspection report is the checklist of points to be inspected for the specific PPE.
By clicking on the ![]() button next to the REPORT item, it is possible to expand the section to view all the points on the checklist.
button next to the REPORT item, it is possible to expand the section to view all the points on the checklist.
If you are inspecting a partner manufacturer’s PPE, the checklist is provided directly by the manufacturer.
If, on the other hand, you are inspecting an PPE model you have entered, you will find the template associated with that specific model.
If no template has yet been selected for that model, a standard template with a single question will be shown.
In that case you can currently associate a specific template from the SELECT TEMPLATE drop-down menu, or continue with the standard template present.
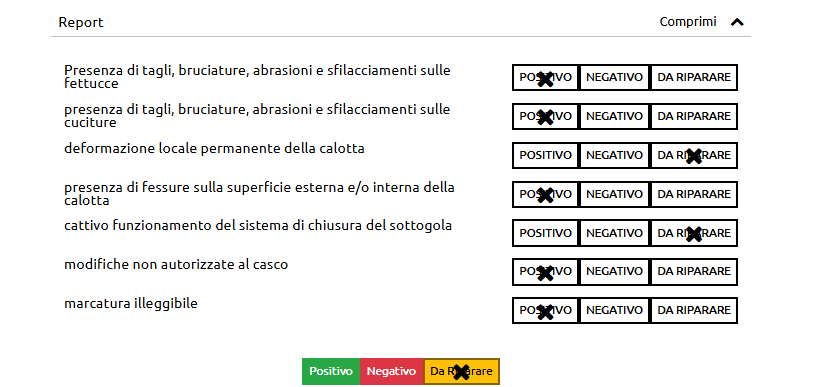
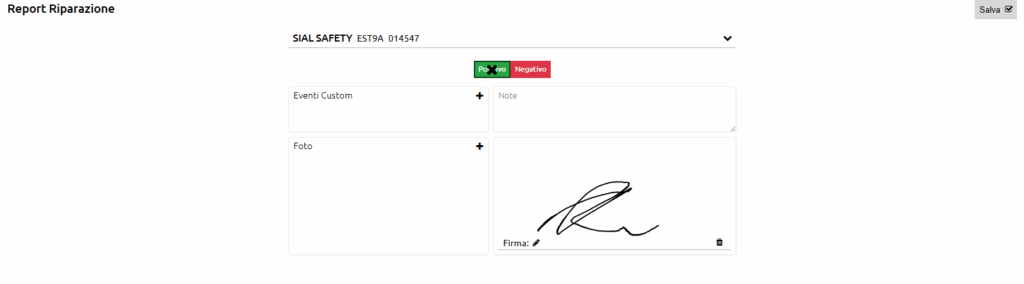
FINAL OUTCOME AND CUSTOMISATION:
Below the checklist there are three coloured buttons to indicate the final result of the inspection carried out.
If the inspection was positive, you can simply click on the POSITIVE button and all points on the checklist will automatically be marked positive.
If, on the other hand, the result of the inspection is NEGATIVE or MUST BE REPAIRED, you must indicate one or more points in the checklist with the specific result and the result of the inspection will be indicated automatically.
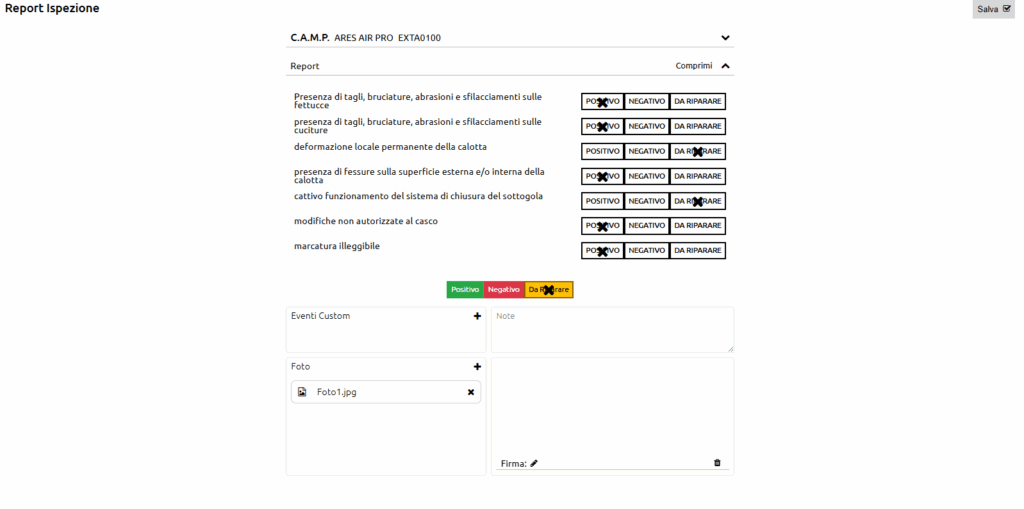
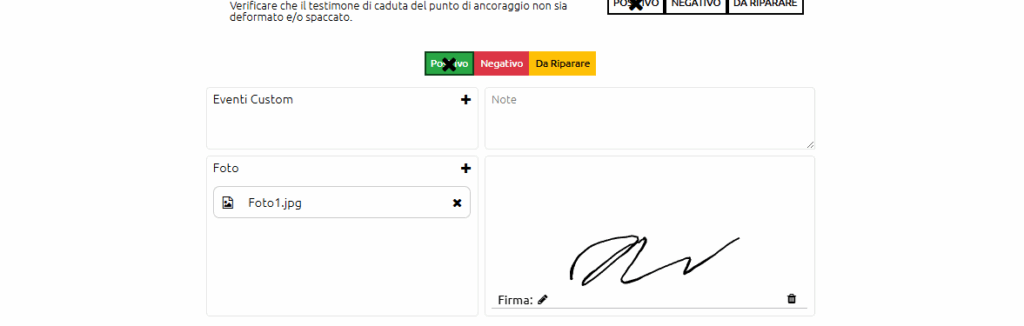
The following inspection customisations can be entered below the inspection result boxes:
CUSTOM EVENTS: allows you to enter a specific reminder relating to PPE on a specific date. Please note that due dates or upcoming inspection dates are automatically updated and therefore it is not necessary to use the CUSTOM EVENTS option to indicate such deadlines.
NOTES: Allows you to enter certain notes concerning the inspection performed, which will also appear in the inspection report.
PHOTOS (FULL licence plan only): Allows you to upload one or more photos demonstrating the inspection activity performed. The photos will also appear in the inspection report.
SIGNATURE: allows the inspection report to be signed directly in electronic mode. The signature can be done in calligraphic mode, by inserting it using a mouse or stylus in the appropriate box. Alternatively, to speed up the activity, you can affix your signature directly using the badge associated with your user account (FULL licence plan only).
To learn how to associate the badge with the user, please read the appropriate chapter “4.3 USER BADGE ASSOCIATION”.
Once the inspection is complete, click the SAVE button to save the activity. Should you sign with the badge, the saving will take place automatically with the insertion of the signature.

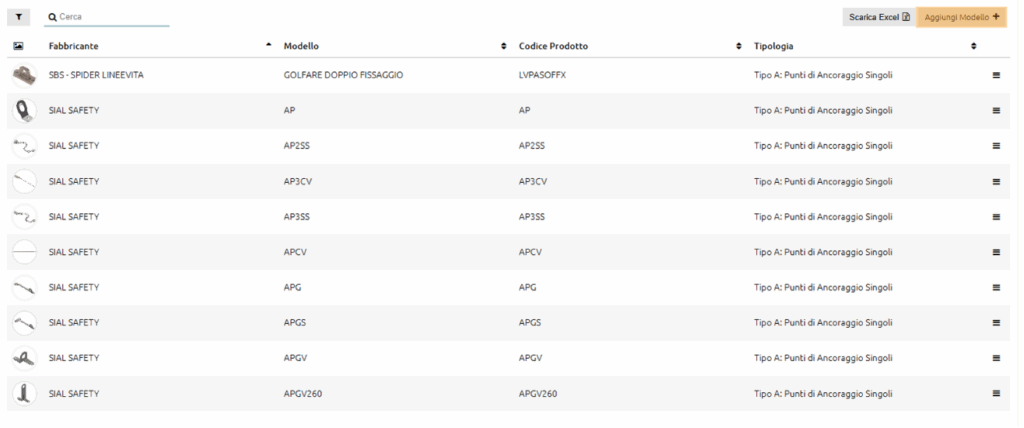
Within the REGISTRIES menu, the PPE REGISTRY function provides an overview of all PPE managed as an inspector.
For each piece of PPE, the main characteristics are shown in the table, including the data of the company and of the worker, if any, who has the device in use.
In the last column of the table, the status of the PPE is visible in different colours. The PPE status options are as follows:
OK (green colour): there are no warnings concerning the PPE
EXPIRY (yellow colour) : an expiry date is found within 30 days (periodic inspection or end of life of the PPE)
EXPIRED (red colour) : an expiry date of the PPE has passed (periodic inspection or end of life of the PPE)
QUARANTINE: The PPE is awaiting inspection or repair
OUT OF USE: The PPE has received a negative result at the last inspection or has been specifically taken out of use.
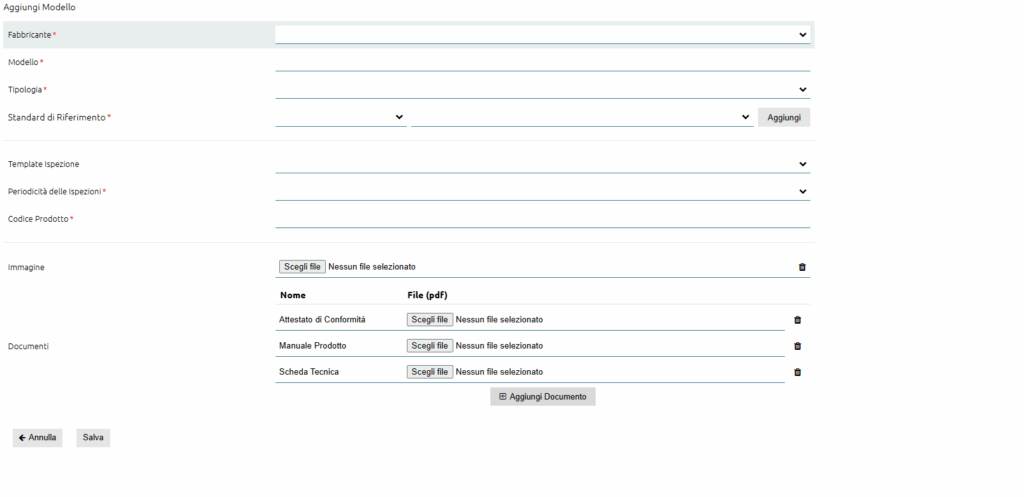
A new PPE can be added to the REGISTRY by clicking the ADD PPE button.
Within the form, enter the required data and click on the SAVE button.
If the PPE models do not include the one you need, you can create the appropriate model sheet within the PPE MODELS REGISTRY function in the REGISTRIES menu.
In order to associate the user company and the possible user, you must first enter this data in the section COMPANY. To find out how to enter this data, please read the appropriate chapters of the tutorial.
In order to associate a specific KIT to the PPE, you will first have to create it via the appropriate KIT REGISTRY. To learn how to insert a kit, please read the appropriate chapter of the tutorial.
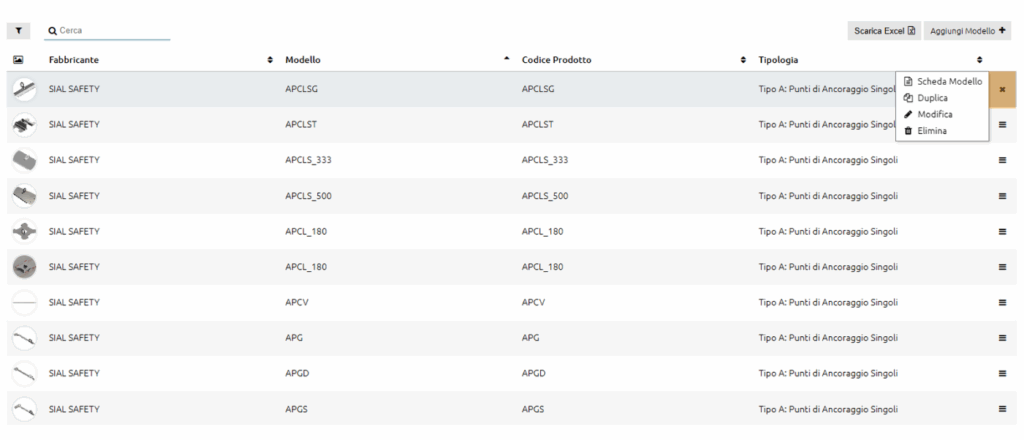
Once a specific PPE has been created, it is possible to edit its data or delete it via the appropriate options in the product menu, accessible by clicking on the ![]() button.
button.
Within the function it is also possible to make multiple downloads of the cards for specific PPE. To do this, select the PPE using the appropriate button to the left of the PPE MODEL column and then select the DOWNLOAD PDF button.
Within the REGISTRIES menu, the KIT REGISTRY function provides an overview of all kits managed as an inspector.
The KIT function makes it possible to group several PPE within a single identifier and to associate it with a specific company and worker.
To create a new KIT, click the ADD KIT button and then enter the required data in the appropriate FORM.
In order to insert the PPE within the KIT, you must first have REGISTRYed the PPE within the PPE REGISTRY and then you can read the appropriate digital identifier to associate it.
Alternatively, you can first create the KIT associated with a company and a worker and then create the PPE within the PPE REGISTRY, associating the appropriate KIT created.
Once a specific KIT has been created, it is possible to edit its data or delete it via the appropriate options in the product menu, accessible by clicking on the ![]() button.
button.
Please note that by deleting the Kit, all PPE contained in it will also be automatically deleted.
Within the function it is also possible to make multiple downloads of the cards for specific KITS. To do this, select the KITS using the appropriate button on the left of the NAME column and then select the DOWNLOAD PDF button.
Within the REGISTRIES menu, the INSPECTIONS REGISTRY function provides an overview of all inspections carried out as an inspector.
If an inspection has been carried out incorrectly, it can be deleted within 24 hours of its creation, by selecting the appropriate DELETE function in the menu accessible with the ![]() button.
button.
After 24 hours, this function will no longer be displayed.
Within the function it is also possible to make multiple downloads of the tabs relating to specific inspection reports. To do this, select the reports using the appropriate button to the left of the DATA column, and then select the DOWNLOAD PDF button.
Within the REGISTRIES menu, the REPAIR RECORD function allows an overview of all repairs carried out as an inspector.
In the event that a repair has been carried out incorrectly, it can be deleted within 24 hours of its creation by selecting the appropriate DELETE function in the menu accessible with the ![]() button.
button.
After 24 hours, this function will no longer be displayed.
Within the function, it is also possible to make multiple downloads of specific repair reports. To do this, select the reports using the appropriate button to the left of the DATA column, and then select the DOWNLOAD PDF button.


Within the MULTI-USER MANAGEMENT menu, the SYSTEMS GENERAL REGISTRY function allows you to have an overview of all SYSTEMS managed by the different users of the licence.
For each System, the main characteristics are shown in the table, including the data of the company and the plant on which they are installed.
The last column of the table shows the status of the plant in different colours. The System status options are derived from the statuses of the individual components and are as follows:
OK (green colour) : there are no component warnings
EXPIRY (yellow colour) : an expiry date within 30 days (periodic inspection) of at least one of the components of the installation has been found.
EXPIRED (red colour) : an inspection deadline has passed for at least one of the system’s components.
TO BE REPAIRED – USEFUL: At least one of the components of the installation has had an inspection with outcome TO BE REPAIRED but it has been indicated that it can still be used.
MUST BE REPAIRED – NOT USEFUL: At least one of the system components has had an inspection with the outcome MUST BE REPAIRED and must not be used.
OUT OF USE: At least one of the components of the system has received a negative result at the last inspection or has been specifically put out of use.
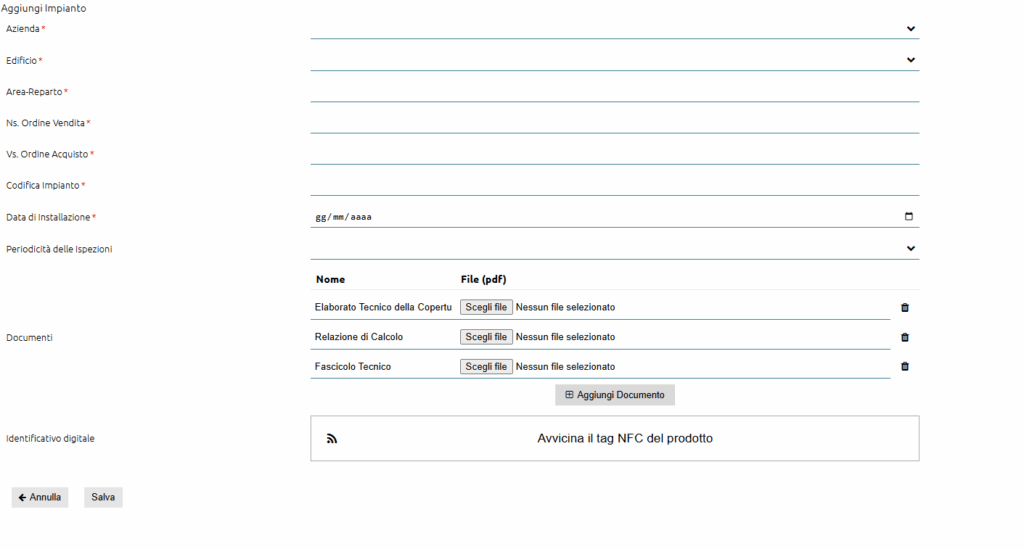
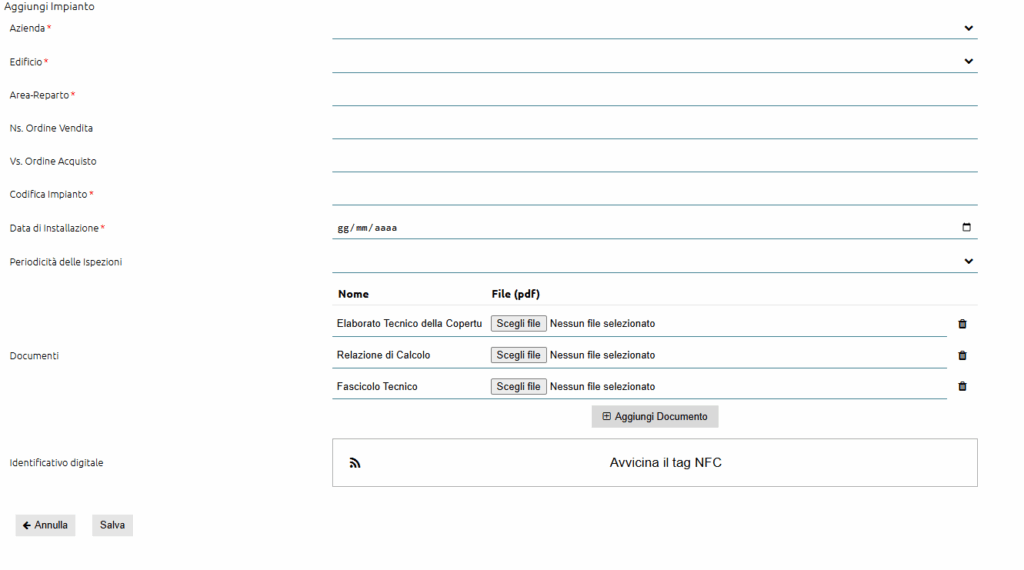
You can add a new SYSTEM to the register by clicking the ADD SYSTEM button.
Within the form, enter the required data and click on the SAVE button.
In order to associate the user company and its building, you must first enter this data in the section COMPANIES. To learn how to enter this data, please read the appropriate chapters of the tutorial.
For each System you can associate different digital identifiers (NFC/QRcode) so that they can be placed at the various access points of the System.
Once a specific system has been created, it is possible to edit its data or delete it via the appropriate options in the product menu, which can be accessed by clicking on the ![]() button.
button.
Please note that by eliminating a System, you also eliminate all components associated with it.
Again by clicking the ![]() button you can select the option SHOW COMPONENTS to access the table showing all components of the specific system.
button you can select the option SHOW COMPONENTS to access the table showing all components of the specific system.
For the management of individual components, we refer you to the following chapter 7.4 FALL ARREST SYSTEMS – COMPONENTS GENERAL REGISTRY .
Within the function it is also possible to make multiple downloads of the shets for specific Components. To do this, select the PPE using the appropriate button on the left of the COMPANY column and then select the DOWNLOAD PDF button.


Within the MULTI-USER MANAGEMENT menu, the function COMPONENTS GENERAL REGISTRY provides an overview of all components managed within the various systems by the different users of the licence.
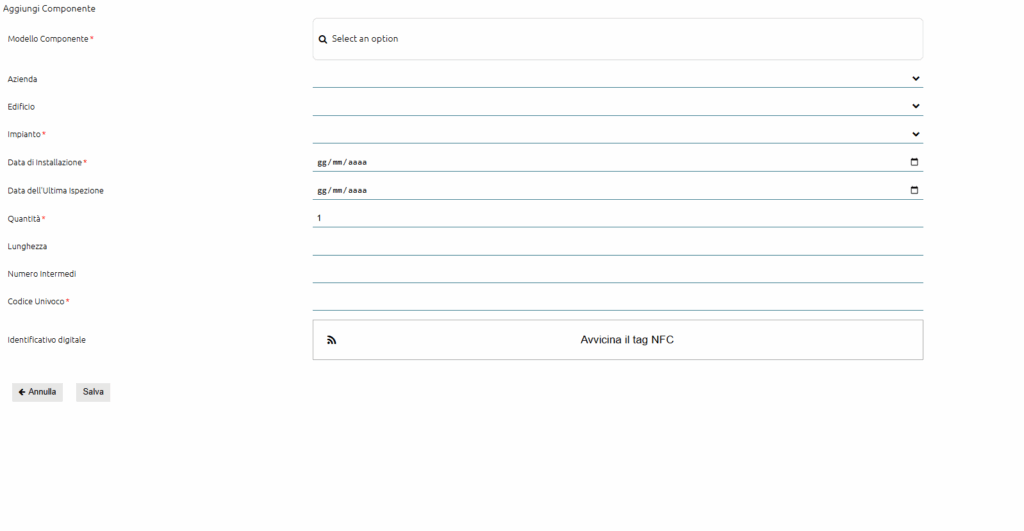
To enter a new component of a system, click the ADD COMPONENT button and then enter the required data in the appropriate FORM.
If the component models do not include the one you need, you can create the appropriate model sheet within the MODELS REGISTRY function in the REGISTRIES menu.
Once a specific component has been created, it is possible to edit its data or delete it via the appropriate options in the component menu, accessible by clicking on the ![]() button.
button.
Within the function, it is also possible to make multiple downloads of sheets for specific components. To do this, select the components using the appropriate button to the left of the column with the component photo and then select the DOWNLOAD PDF button.
Within the MULTI-USER MANAGEMENT menu, the function GENERAL COMPONENT REGISTER provides an overview of all components managed within the various systems by the different users of the licence.
To enter a new component of a plant, click the ADD COMPONENT button and then enter the required data in the appropriate FORM.
If the component models do not include the one you need, you can create the appropriate model sheet within the MODELS REGISTRY function in the REGISTRIES menu.
Once a specific component has been created, it is possible to edit its data or delete it via the appropriate options in the component menu, accessible by clicking on the ![]() button.
button.
Within the function, it is also possible to make multiple downloads of sheets for specific components. To do this, select the components using the appropriate button to the left of the column with the component photo and then select the DOWNLOAD PDF button.


Within the MULTI-USER MANAGEMENT menu, the REPAIRS GENERAL REGISTRY RECORD function provides an overview of all repairs carried out by the different users of the licence.
In the event that a repair has been carried out incorrectly, it can be deleted within 24 hours of its creation by selecting the appropriate DELETE function in the menu accessible with the ![]() button.
button.
After 24 hours, this function will no longer be displayed.
Within the function, it is also possible to make multiple downloads of specific repair reports. To do this, select the reports using the appropriate button to the left of the DATA column, and then select the DOWNLOAD PDF button.
The function INSPECTORS MANAGEMENT, present within the MULTI-USER MANAGEMENT menu, allows a user with the following privilege to define the activity of control and management of Fall arrest Systems among different users, activating or deactivating for each of them specific Manufacturers, Companies or individual Branches.
To manage the management filters for a specific inspector, click the ![]() button at the end of the user’s line and then click the EDIT button.
button at the end of the user’s line and then click the EDIT button.
Within the appropriate function you can select the companies, buildings or manufacturers to be managed by that user.


The TEMPLATE MANAGEMENT function allows the creation of inspection templates to be associated with the different component templates under management of different users.
Each template consists of QUESTIONS, understood as the different points of the check list that the user checks during inspection, and SECTIONS (not mandatory) understood as general areas to which specific questions refer.
In order to generate a new template, it is therefore first necessary to generate the various points of the checklist by clicking on the appropriate QUESTIONS button and then on the NEW QUESTION button.
For each question, an activity title and, optionally, a follow-up text must be included.
Once the questions have been created, it is also optionally possible to generate one or more sections by clicking on the SECTIONS button and then on the NEW SECTION button.
For each section, the title must be entered.
Questions and inspections can be edited or deleted via the appropriate options selectable via the ![]() button.
button.
Please note that if certain questions or sections are deleted or changed, they will no longer be available for future inspections but will remain stored in the inspections already carried out.
Once you have created the questions and any sections, you can then generate a new template by clicking on the TEMPLATE button and then on the NEW TEMPLATE button.
Within the function, on the right-hand side of the screen, enter the name of the TEMPLATE and then enter Sections and Related Questions in the desired order.
To confirm the generation of the new template, click the SAVE button.
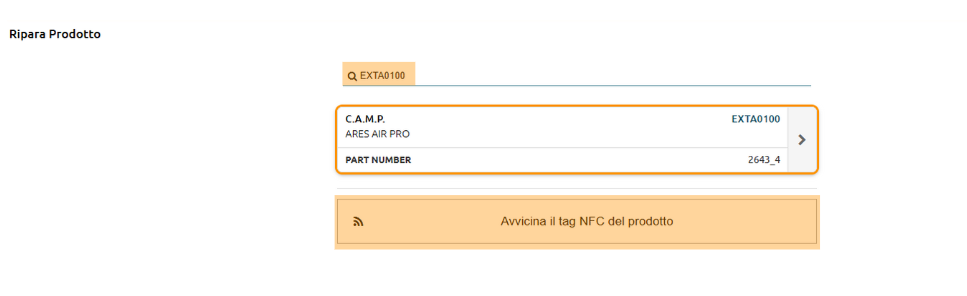
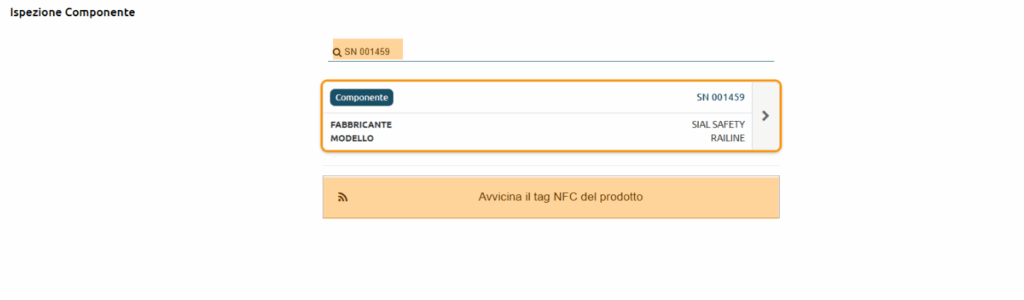
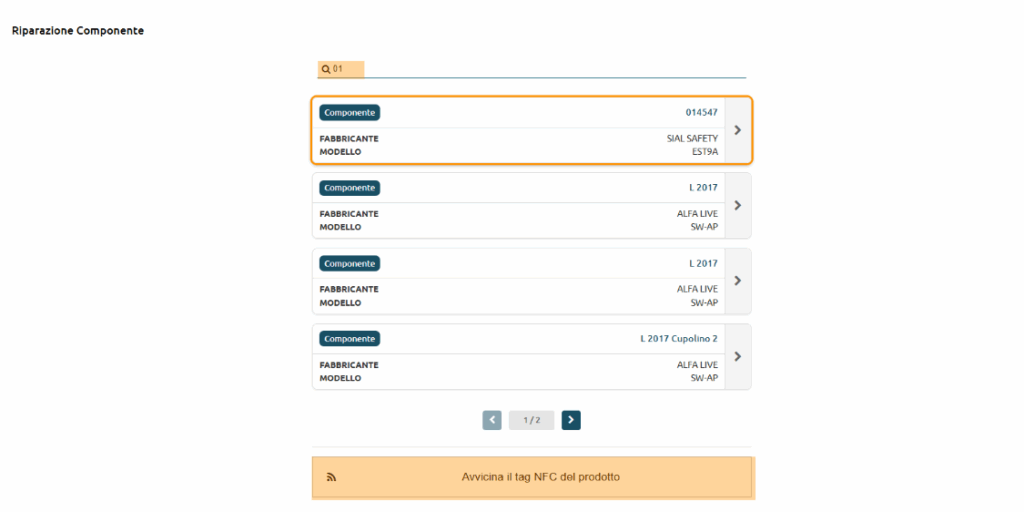
The INSPECT COMPONENTS function allows you to start the inspection process of a specific component of a fall arrest system.
First, you have to allow the component to be recognised by means of the appropriate Digital Identifier (NFC/QRcode) or by entering the unique product code manually.
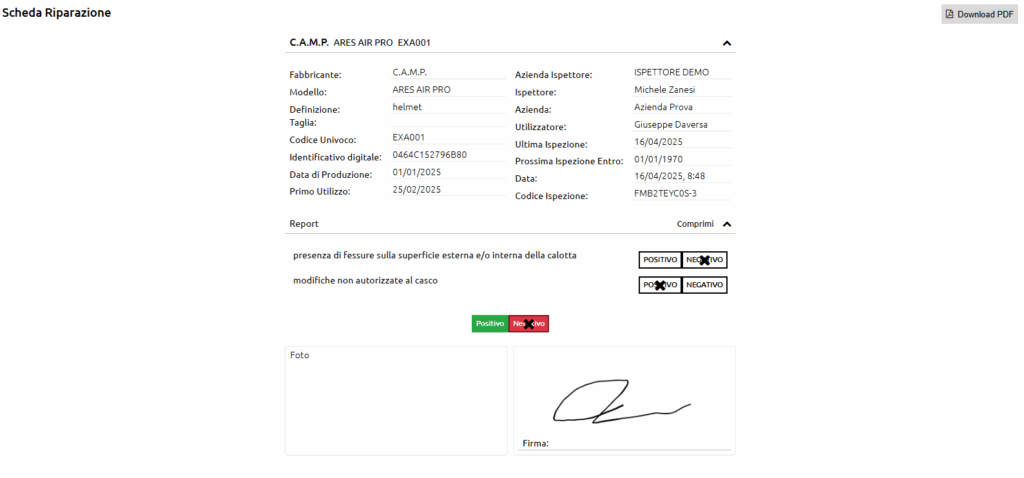
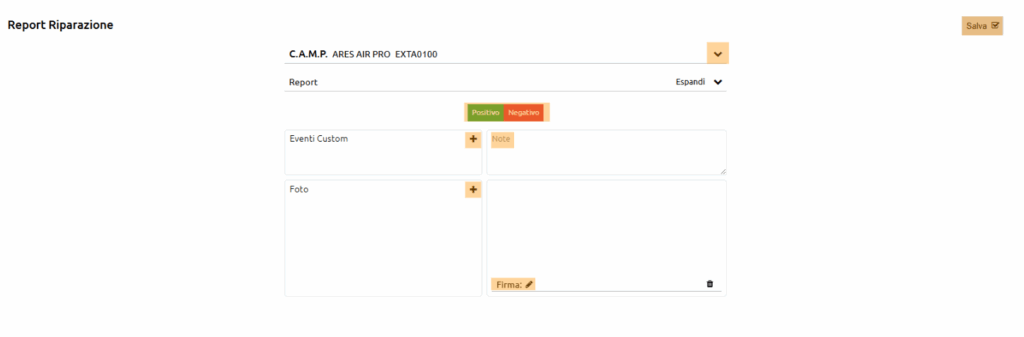
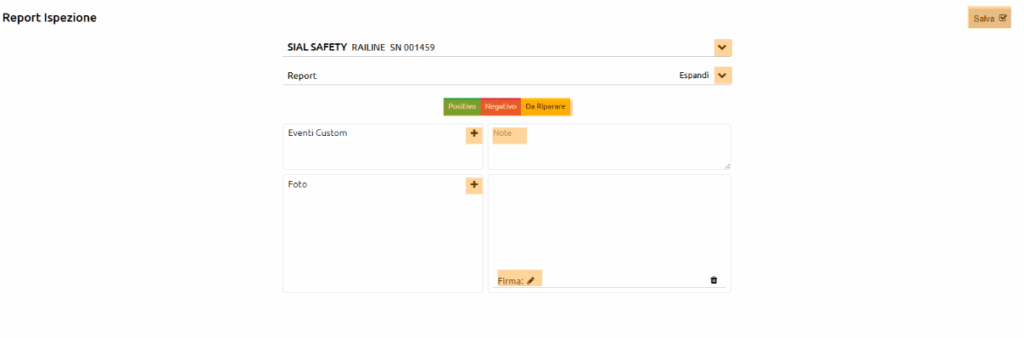
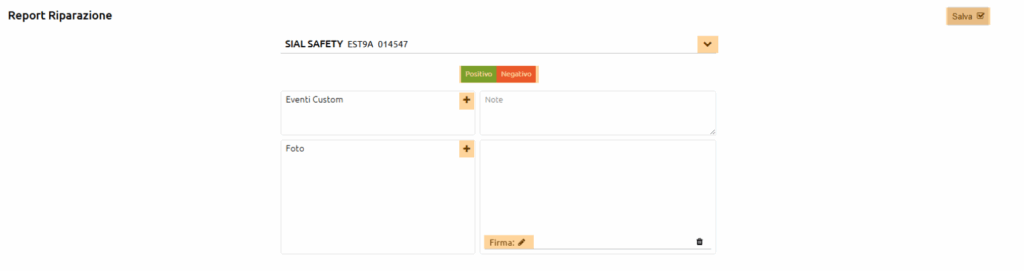
The inspection report consists of three different sections that can be defined as follows:
COMPONENT DATA:
By clicking on the ![]() button next to the component name, you can expand the section to display product information.
button next to the component name, you can expand the section to display product information.
All information present can be changed before the inspection is saved.
INSPECTION REPORT:
Within the inspection report is the checklist of points to be inspected for the specific component.
By clicking on the ![]() button next to the REPORT item, it is possible to expand the section to display all the points of the checklist.
button next to the REPORT item, it is possible to expand the section to display all the points of the checklist.
If you are inspecting a partner manufacturer’s component, the checklist is offered directly by the manufacturer.
If, on the other hand, you are inspecting a component model entered by you, you will find the template associated with that specific model.
If no template has yet been selected for that model, a standard template with a single question will be displayed.
In this case you can associate a specific template at the moment from the SELECT TEMPLATE drop-down menu, or continue with the standard template present.
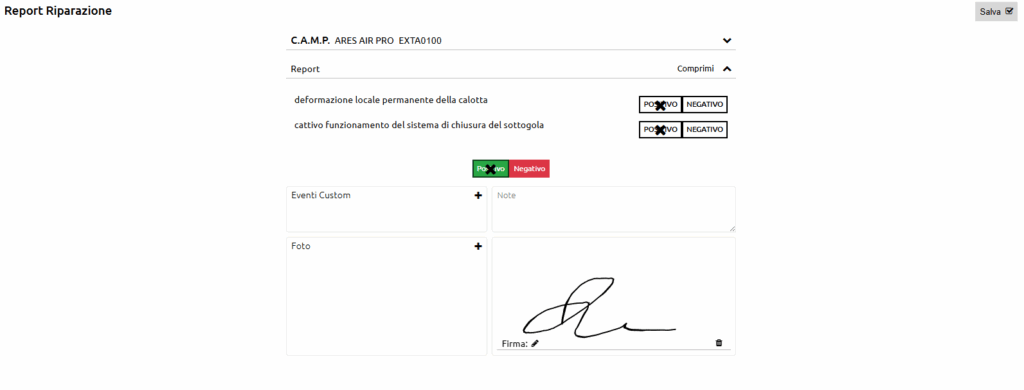
FINAL OUTCOME AND CUSTOMISATION:
Below the checklist there are three coloured buttons to indicate the final result of the inspection carried out.
If the inspection is positive, you can simply click on the POSITIVE button and all points on the checklist will automatically be marked positive.
If, on the other hand, the result of the inspection is NEGATIVE or TO BE REPAIRED, you must indicate one or more points in the checklist with the specific result and the result of the inspection will be indicated automatically.
If the outcome TO BE REPAIRED is indicated, you must also indicate whether the component is still usable or not, pending repair.
The following inspection customisations can be entered below the inspection result boxes:
CUSTOM EVENTS: allows you to enter a specific reminder related to the component on a specific date. Please note that due dates or upcoming inspection dates are automatically updated and therefore it is not necessary to use the CUSTOM EVENTS option to indicate such deadlines.
NOTES: Allows you to enter certain notes concerning the inspection performed, which will also appear in the inspection report.
PHOTOS (only for FULL licence plan): Allows you to upload one or more photos demonstrating the inspection activity performed. The photos will also appear in the inspection report.
SIGNATURE: Allows the inspection report to be signed directly in electronic mode. The signature can be done in calligraphic mode, by inserting it using a mouse or stylus in the appropriate box. Alternatively, to speed up the activity, you can affix your signature directly using the badge associated with your user account.
To find out how to associate the badge with the user, please read the appropriate chapter “4.3 USER BADGE ASSOCIATION “.
Once the inspection is complete, click the SAVE button to save the activity. Should you sign with the badge, the saving will be done automatically with the insertion of the signature.
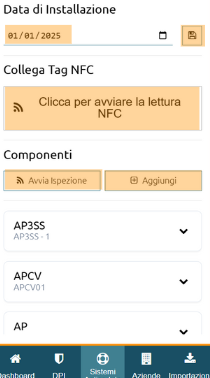
The OPERATIONS MANAGEMENT function allows the facilitation of data association and component inspection operations when the installer/inspector is operating.
This function summarises the main activity options for managing systems and components, such as entering system data, adding components or quickly starting inspection activities.
Using the dedicated space it is possible to search for the plant to be managed.
If plans have been added to the building (see chapter 8.3 MANAGE BRANCHES BY COMPANY) you can click on the building address to access their display.
By clicking the ![]() button next to the plant name, you can access the details and operation of the selected system.
button next to the plant name, you can access the details and operation of the selected system.
In this section it is possible to enter or modify the installation date of the installation (by entering the date and clicking the ![]() button), connect one or more NFC tags referring to the installation or add or inspect the components connected to the installation.
button), connect one or more NFC tags referring to the installation or add or inspect the components connected to the installation.
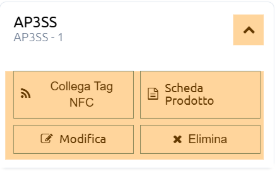
By clicking the ![]() button next to one of the components, it is possible to display the management options of the individual component.
button next to one of the components, it is possible to display the management options of the individual component.


Within the REGISTRIES menu, the SYSTEMS REGISTRY function provides an overview of all the SYSTEMS managed as an inspector.
For each plant, the main characteristics are shown in the table, including the data of the company and the system on which they are installed.
In the last column of the table the status of the system is visible in different colours. The system status options are derived from the statuses of the individual components and are as follows:
OK (green colour) : there are no component warnings
EXPIRY (yellow colour) : an expiry date within 30 days (periodic inspection) of at least one of the components of the installation has been found.
EXPIRED (red colour) : an inspection deadline has passed for at least one of the system’s components.
TO BE REPAIRED – USEFUL: At least one of the components of the installation has had an inspection with outcome TO BE REPAIRED but it has been indicated that it can still be used.
MUST BE REPAIRED – NOT USEFUL: At least one of the system components has had an inspection with the outcome MUST BE REPAIRED and must not be used.
OUT OF USE: At least one of the components of the system has received a negative result at the last inspection or has been specifically put out of use.
You can add a new system to the register by clicking the ADD SYSTEM button.
Within the form, enter the required data and click on the SAVE button.
In order to associate the user company and its building, you must first enter this data in the section COMPANY. To learn how to enter this data, please read the appropriate chapters of the tutorial.
For each installation you can associate different digital identifiers (NFC/QRcode) so that they can be placed at the various access points of the installation.
Once a specific installation has been created, it is possible to edit its data or delete it via the appropriate options in the product menu, which can be accessed by clicking on the ![]() button.
button.
Please note that by eliminating a System, you also eliminate all components associated with it.
Again by clicking the ![]() button you can select the option SHOW COMPONENTS to access the table showing all components of the specific system.
button you can select the option SHOW COMPONENTS to access the table showing all components of the specific system.
For the management of individual components, we refer you to the next chapter “7.13 COMPONENTS REGISTRY”.
Within the function it is also possible to make multiple downloads of the cards for specific PPE. To do this, select the PPE using the appropriate button on the left of the COMPANY column and then select the DOWNLOAD PDF button.
Within the REGISTRIES menu, the COMPONENT REGISTRY function provides an overview of all components managed within the various installations managed as an inspector.
To enter a new component of a plant, click the ADD COMPONENT button and then enter the required data in the appropriate FORM.
If the component models do not include the one you need, you can create the appropriate model sheet within the MODEL REGISTER function in the REGISTER menu.
Once a specific component has been created, it is possible to edit its data or delete it via the appropriate options in the component menu, accessible by clicking on the ![]() button.
button.
Within the function, it is also possible to make multiple downloads of sheets for specific components. To do this, select the components using the appropriate button to the left of the column with the component photo and then select the DOWNLOAD PDF button.
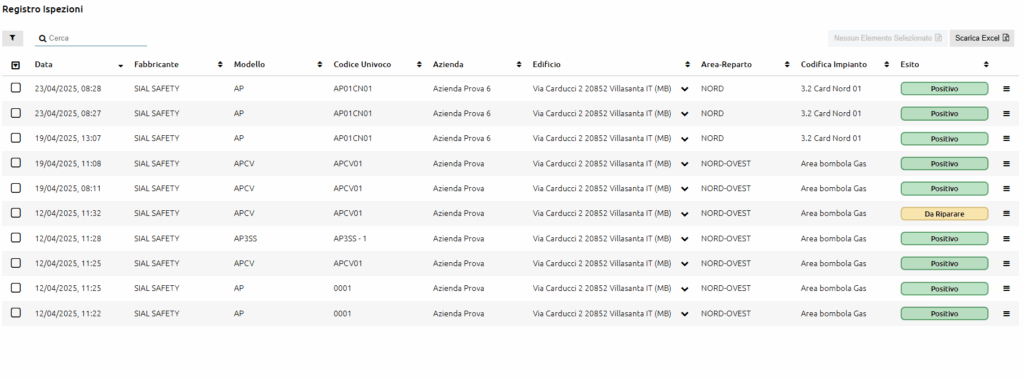
Within the REGISTRIES menu, the INSPECTIONS REGISTRY function provides an overview of all inspections carried out as an inspector.
If an inspection has been carried out incorrectly, it can be deleted within 24 hours of its creation, by selecting the appropriate DELETE function in the menu accessible with the ![]() button.
button.
After 24 hours, this function will no longer be displayed.
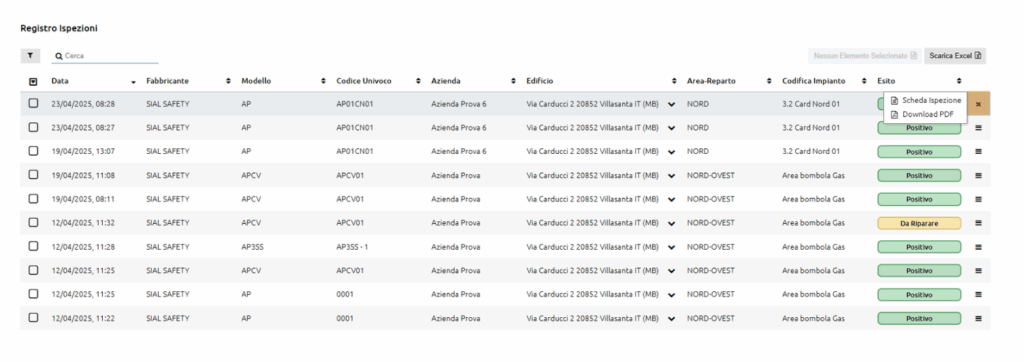
Within the function it is also possible to make multiple downloads of the tabs relating to specific inspection reports. To do this, select the reports using the appropriate button to the left of the DATA column, and then select the DOWNLOAD PDF button.
Within the REGISTRIES menu, the INSPECTIONS REGISTRY function provides an overview of all inspections carried out as an inspector.
If an inspection has been carried out incorrectly, it can be deleted within 24 hours of its creation, by selecting the appropriate DELETE function in the menu accessible with the ![]() button.
button.
After 24 hours, this function will no longer be displayed.
Within the function it is also possible to make multiple downloads of the tabs relating to specific inspection reports. To do this, select the reports using the appropriate button to the left of the DATA column, and then select the DOWNLOAD PDF button.

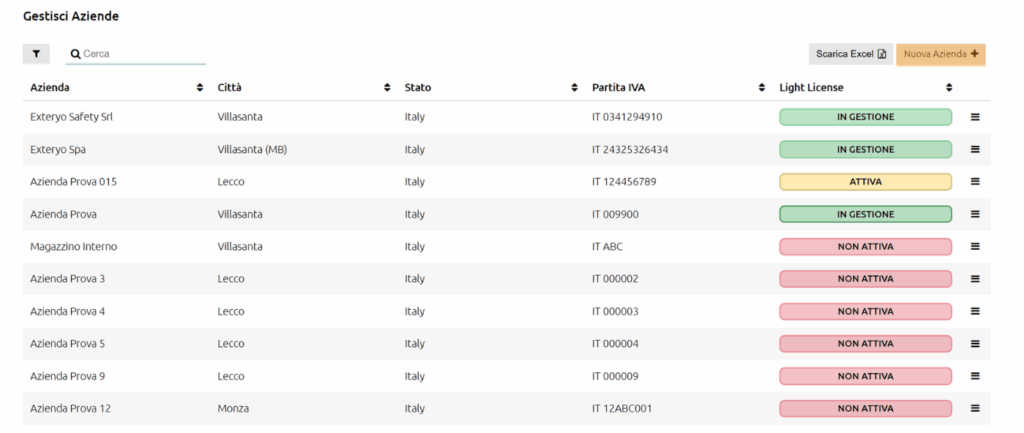
Within the COMPANIES section you can manage all data relating to the companies whose PPE or fall protection systems you need to manage.
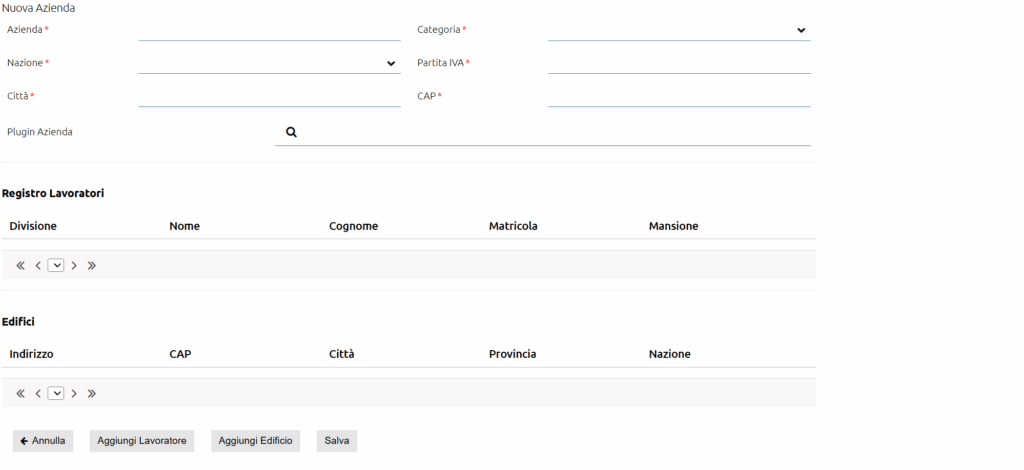
To add a NEW COMPANY click on the appropriate button at the top right of the table and then fill in the form with the company-specific data.
Among the data to be entered, in the COMPANY PLUGIN section you will also be able to decide whether the activity you carry out for that company is for the management of PPE, fall arrest systems or both.
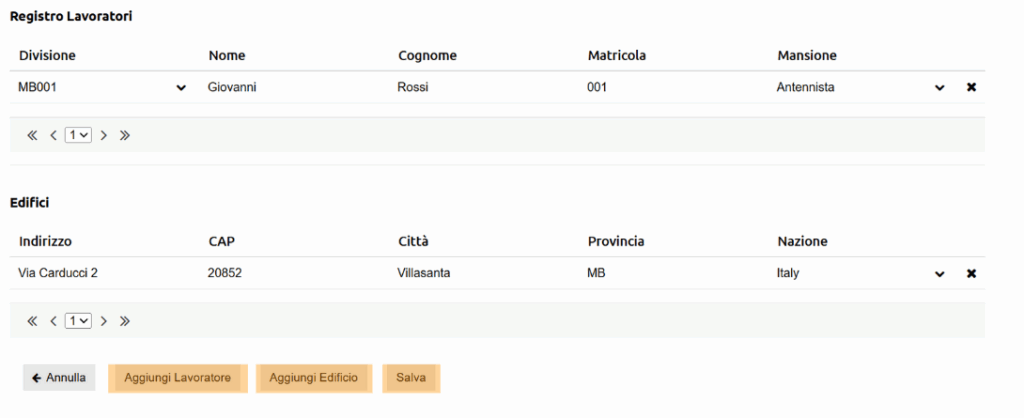
Also within the NEW COMPANY function, below the company data you can enter the individual workers to whom the PPE should be assigned.
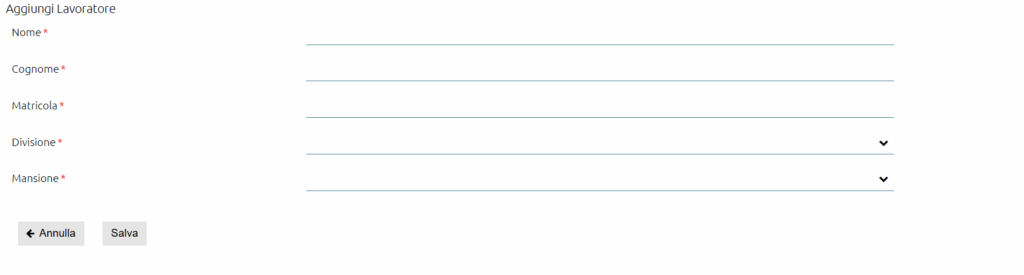
To add a new worker click on the ADD WORKER button and fill in the required data.
If you are adding a new DIVISION or a new DUTY, you must first enter the name and confirm it by clicking on the NEW WORKER button.
In the same way, you can also enter the company’s branches that are required for the management of the facilities and components of the fall arrest systems.
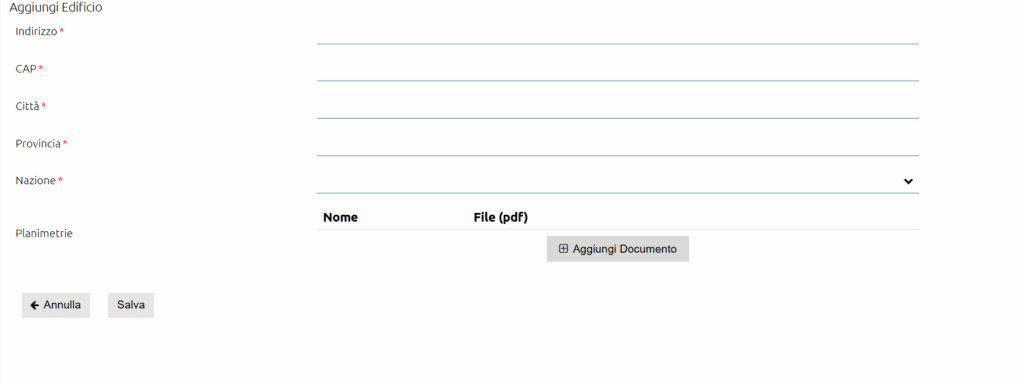
To enter a new branch, click the ADD BRANCH button and fill in the table with the required data.
Once all actions have been performed, click on SAVE to add the company and any workers and buildings entered.
You can change the general data of one of the companies in the table if that company does not have an active COMPANY MANAGEMENT licence (Light or higher).
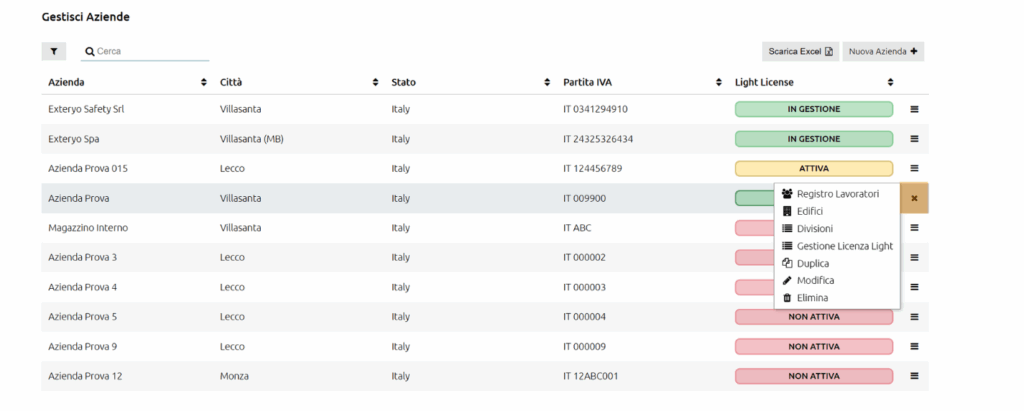
To change company data, access the menu via the ![]() button and select the MODIFY function.
button and select the MODIFY function.
Also from the same menu you can select the option DELETE Company.
If the company does not have an active COMPANY MANAGEMENT licence (light or higher), all company, PPE and Fall Arrest System data will be completely deleted.
If, on the other hand, the company has an active COMPANY MANAGEMENT licence, you will be de-registered from the management of that company’s data, but these will remain active and in the company’s view.
To manage the data of workers associated with a specific company, access the company data management menu via the ![]() button and select the WORKERS item.
button and select the WORKERS item.
Within the function you will see the data of all workers under your management. You can add a new worker via the ADD WORKER button and by filling in the appropriate form.
By clicking the ![]() button next to the worker data you can select the option to edit the data or to delete the worker.
button next to the worker data you can select the option to edit the data or to delete the worker.
Please note that if you delete the worker, the PPE associated with him/her will also be deleted.


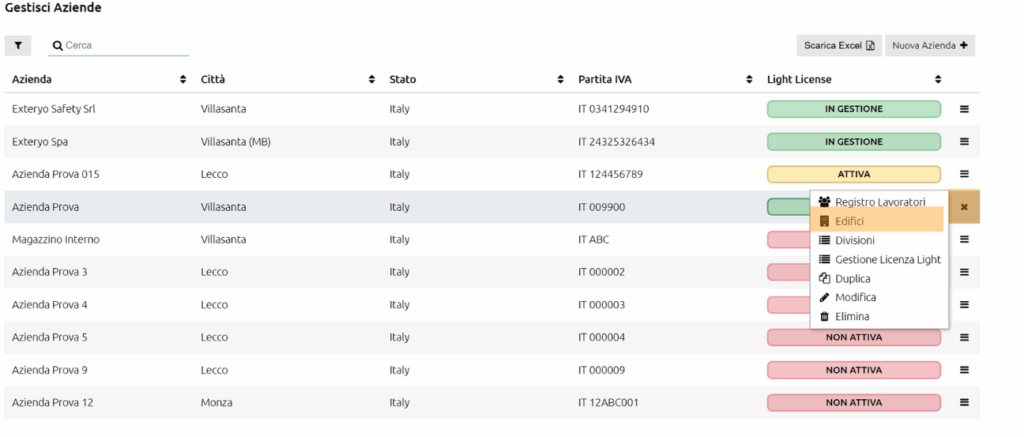


To manage the data of branches associated with a specific company, access the company data management menu via the ![]() button and select the BRANCH option.
button and select the BRANCH option.
Within the function you will see the data of all branches under your management. You can add a new branch by using the ADD BRANCH button and filling in the appropriate form.
By clicking the ![]() button next to the branch data you can select the option to edit the data or to delete the branch.
button next to the branch data you can select the option to edit the data or to delete the branch.
Please note that if you delete the branch, the systems and components associated with it will also be deleted.
Also within the menu you can select the PLANIMETERS item to add up to three PDFs of the branch systems.
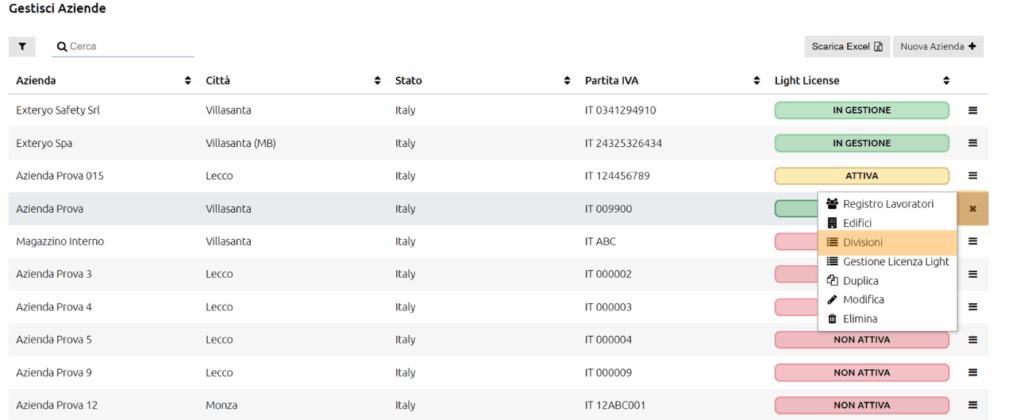
To manage the data of the divisions associated with a specific company, access the company data management menu via the ![]() button and select the DIVISIONS item.
button and select the DIVISIONS item.
Within the function you will see the data of all divisions under your management. You can add a new division by using the ADD DIVISION button and filling in the appropriate form.
By clicking the ![]() button next to the division data you can select the option to edit the data or to delete the worker.
button next to the division data you can select the option to edit the data or to delete the worker.
Please note that if you delete the division, the workers in that division and the PPE associated with them will also be deleted.


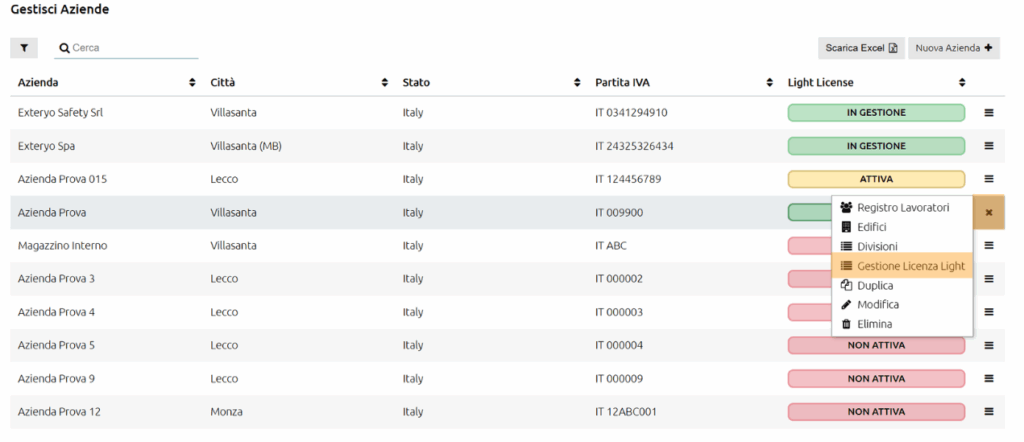
The Light Licence is a function that allows your client companies to access their own dedicated area of the platform free of charge in order to consult and manage online the inspection and repair reports you have carried out.
Activation of the Light Licence is carried out per business division in order to allow several contacts of the client company to view the data if they each manage their own business division.
To activate or manage a light licence, click on the LIGHT LICENCE MANAGEMENT button in the company menu, which can be viewed using the ![]() button.
button.
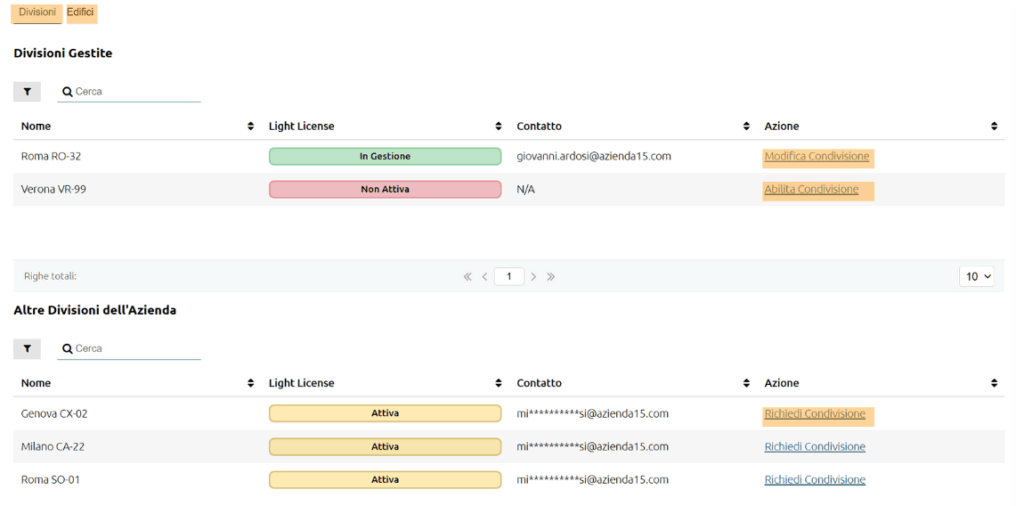
Inside you will have access to a view of the divisions and branches active on that company’s platform and divided into two sections.
In the first section you can view the divisions or branches directly managed by you (i.e. created by you or to which you have been authorised as inspector).
If it is not yet active, you can activate light access to the data of that division/branch via the ENABLE SHARING button.
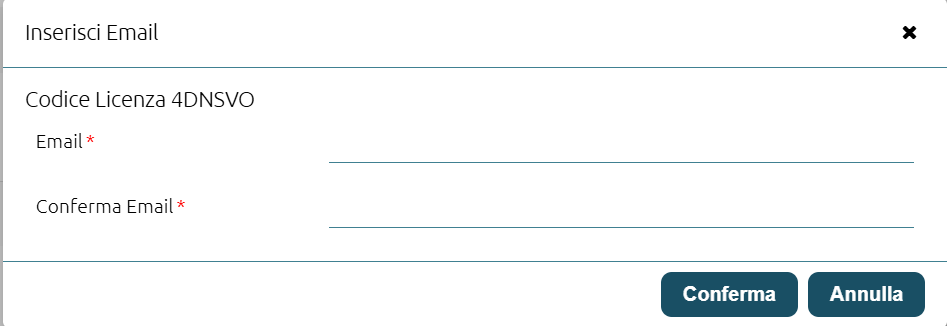
On the page that opens you will be asked to enter and confirm the e-mail address of the contact person of the client company who will be able to access the data via the platform.
If the contact person is not already authorised to manage the light licences of other divisions or branches, he/she will receive an email with instructions on how to access the light licence.
If, on the other hand, the contact person is already active in the management of at least one division or building, he/she will receive an email notifying him/her of the activation of the management of a further division or branch.
The second section of the page contains the other divisions or branches of that company that are not directly managed by your licence as an inspector.
Should you need to manage the data of those specific divisions or branches, you can click the REQUEST SHARING button.
The company contact person will receive an e-mail through which he/she can confirm that you have access to the data of that specific division or branch.