

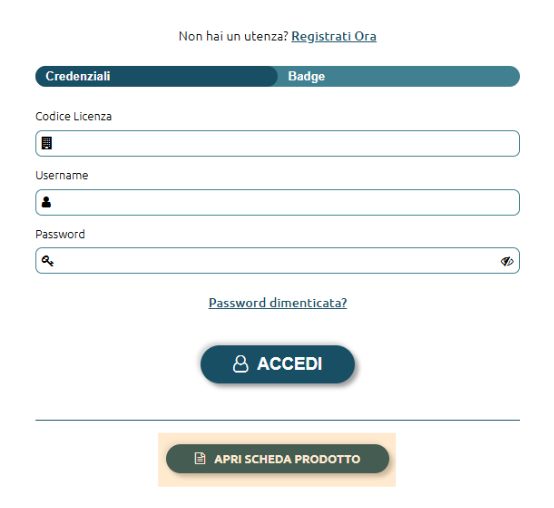

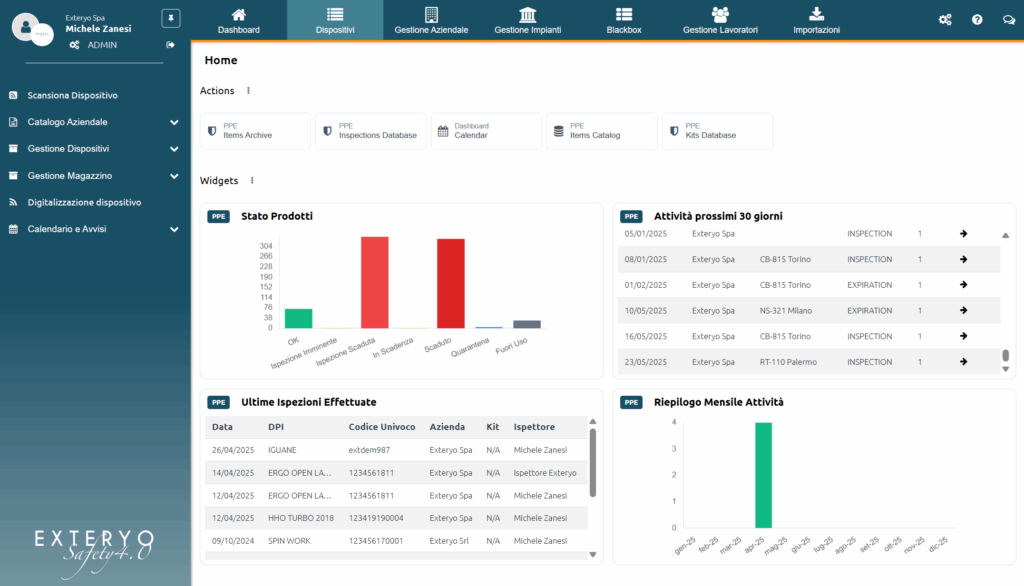
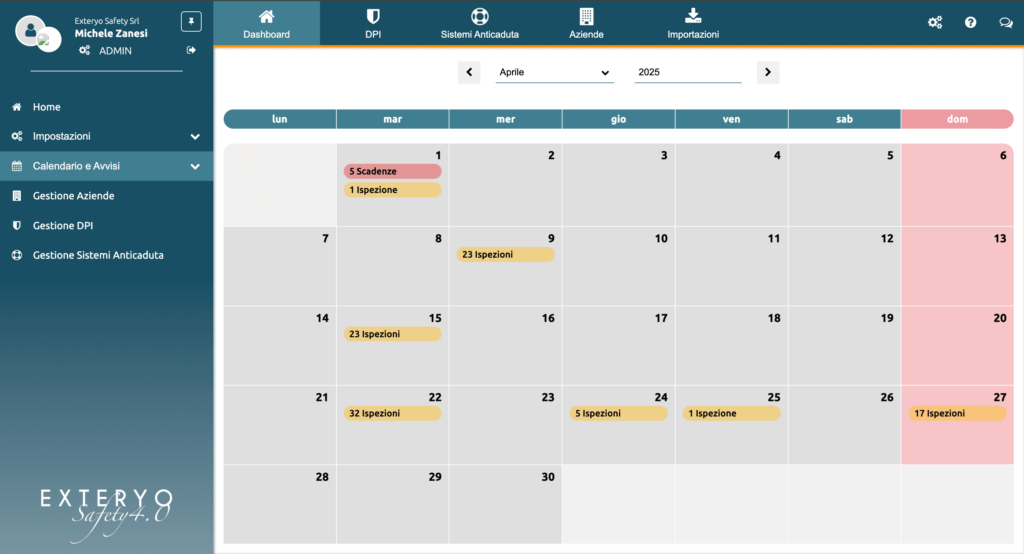
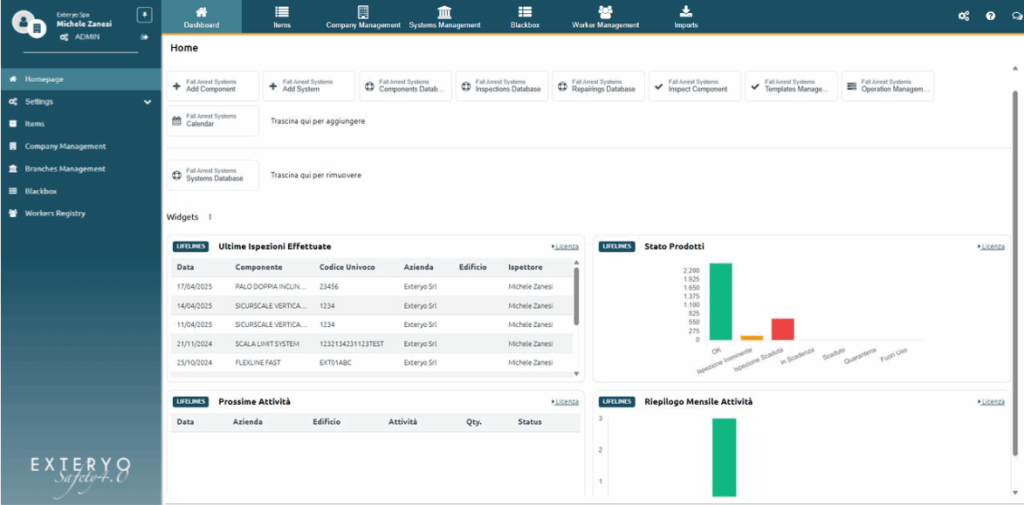
Once logged in, you can access the programme’s DASHBOARD.
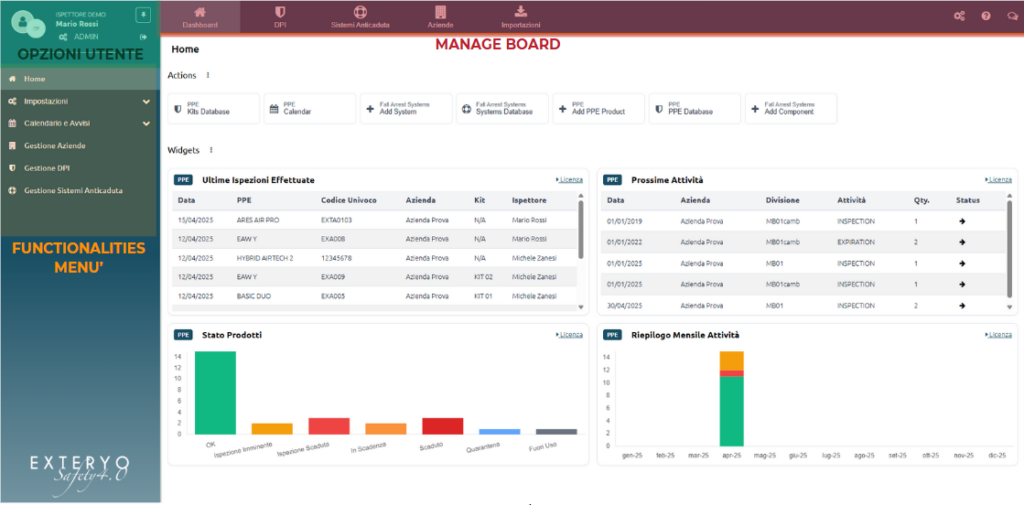
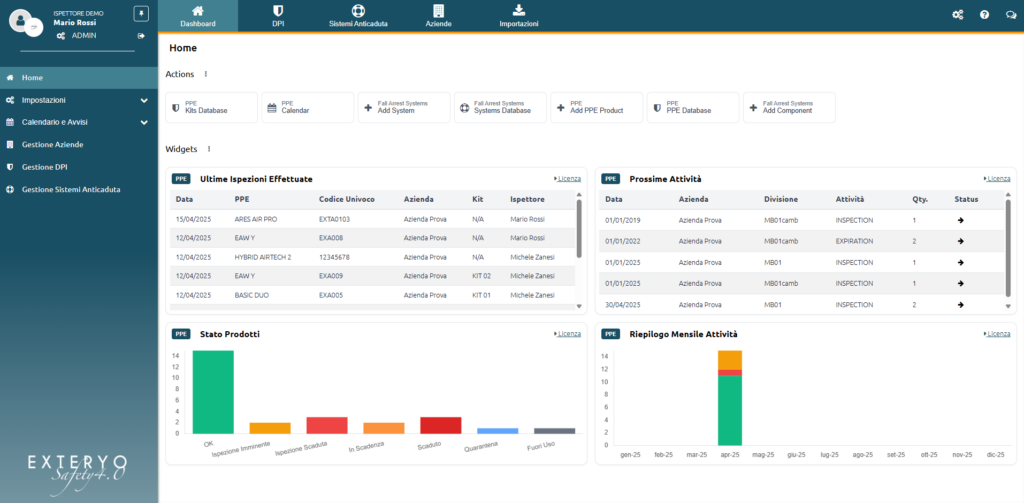
The structure of the platform is organised into two main sections that can be defined as follows
TOP BAR: this is the menu in which the macro-areas of operation of the platform (Dashboard, PPE, Fall Protection Systems, etc.) are presented.
The right-hand side of the manage board also contains the GENERAL SETTINGS, TUTORIAL access and SUPPORT buttons.
SIDE MENU: this is the platform menu where it is possible to select the functions for using the platform.
The functions of the side menu vary depending on the macro-area selected within the manage board.
At the top of the FUNCTIONALITIES MENU’ it is possible to access the USER OPTIONS by clicking the ![]() button positioned below your user name.
button positioned below your user name.
Instead, by clicking the ![]() button it is possible to log out of the platform.
button it is possible to log out of the platform.
Finally, by clicking the ![]() button you can fix or hide the FUNCTIONALITIES MENU’ according to your needs.
button you can fix or hide the FUNCTIONALITIES MENU’ according to your needs.
Actions and Widgets are platform tools that help you improve your experience of using the platform.
These tools are available both within the DASHBOARD section and within the DEVICES and BUILDINGS sections.
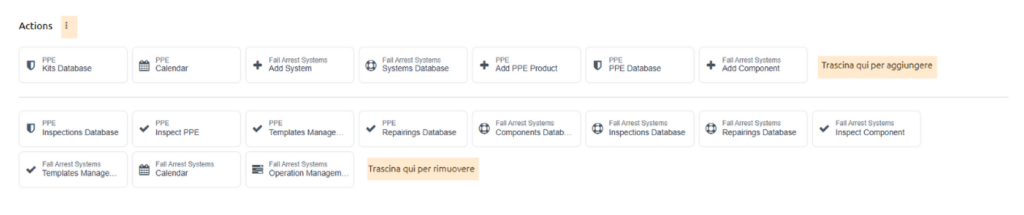
ACTIONS:
ACTIONS are shortcut keys that can be set to speed up access to certain application features.
To select the desired ACTIONS, click on the ![]() button to display all available options.
button to display all available options.
Once you have located the desired option, simply drag it above the separator line.
Similarly, should you wish to remove one of the previously selected options, you can drag it below the separation line.
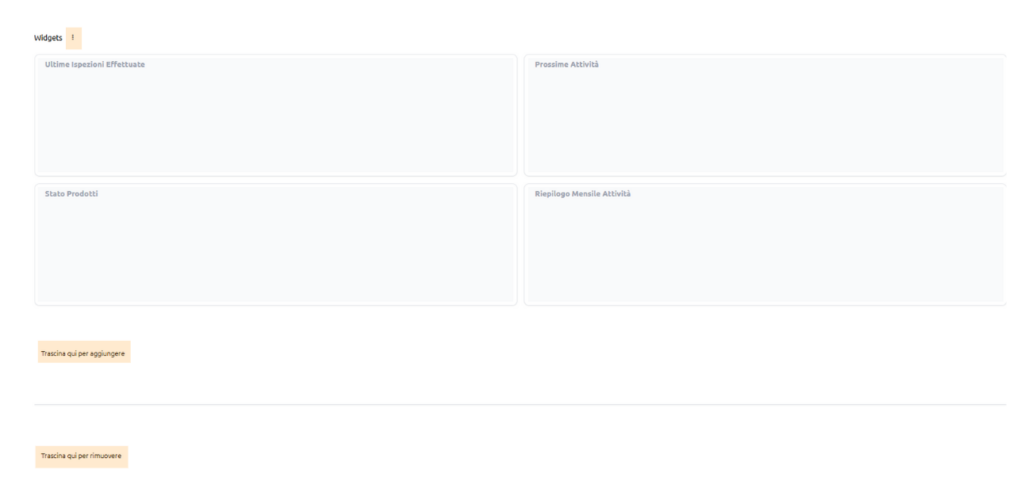
WIDGETS:
WIDGETS are graphs supporting your activity as an INSPECTOR that allow you to view the following types of activity:
– Last Inspections performed
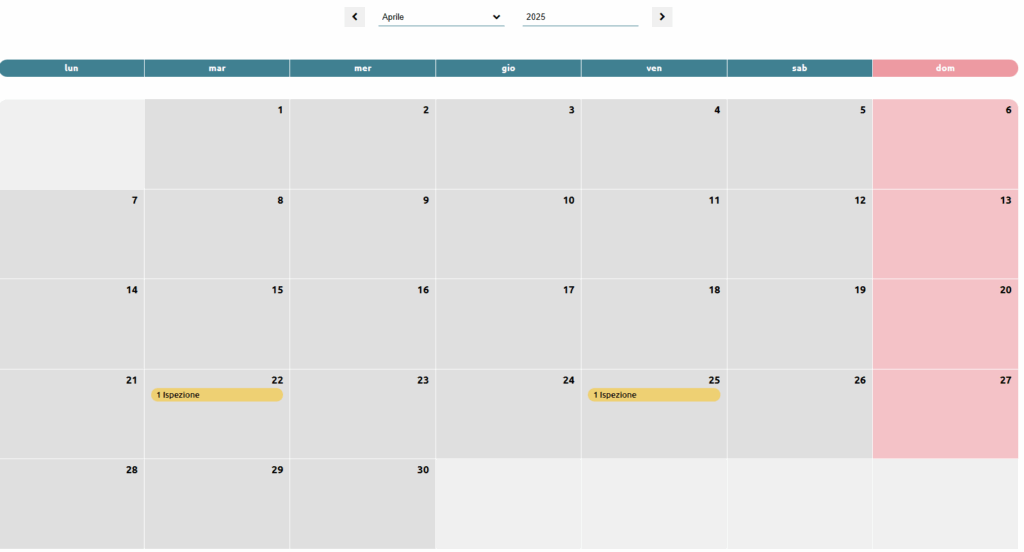
– Upcoming Calendar Activities
– Status of managed products
– Summary of activities performed month by month.
To select the desired WIDGETS, click on the ![]() button to display all available options.
button to display all available options.
Once you have located the desired option, simply drag it above the separation line.
Similarly, should you wish to remove a previously selected option, you can drag it below the separation line.
Within the DASHBOARD section, it is possible to display for each widget the activities related to both PPE and DASHBOARD SYSTEMS.
To change the display from PPE to Fall Protection Systems you can click on the BLUE button to the left of the widget description.
In all Sections you can view data on the general activity of the licence or of the individual inspector.
To change the view from LICENCE to USER, simply click on the appropriate button to the right of the individual WIDGET description.
By clicking on the ![]() button on the right-hand side of the TOP MENU, you can access the GENERAL SETTINGS of your platform.
button on the right-hand side of the TOP MENU, you can access the GENERAL SETTINGS of your platform.
Within this menu there are various options which will allow you to customise and manage your activity with Exteryo Safety 4.0.
Let us see below the different options within the general settings.

In the ROLES AND USERS section, it is first of all possible to set privilege and display rules for definable activities for groups of users and workers within the platform.
This activity can be managed within the ROLES section.
When you activate your licence, you will already have several pre-configured roles within the table to which you can associate different users and workers.
You can change the management options for these roles at any time by clicking on the ![]() button and then the MODIFY ROLE entry.
button and then the MODIFY ROLE entry.
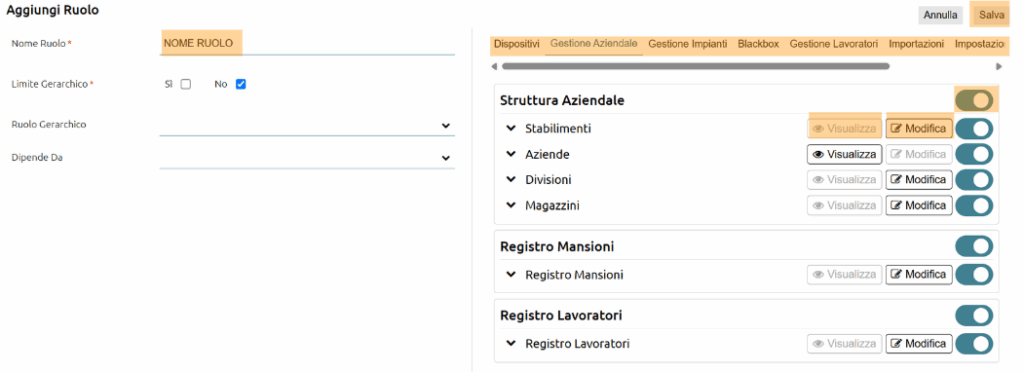
Within the specific functionality you will find the possibility to edit the following information:
NAME: Defines the name given to the specific role
Hierarchical LIMIT: Defines the possibility for users and workers associated with that role to be able to view data on all company divisions (if the option ‘NO’ is indicated) or only divisions belonging to their own hierarchical branch (if the option ‘YES’ is indicated).
GERARCHIC ROLE: Allows that specific role to be associated with a role in the employer chain provided for by the safety regulations (Employer, Delegated Manager, Sub-delegated Manager, Supervisor or Worker).
DEPENDENT ON: Allows a relationship of dependence to be created in relation to another role.
PRIVILEGE MANAGEMENT: On the right-hand side of the page, it is possible for each type of activity to define whether or not a specific privilege is activated. For some functions, it is also possible to set the privilege only as a viewing option or as a data editing option.
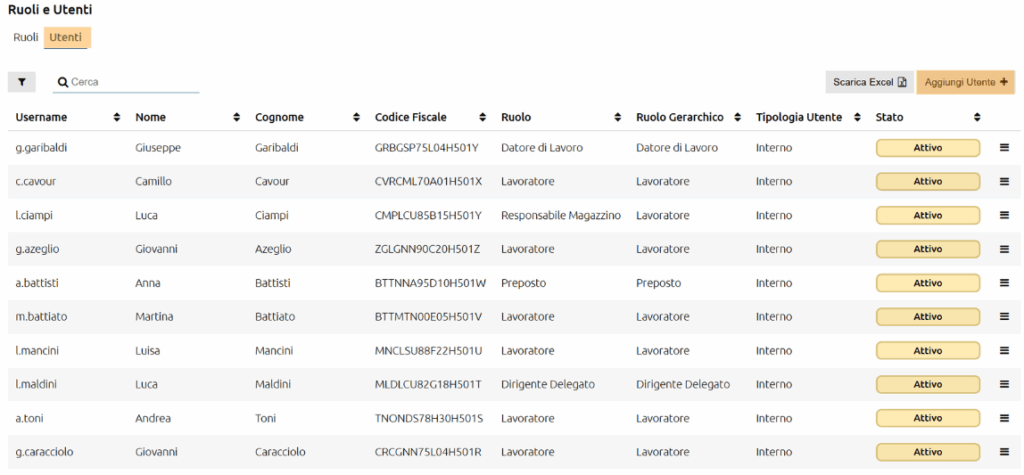
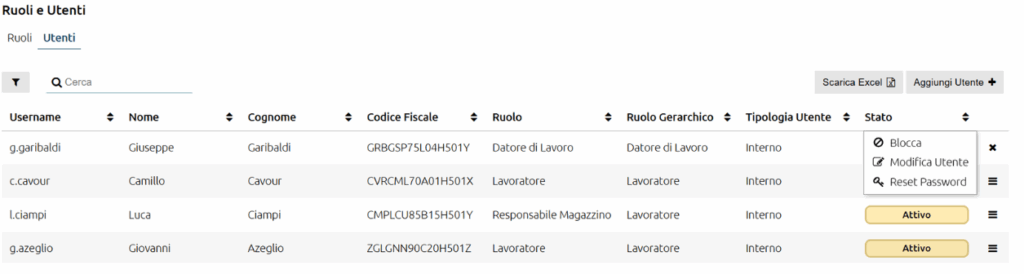
Using the horizontal menu, you can also display the page dedicated to USERS.
All active users within the licence are displayed within this section.
Every worker Registryed within the platform is also automatically converted into a platform user by giving them the appropriate WORKER role.
It is possible for each user/worker within the table to change the associated role at any time as well as to decide whether to activate or block access to the platform.
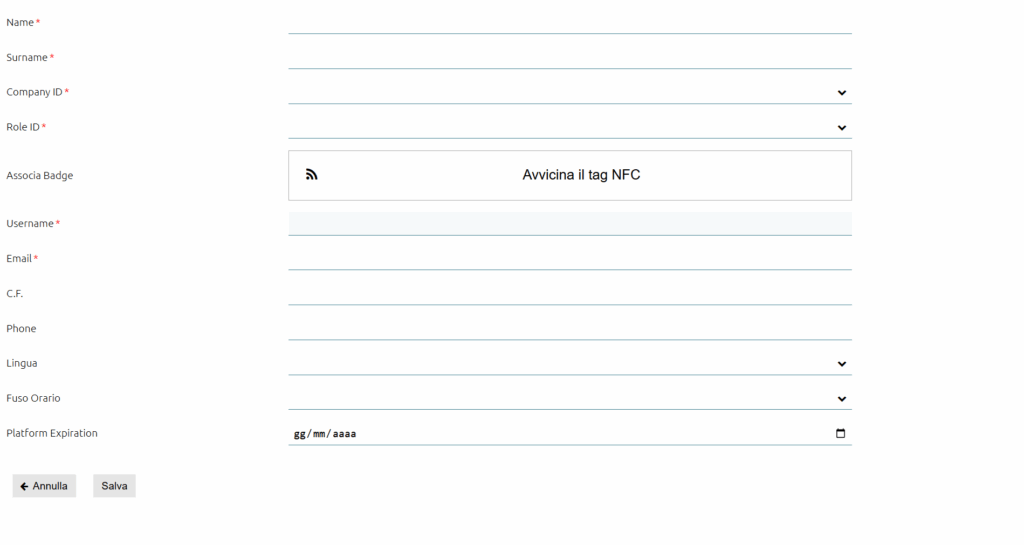
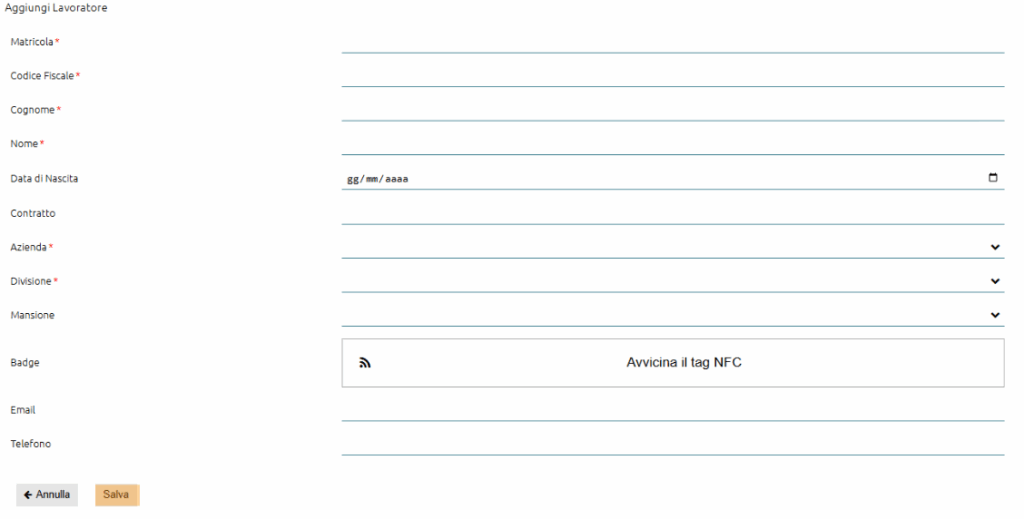
Within the page it is also possible to create new users, assuming access to the platform even for profiles that are not employees of the company.
To create a new user, click the ADD USER button at the top right of the table and fill in the form with the required data.


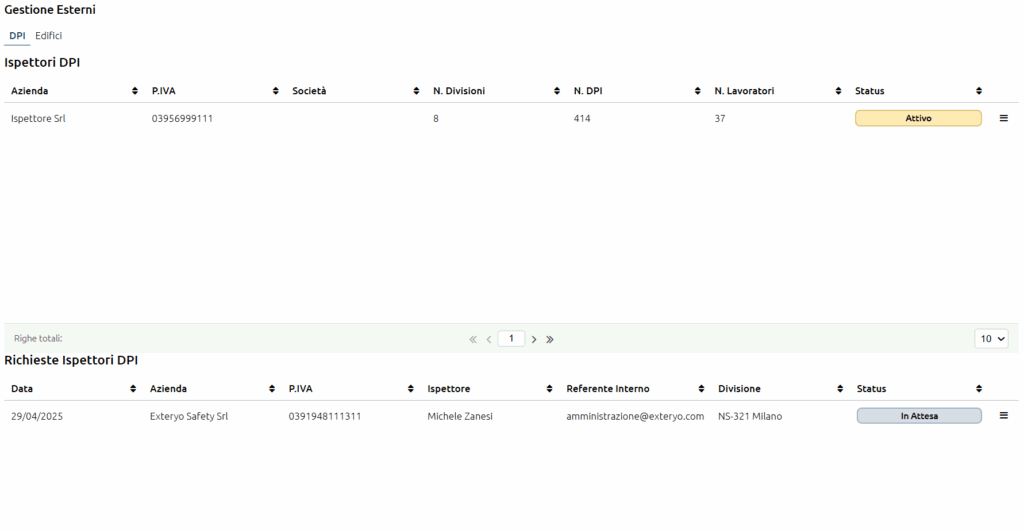
In this option it is possible to manage the synchronisation with any inspectors dedicated to inspecting company PPE or company fall protection systems.
There are two tables for both PPE and fall protection systems, one for licensed inspectors and one for inspectors who applied for a licence for at least one division or building.
When an inspector is synchronised with the company, data on devices, workers or buildings and components are shared within the inspector’s licence.
By clicking the button ![]() at the end of the row of one of the active inspectors, it is possible to manage the sharing mode, i.e. to define the DIVISIONS (or buildings) for which the inspector is authorised to manage the inspection activities.
at the end of the row of one of the active inspectors, it is possible to manage the sharing mode, i.e. to define the DIVISIONS (or buildings) for which the inspector is authorised to manage the inspection activities.


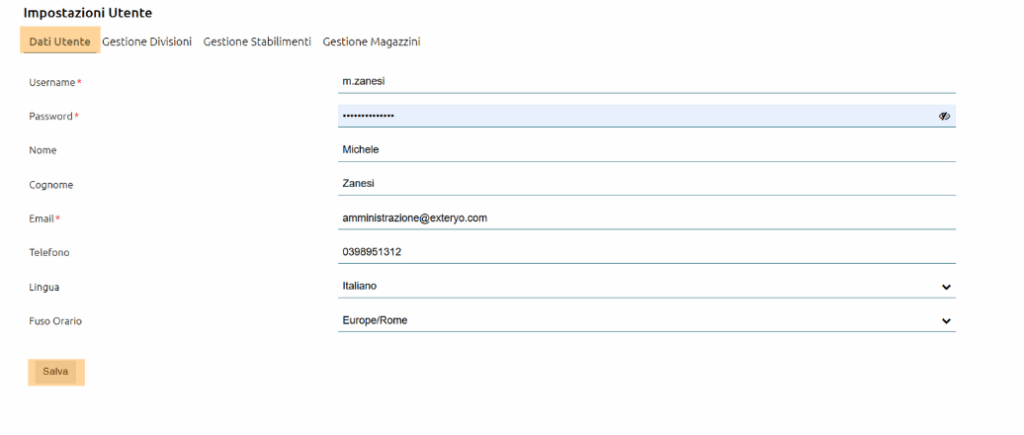
The USER OPTIONS function allows you to customise your specific user data.
To access the function, click the ![]() button at the top of the SIDE MENU.
button at the top of the SIDE MENU.
Within the USER DATA you can change some of your personal details such as your password, time zone or the language in which you use the platform.
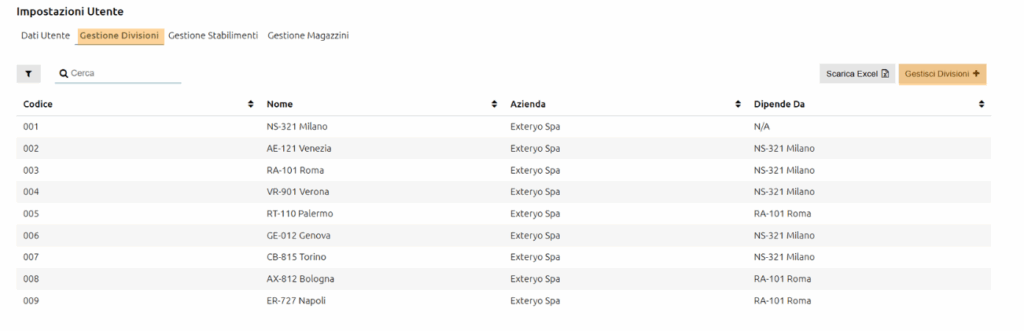
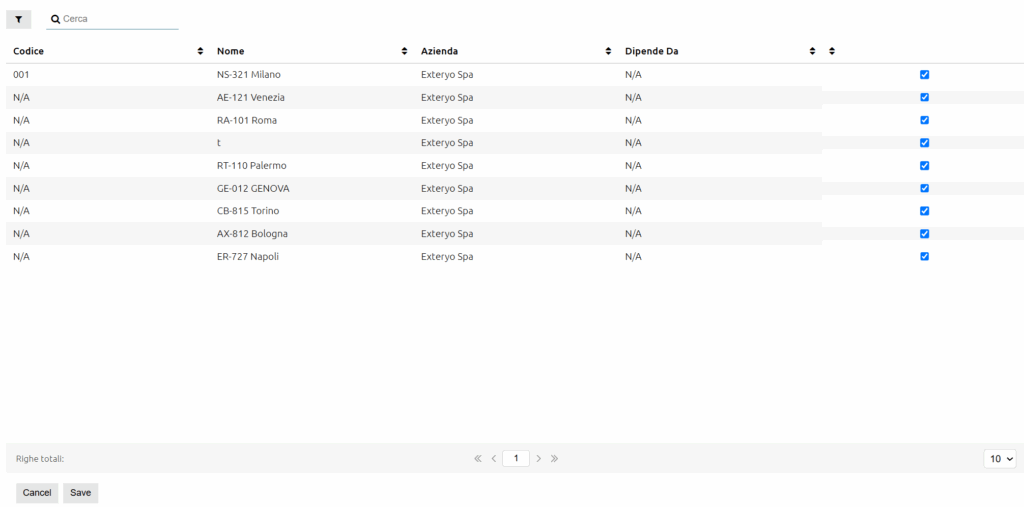
In the DIVISION MANAGEMENT section you can define the divisions (and thus the respective workers and devices) you wish to have under your management.
You can add or remove divisions by clicking on the DIVISION MANAGEMENT button and selecting the flag to the right of each division.
In this table you will only see divisions available to you according to the role held and the hierarchical limit set.
To learn how to manage the hierarchical limits of divisions, please read section 4.2 ROLES AND USERS.
In the ESTABLISHMENT MANAGEMENT section, you can define the establishments (and thus the relevant facilities and fall protection systems) that you wish to have under your management.
You can add or remove establishments by clicking on the ESTABLISHMENT MANAGEMENT button and selecting the flag to the right of each establishment.
Only those establishments available to you will be shown in this table according to the role held and the hierarchical limit set.
In the STORE MANAGEMENT section, you can define which warehouses you wish to have under your management.
You can add or remove warehouses by clicking on the WAREHOUSE MANAGEMENT button and selecting or not selecting the flag to the right of each individual warehouse.
This table will only show the warehouses available to you according to the role you hold and the hierarchical limit set.
You can access the online version of this tutorial directly from the platform by clicking the ![]() button on the right-hand side of the TOP BAR.
button on the right-hand side of the TOP BAR.


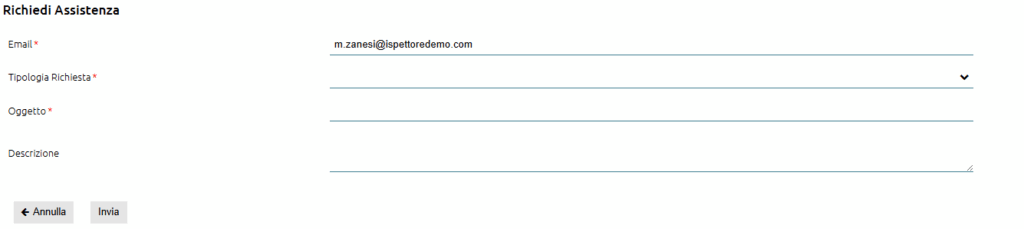
Should you not find the appropriate answers within this tutorial, you can always open a support ticket within the specific function.
To access the function, click the ![]() button on the right-hand side of the TOP BAR.
button on the right-hand side of the TOP BAR.
Within the window, fill in the form indicating the e-mail address on which you would like to receive a reply to your request, the type of request (technical or commercial) and then the subject and description of the request.
Our Customer Care service will receive and handle your request as soon as possible. Please note that the service is active from Monday to Friday from 9:00 a.m. to 6:00 p.m. (Central European Time- CET) and responds to requests within 4 hours of receipt.

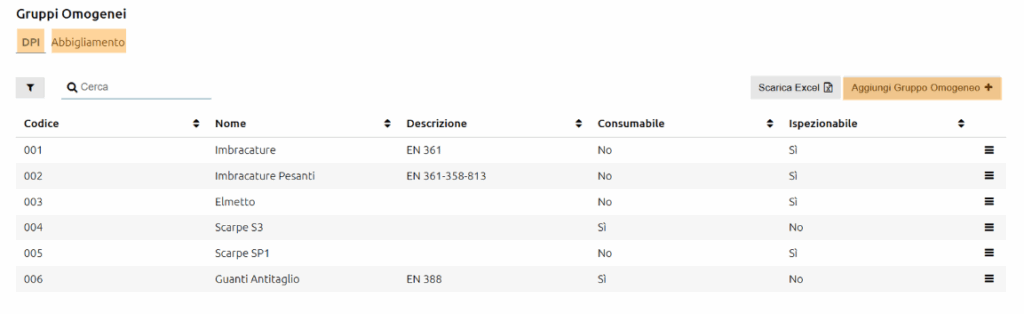
Within this function, it is possible to generate company catalogues dedicated to PPE, workwear and any types of KIT managed by the company.
Let’s take a detailed look at the three different types of catalogue and their options.
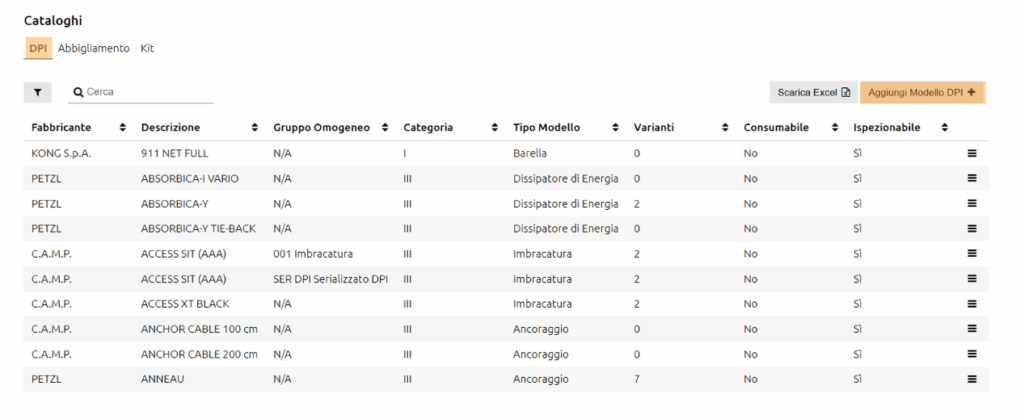
PPE CATALOGUE
This allows you to create and manage information on the different PPE models managed in your company.
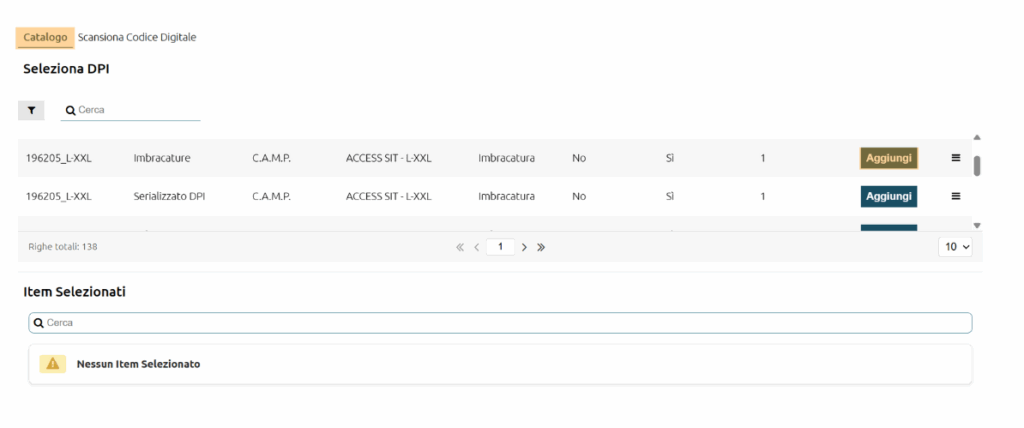
To add a new PPE model, click on the ADD PPE MODEL button at the top of the table. The page that opens will show the database of PPE models already pre-provided by the platform, whose sheets have been entered directly by the PPE manufacturers.
If the model you need is among those in this database, simply click the ![]() button and select ADD.
button and select ADD.
Once this action has been taken, the tab of the model you wish to add will open, to which you can possibly change the name, enter a homogeneous reference group and any MATERIAL CODES (internal company code) for each specific variant of that model.
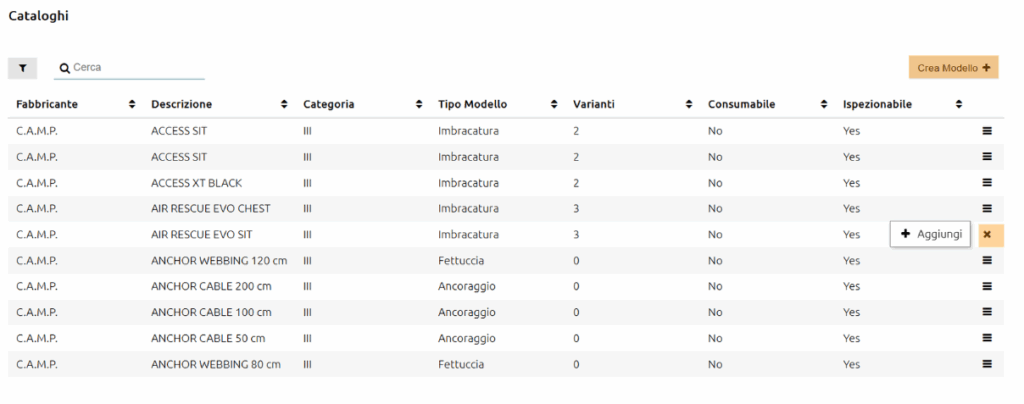
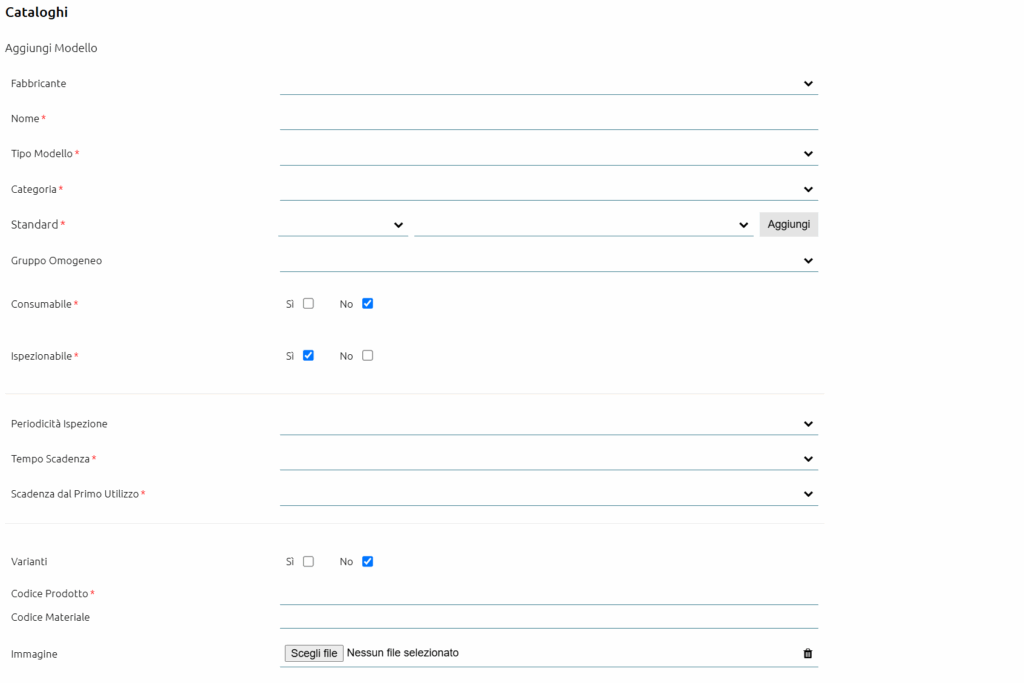
If, on the other hand, the PPE model to be added to the catalogue does not exist in our general database, you can create it by clicking on the CREATE TEMPLATE button.
This will open the form for entering the data required to create the PPE model.
WORKWEAR CATALOGUE
It allows you to create and manage information on the different garment models managed in your company.
To add a new garment model, click on the ADD WORKWEAR button at the top right of the table.
This will open the form for entering the data required to create the garment model.
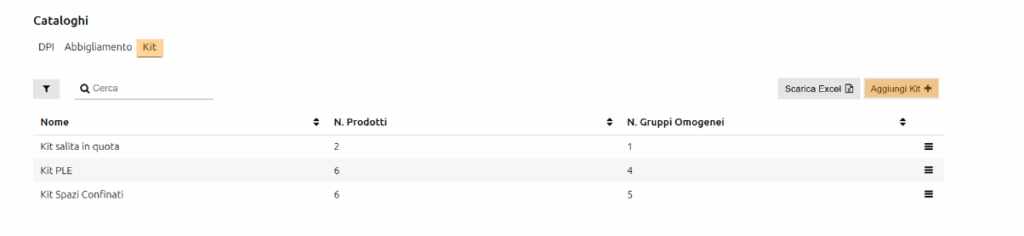
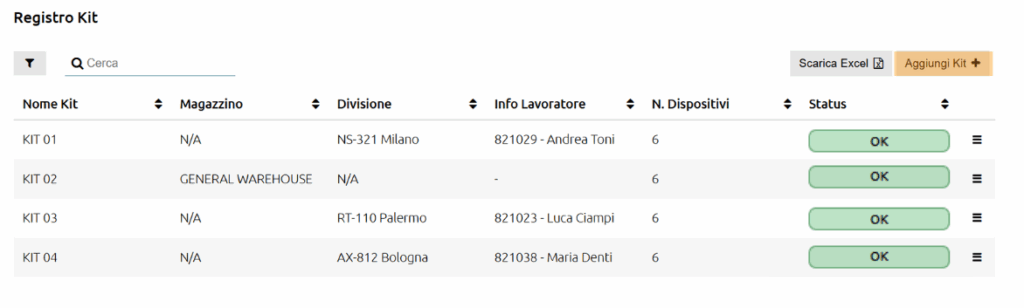
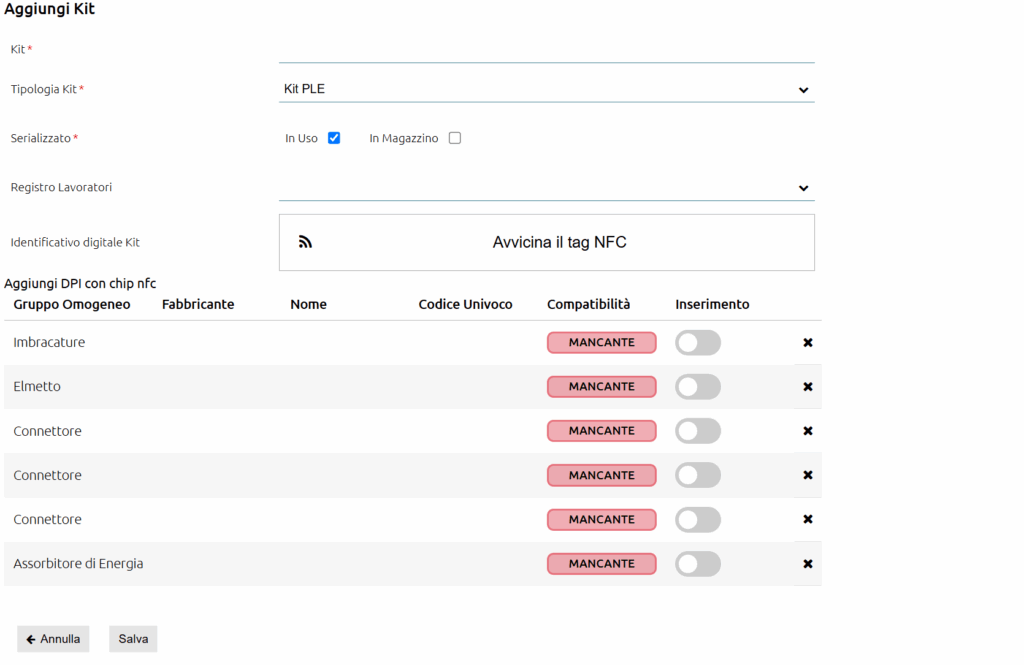
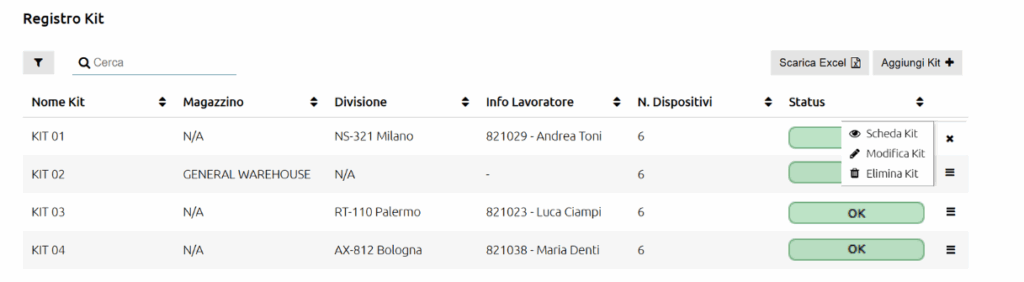
KIT CATALOGUE
Allows the creation of organised KIT templates used within the company.
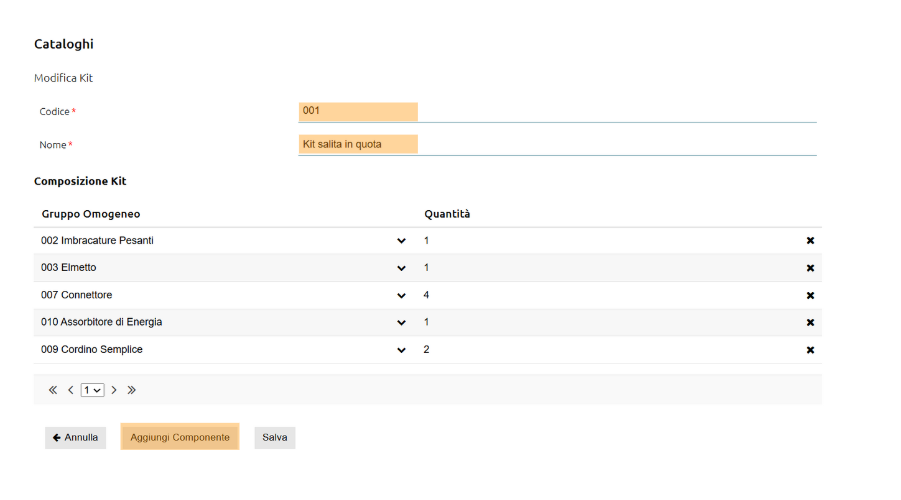
To add a new KIT model, click on the ADD KIT button and enter a specific coding and the name of the relevant model.
It is then possible to compose the kit by adding the different components using the ADD COMPONENT button.
For each component inserted, the specific uniform code and the relative quantities must be indicated.
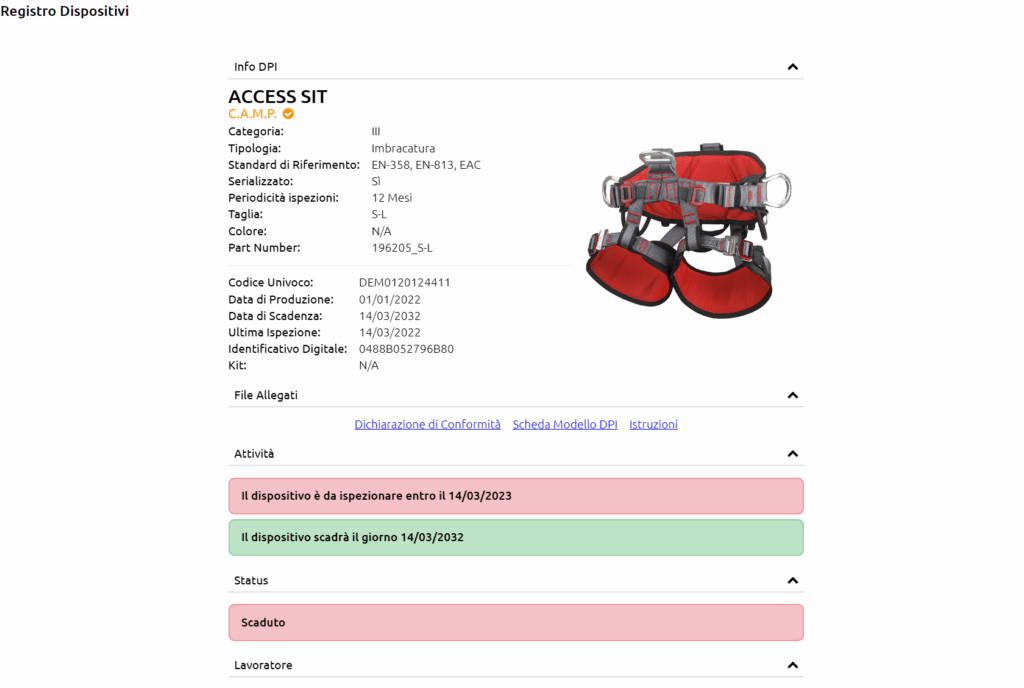
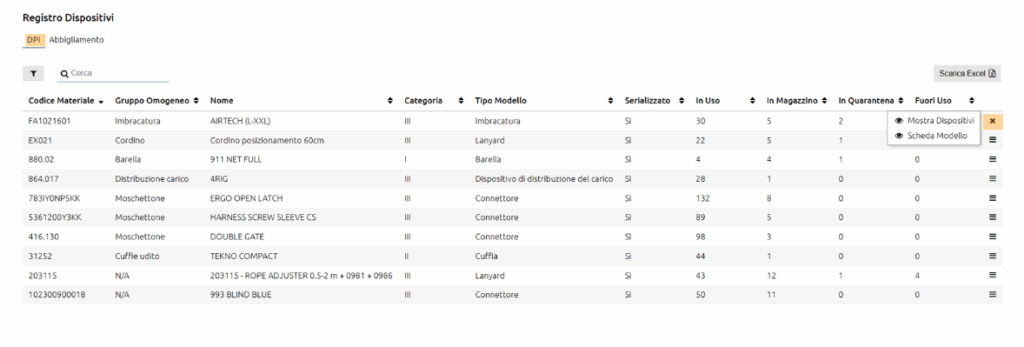
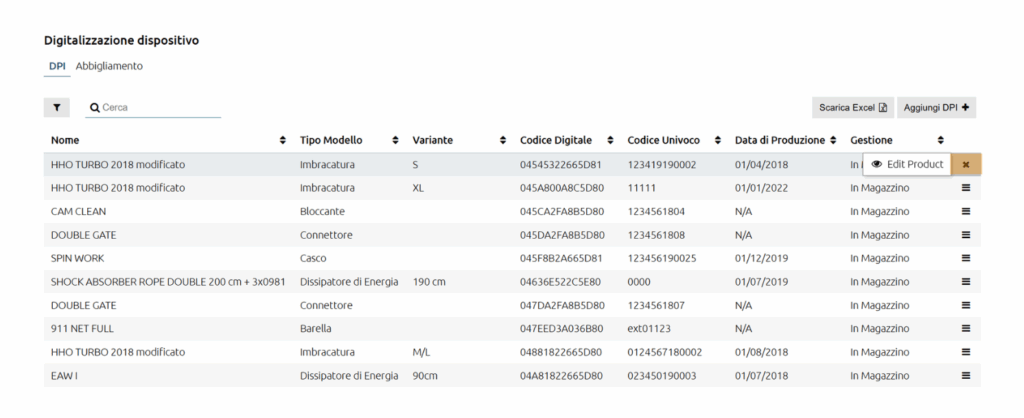
This function, found within the ITEMS MANAGEMENT menu, allows the management of all company devices, divided into PPE and workwear, to be kept under control.
Once a catalogue model has been generated, it will also be displayed within the Item Registry with an indication of the status of each individual device, diversified between “In use”, “in Warehouse”, “in quarantine” or “Out of use”.
By clicking on the ![]() button placed at the end of the line of a specific model and then clicking on the SHOW ITEMS button, it is possible to access precise information on each individual device in use and diversified between the various statuses.
button placed at the end of the line of a specific model and then clicking on the SHOW ITEMS button, it is possible to access precise information on each individual device in use and diversified between the various statuses.

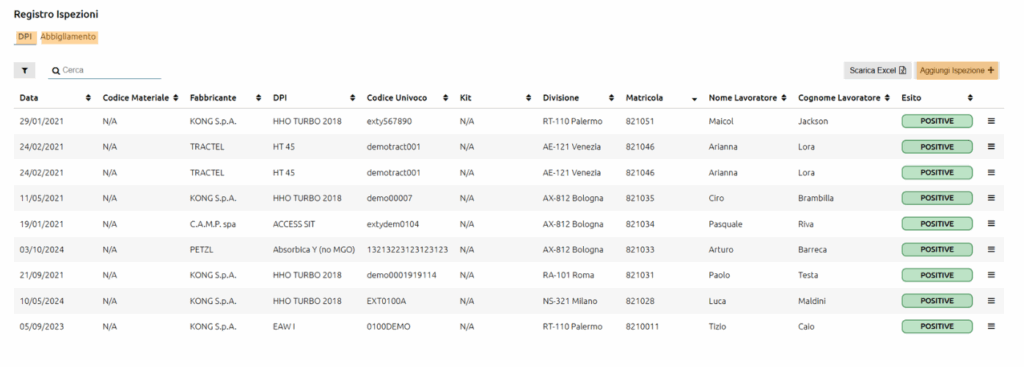
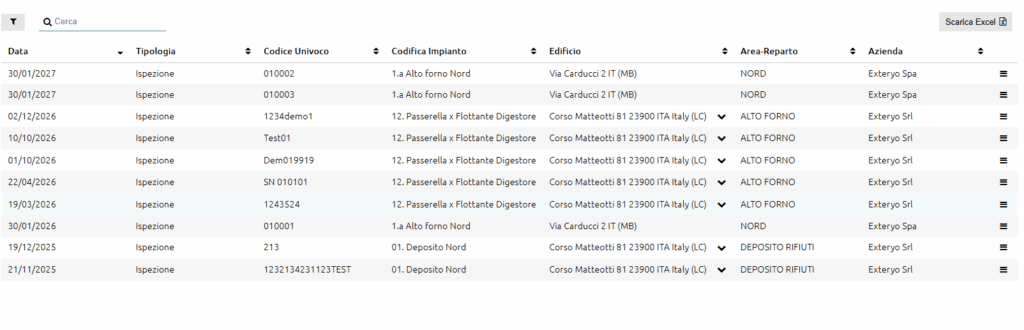
Inspections of company devices will be displayed in this table.
Inspections can be managed by an external inspector using his dedicated Exteryo Safety 4.0 licence.
By clicking on the ![]() button, it will be possible to view the relevant inspection sheet or download a PDF of it.
button, it will be possible to view the relevant inspection sheet or download a PDF of it.
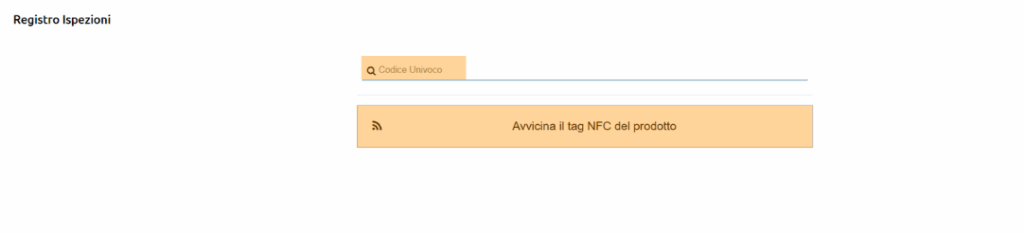
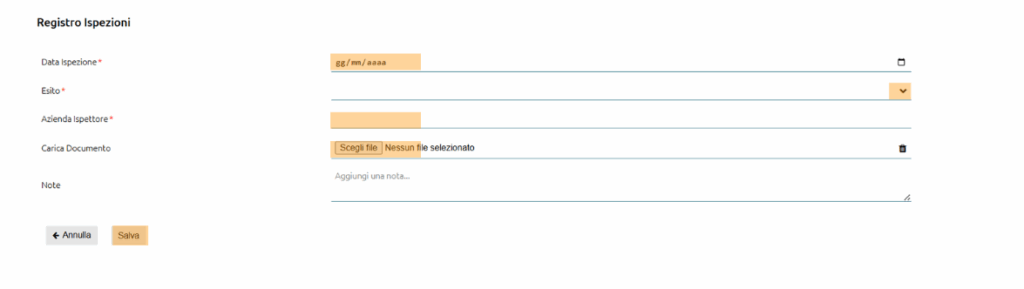
It is also possible to add repairs manually by clicking the ADD INSPECTION button and entering the unique product code (or reading the digital identifier).
Then simply enter the data requested in the form and attach the inspection document.
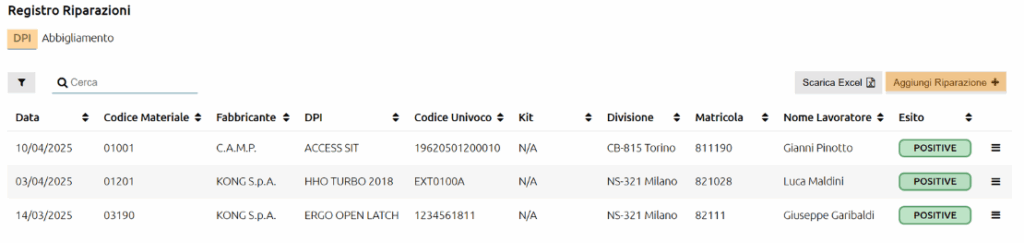
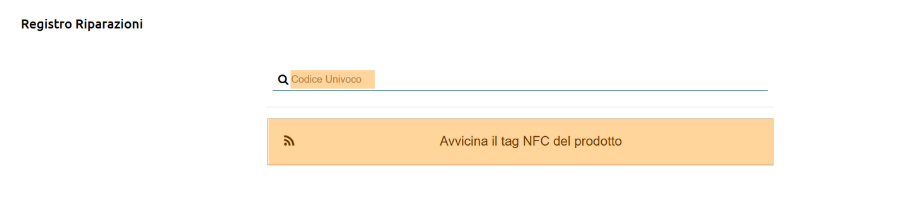
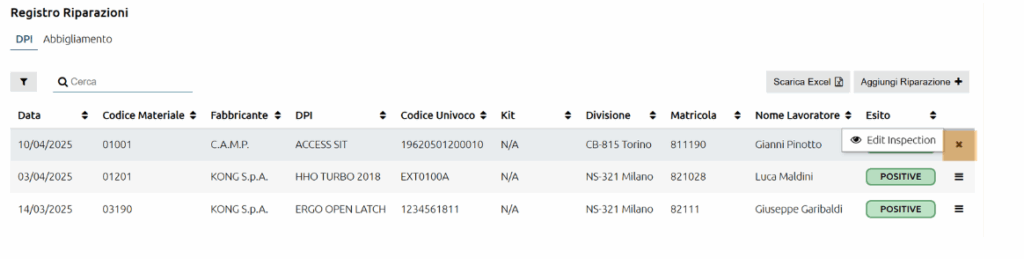
In this table, repairs to company devices can be viewed.
Repairs can be managed by an external inspector via his dedicated Exteryo Safety 4.0 licence.
By clicking on the ![]() button, it will be possible to view the relevant repair record or download a PDF of it.
button, it will be possible to view the relevant repair record or download a PDF of it.
It is also possible to add repairs manually by clicking the ADD REPAIR button and entering the unique product code (or reading the digital identifier).
The system will only allow the management of those devices that have received a result TO BE REPAIRED in a previous inspection carried out.
Then simply enter the data requested in the form and attach the inspection document.


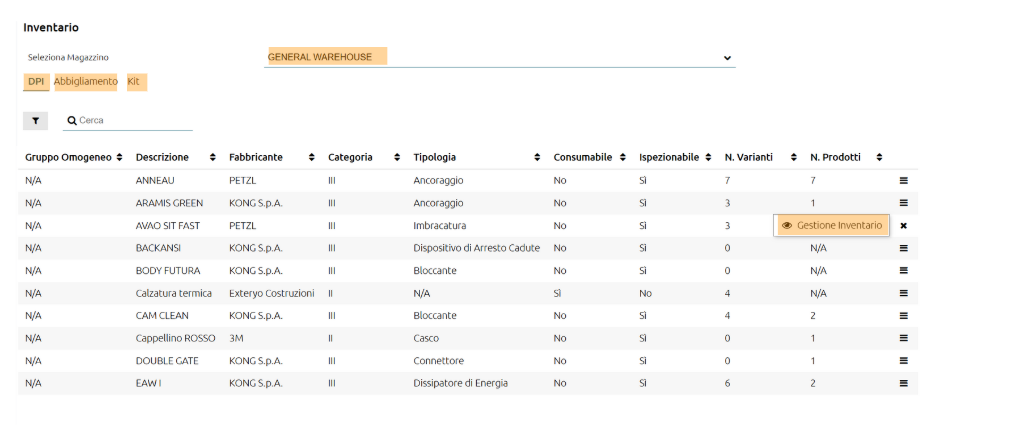
The INVENTORY function, which can be found within the WAREHOUSE MANAGEMENT menu, is only available if warehouse management has been enabled in PREFERENCES.
With this function it is possible to manage the stock quantities of the different device models within the individual warehouses.
By selecting the warehouse, it is first of all possible to view the quantities present for each individual device model.
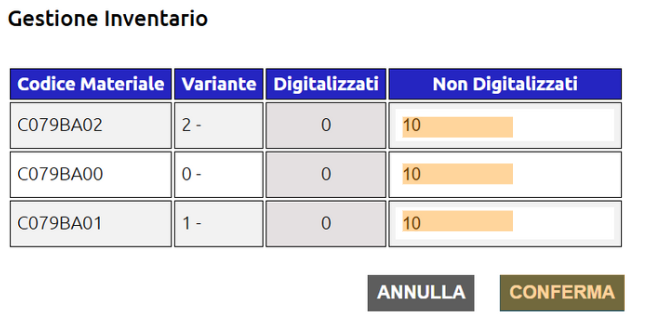
By clicking the ![]() button at the end of the line of a specific model, and then selecting MANAGE INVENTORY, it is possible to access the management of quantities for each variant.
button at the end of the line of a specific model, and then selecting MANAGE INVENTORY, it is possible to access the management of quantities for each variant.
To increase or decrease the stock quantity of a specific variant, simply change the number in the ‘NON-DIGITALISED’ column and then click the CONFIRM button.
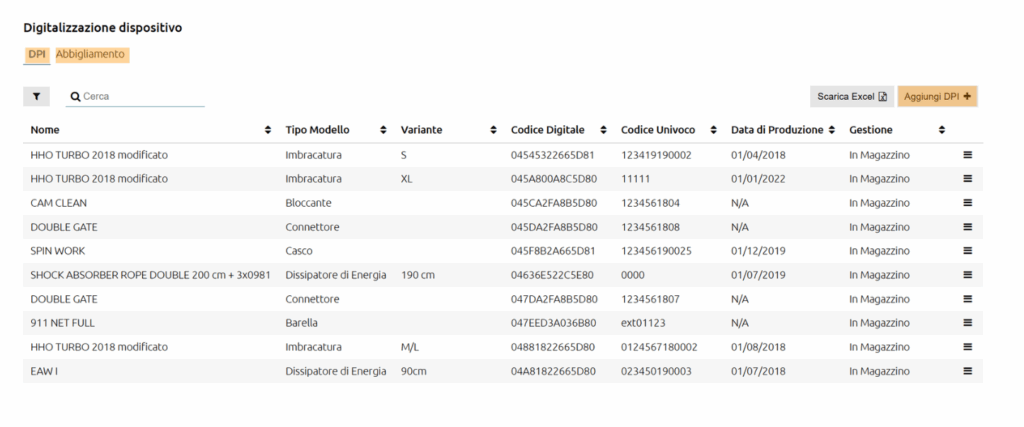
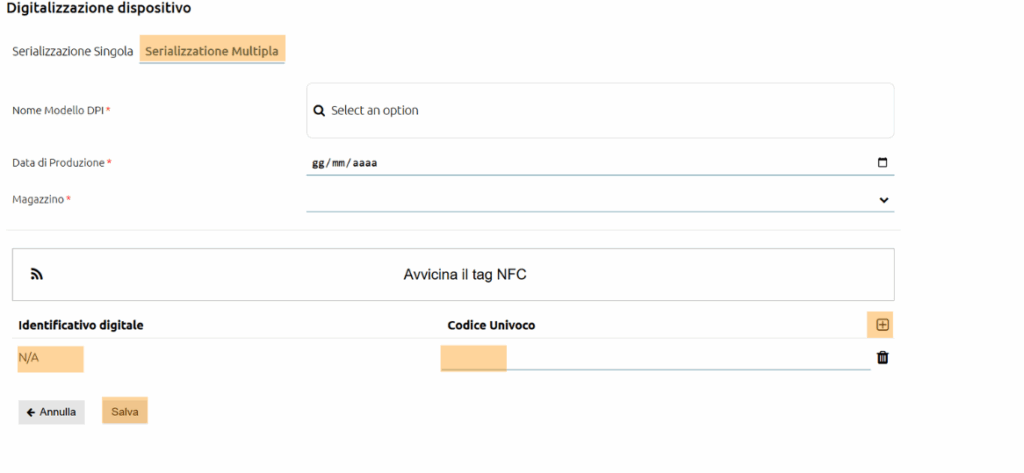
This function makes it possible to manage all serialised devices managed by the company, by modifying any management data, such as model, production date, unique code, digital identifier or usage data.
This function can also be used to manage the digitization of new items in the company.
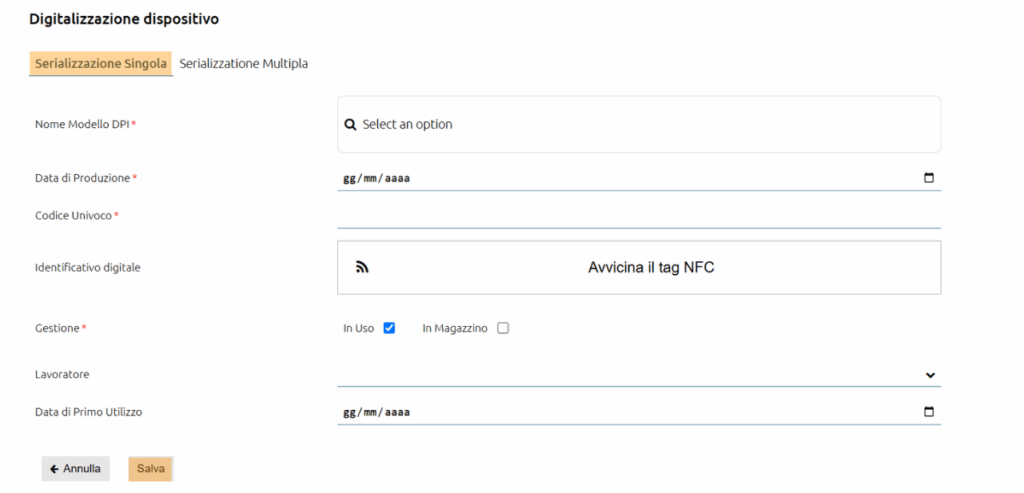
To carry out this activity, click on the button ADD PPE (or ADD WORKEWAR) and then choose between the option SINGLE SERIALIZATION or MULTIPLE SERIALIZATION.
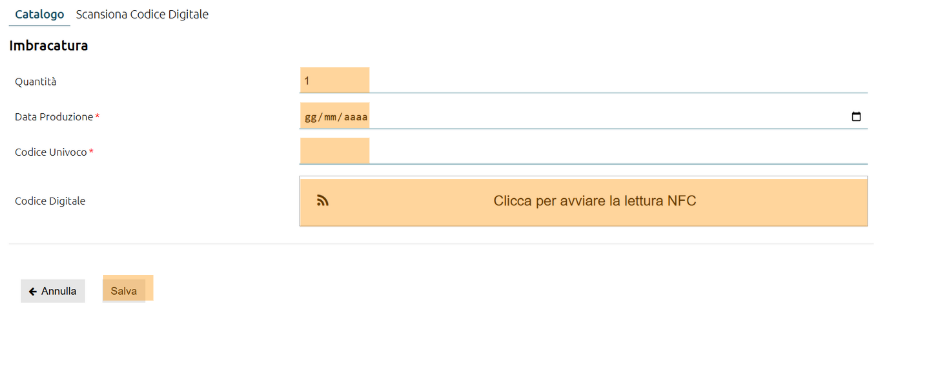
In the case of Single Serialization, fill in the present form with the required data and finally click on the SAVE button to add it to the company management.
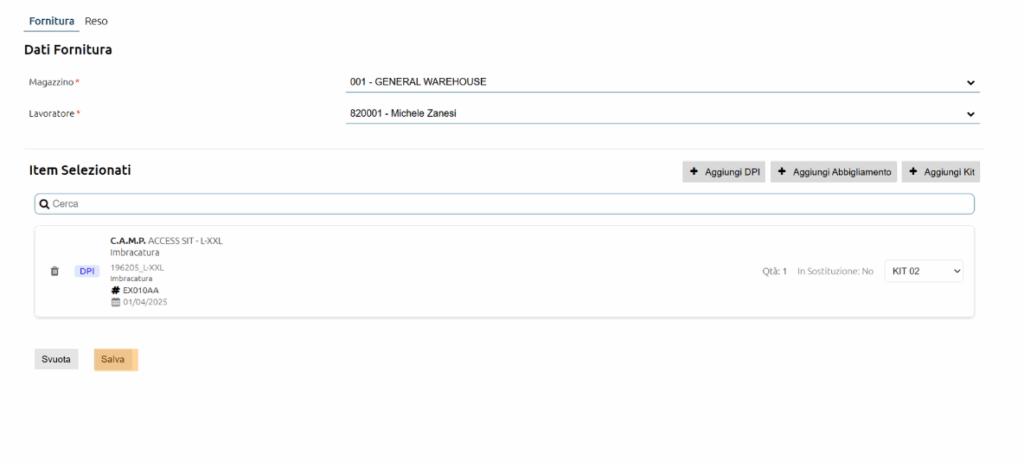
In the case of multiple serialization, first select the PPE model, production date and management warehouse (if warehouse management is enabled in PREFERENCES).
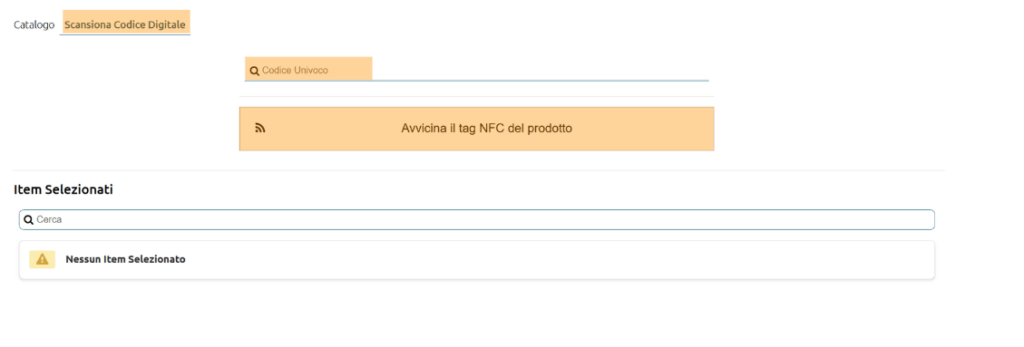
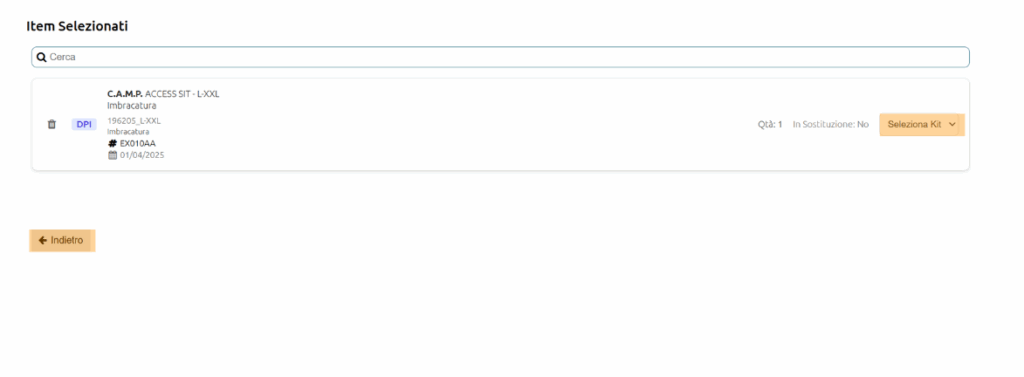
Then read the digital identifiers of the products to add them to the list and enter their unique codes.
If products do not have a digital identifier, they can be added manually by clicking the ![]() button and then adding the relevant unique code.
button and then adding the relevant unique code.
Once the entry is complete, click on SAVE to add the devices to the company management.
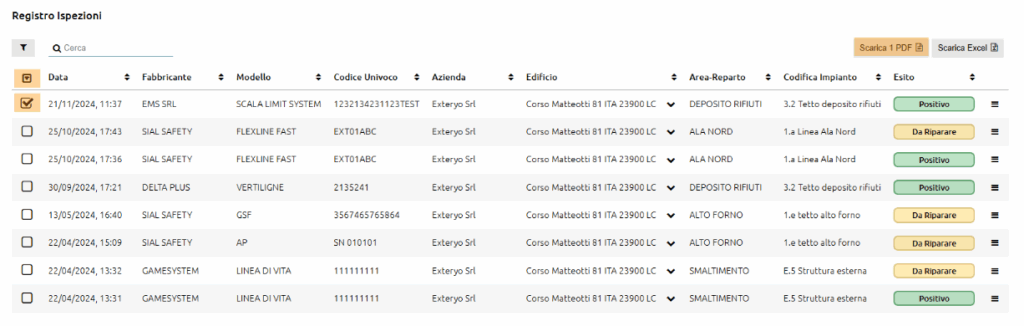

Within this table, inspections of company system components will be displayed.
Inspections can be managed by an external inspector using his dedicated Exteryo Safety 4.0 licence.
By clicking the ![]() button, it will be possible to view the relevant inspection sheet or to download a PDF of it.
button, it will be possible to view the relevant inspection sheet or to download a PDF of it.
It is also possible to add inspections manually by clicking the ADD INSPECTION button and entering the unique product code (or reading the digital identifier).
Then simply enter the required data from the form and attach the inspection document.
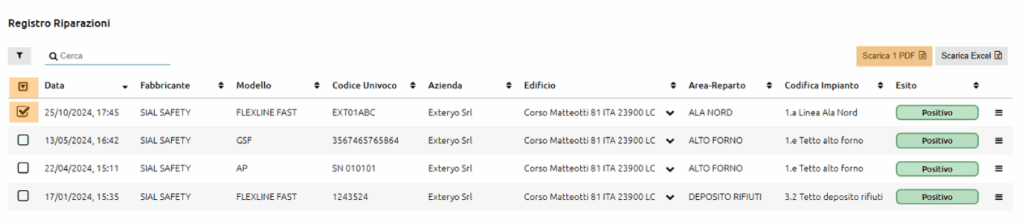
In this table, repairs to company system components can be displayed.
Repairs can be managed by an external inspector using his dedicated Exteryo Safety 4.0 licence.
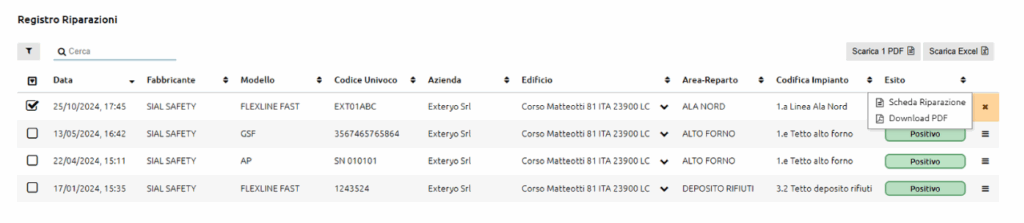
By clicking on the ![]() button, it will be possible to view the respective repair record or download a PDF of it.
button, it will be possible to view the respective repair record or download a PDF of it.
It is also possible to add repairs manually by clicking the ADD REPAIR button and entering the unique product code (or reading the digital identifier).
The system will only allow the management of those devices that have received a result TO BE REPAIRED in a previous inspection.
Then simply enter the data requested in the form and attach the inspection document.


Within the section COMPANY STRUCTURE you can manage all the data relating to the organisation of your company.
In detail, it is possible to add data on these facilities:
COMPANIES: In this section, several companies can be added for which security management is centralised. This option is especially useful for large companies with a diversified company structure.
BRANCHES: In this section it is possible to add and manage data relating to company branches/establishments. Once a new branch has been created, by clicking the ![]() button at the end of the relevant line, it is possible to select the option ADD PLANIMETERS, to add up to 3 planimetries of the branch, which can be accessed by platform users (internal or external inspectors) if required.
button at the end of the relevant line, it is possible to select the option ADD PLANIMETERS, to add up to 3 planimetries of the branch, which can be accessed by platform users (internal or external inspectors) if required.
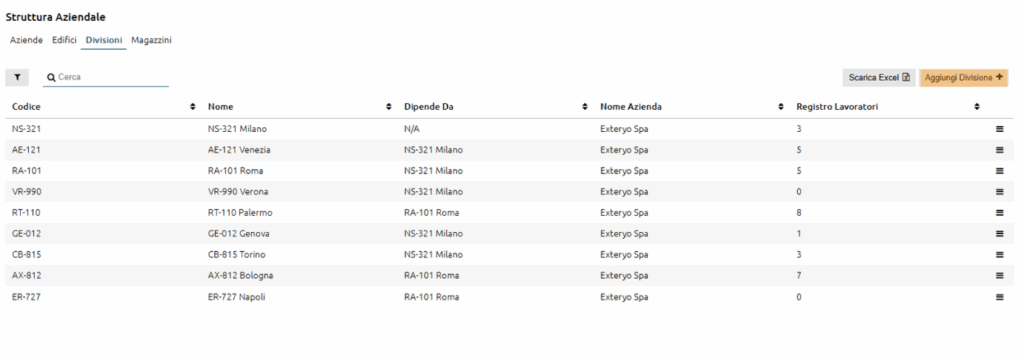
DIVISIONS: In this section, it is possible to add the various company divisions (or cost centres) and associate them with their controlling company.
In addition, it is possible to create hierarchical dependency relationships, which are essential for the display of specific information by the various users, according to their assigned role.
WAREHOUSES: In this section it is possible to add the various company warehouses authorised to supply/receive security devices. It is also possible to associate a dedicated factory to each warehouse.
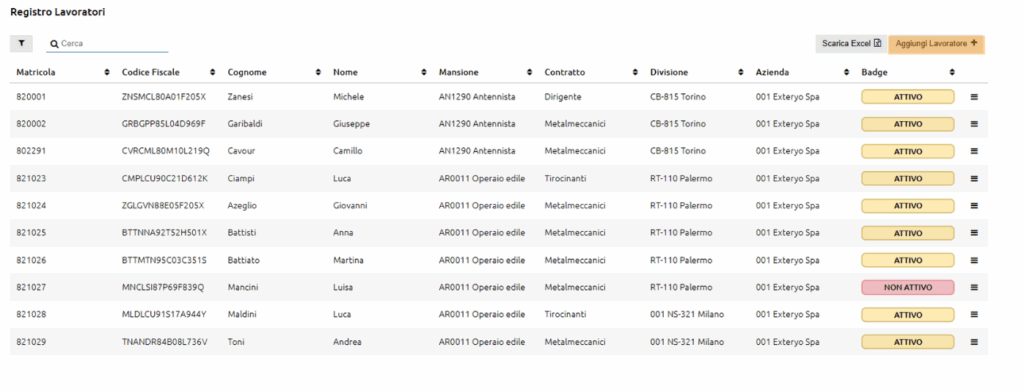
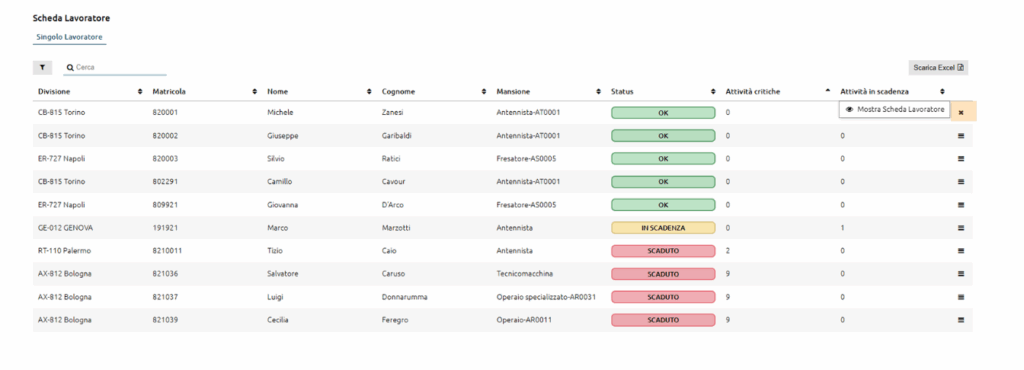
The WORKER MANAGEMENT section contains the functions that enable the direct control and management of the worker’s safety status and related management and control activities.
The first of these features is the WORKER SHEET, which is the section where the safety statuses and related information of both individual workers and company divisions are highlighted.
With regard to the SINGLE WORKER, the table provides a direct overview of the worker’s security status, highlighted with a specific colour within the STATUS column.
If there are devices in the worker’s possession with an expiry date that has already passed the life cycle or inspection date, the status will be highlighted in red with the word EXPIRED and the exact number of indicated expired products in his possession will appear in the EXPIRED column.
If, on the other hand, the worker is in possession of devices that are due to expire within the next month, the status will be highlighted in yellow with the word EXPIRING, and the related column EXPIRING will show the count of devices that have a scheduled activity within 30 days.
By clicking on the ![]() button at the end of the worker’s row, the option SHOW WORKER SHEET can be selected, in order to obtain a more detailed overview of the safety status of the specific worker.
button at the end of the worker’s row, the option SHOW WORKER SHEET can be selected, in order to obtain a more detailed overview of the safety status of the specific worker.
The individual worker sheet consists of a first general section in which the personal and business management data of the individual worker are indicated and, further down, the details of all critical and expiring activities relating to the worker.
In the PPE and WORKWEAR section, on the other hand, the individual devices in the worker’s possession are highlighted, with a specific indication of first use and expiry date, as well as health status.
With regard to the DIVISION, the table behaves in the same manner as displayed for the worker, but offering a complete overview of the notices for all workers belonging to that specific division.
This activity is essential in order to have complete control of all workers within a single page and to be able to intervene promptly to solve any problems.
Again, by clicking the button and selecting SHOW DIVISION DETAILS, it is possible to have a detailed overview of the general information of the division, but also of the PPE and workwear in the possession of the workers belonging to that specific division.
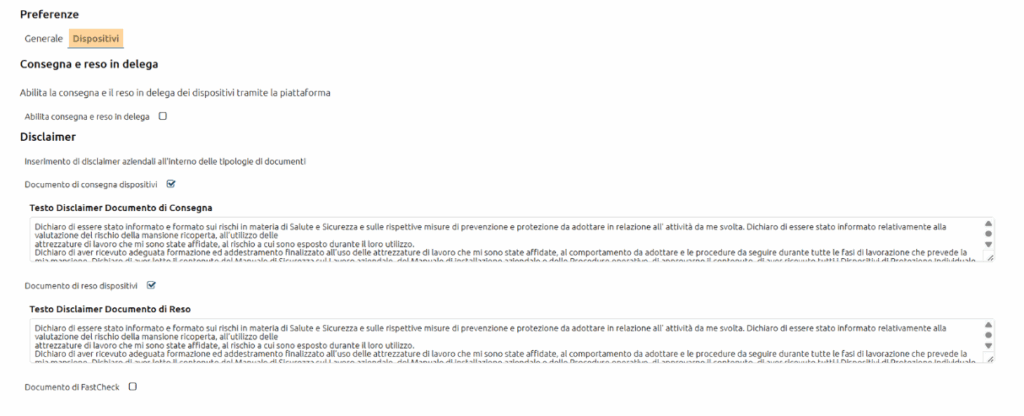
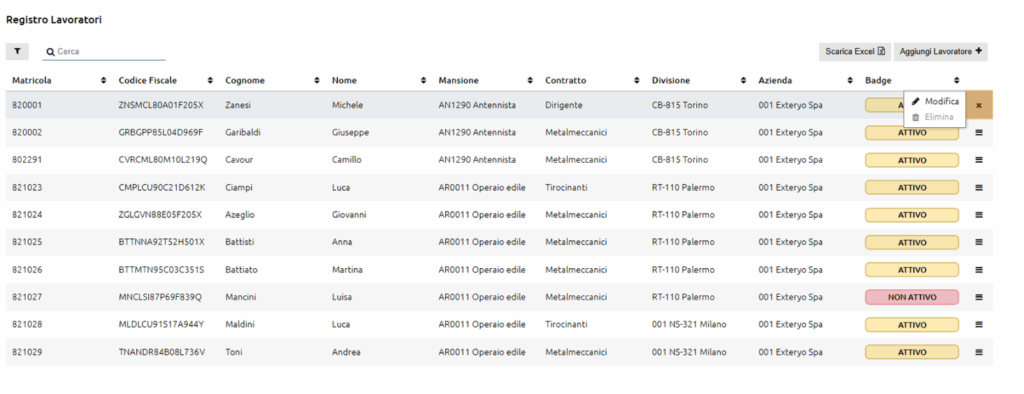
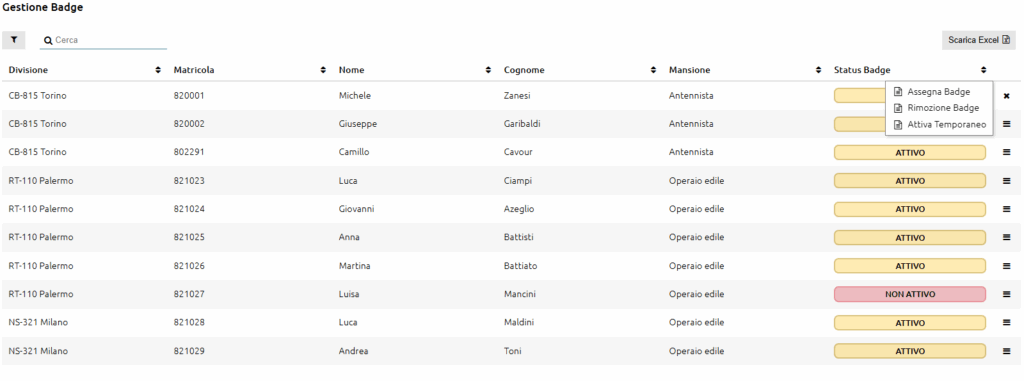
The BADGE MANAGEMENT function allows a company manager to control and activate the workers’ badges required to allow the worker access to his or her own dedicated area of the platform, or to sign documents (after choosing the option to sign with a badge within the PREFERENCES in the GENERAL SETTINGS section).
To assign a badge to a worker using this function, click on the ![]() button at the end of the worker’s line and select the ASSIGN BADGE item.
button at the end of the worker’s line and select the ASSIGN BADGE item.
Then place the badge on the back of your phone or on the NFC reader for PC to enable pairing. Once associated, the heading ACTIVE will appear in the BADGE STATUS column.
If it is necessary to remove the badge, choose the REMOVE BADGE item from the ![]() button. Once removed, the status badge will read NOT ACTIVE.
button. Once removed, the status badge will read NOT ACTIVE.
La funzione FAST CHECK permette ad un responsabile dell’azienda di poter effettuare un rapido audit nei confronti di un lavoratore per il controllo dell’utilizzo dei dispositivi da parte di quest’ultimo e per il controllo dello status di salute degli stessi dispositivi.
Per effettuare un nuovo audit ad un lavoratore, cliccare il tasto ![]() posto al termine della riga relativa ad un lavoratore e selezionare la voce
posto al termine della riga relativa ad un lavoratore e selezionare la voce
controllare e attivare i badge dei lavoratori necessari per permettere l’accesso del lavoratore alla propria area dedicata della piattaforma INIZIA AUDIT.
A questo punto si aprirà il report di Audit nel quale saranno presenti le seguenti sezioni:
INFORMAZIONI GENERALI: indica le informazioni dettagliate del lavoratore e del responsabile che sta effettuando l’audit.
REPORT: mostra la lista di tutti i dispositivi in possesso del lavoratore e per ognuno dei quali è possibile indicare se il lavoratore sta indossando o non indossando il dispositivo durante l’attività, oppure non è necessario l’utilizzo durante l’attività svolta.
ESITO FINALE E PERSONALIZZAZIONI: Al di sotto della checklist è presente con due tasti colorati l’esito finale da indicare per l’audit effettuato, scegliendo tra POSITIVO e NEGATIVO.
Al di sotto dei riquadri relativi all’esito di ispezione è possibile inserire le seguenti personalizzazioni dell’audit:
– FOTO : Possibilità di aggiungere foto dedicate dell’audit effettuato
– NOTE: Possibilità di aggiungere una nota dedicata per l’audit effettuato
– FIRMA DEL LAVORATORE: Spazio di inserimento della firma da parte del lavoratore
– FIRMA DEL RESPONSABILE DEL CONTROLLO: Spazio di inserimento della firma del responsabile del controllo dell’audit.
Una volta conclusa l’attività, cliccare su SALVA per salvare l’audit nel sistema.
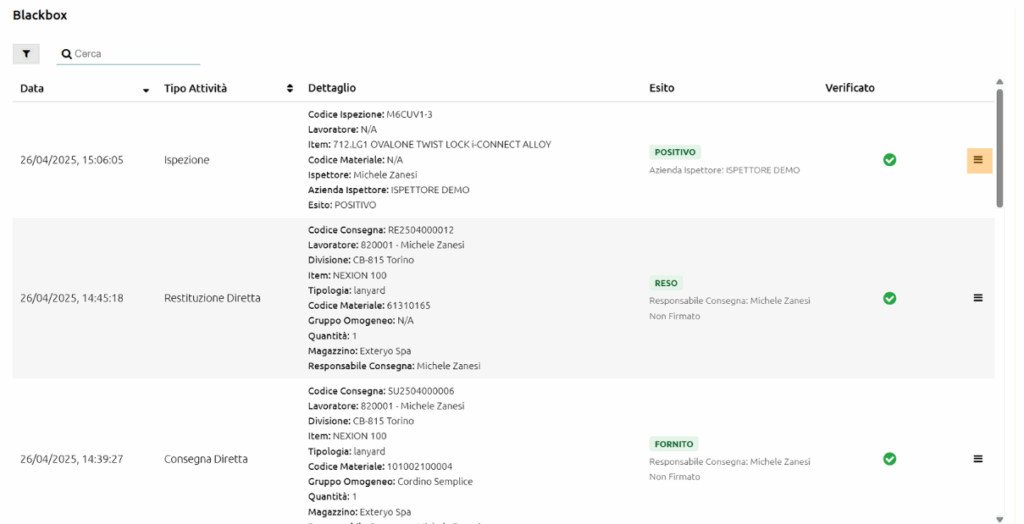
The DELIVERY BY DELEGATION function allows the individual worker to be able to check the list of any devices received through the delegation entrusted to another worker and at the same time be able to sign the related delivery report.
Whenever the delegated delivery of one or more devices is defined (see the appropriate function in section 6.4 ITEMS-SUPPLY), this can be displayed in the table with the data relating to the Date of the delegated delivery, the name of the delegate and the activity status.
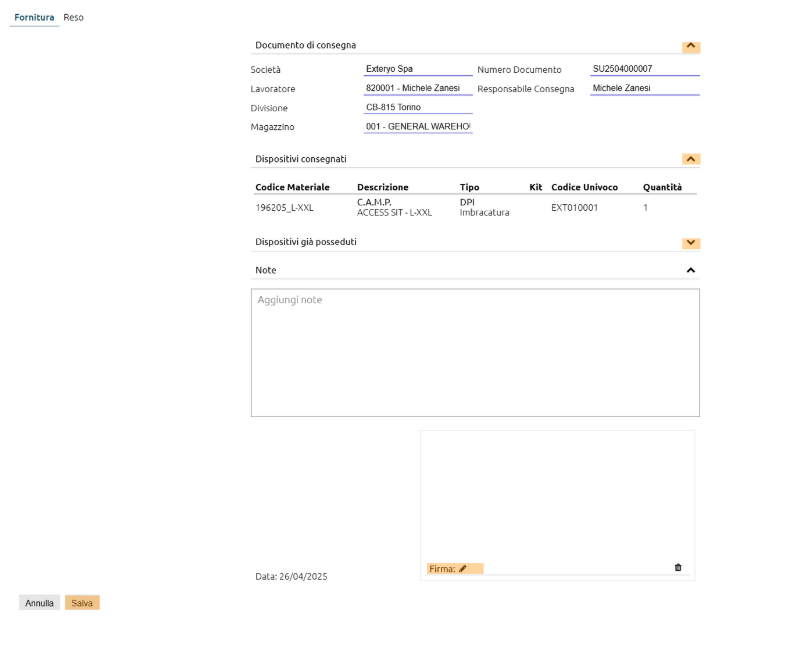
Clicking on the ![]() button and selecting the MANAGE DELIVERY option will display the final delivery report that the worker must sign using the method (calligraphy or badge) defined by the company.
button and selecting the MANAGE DELIVERY option will display the final delivery report that the worker must sign using the method (calligraphy or badge) defined by the company.

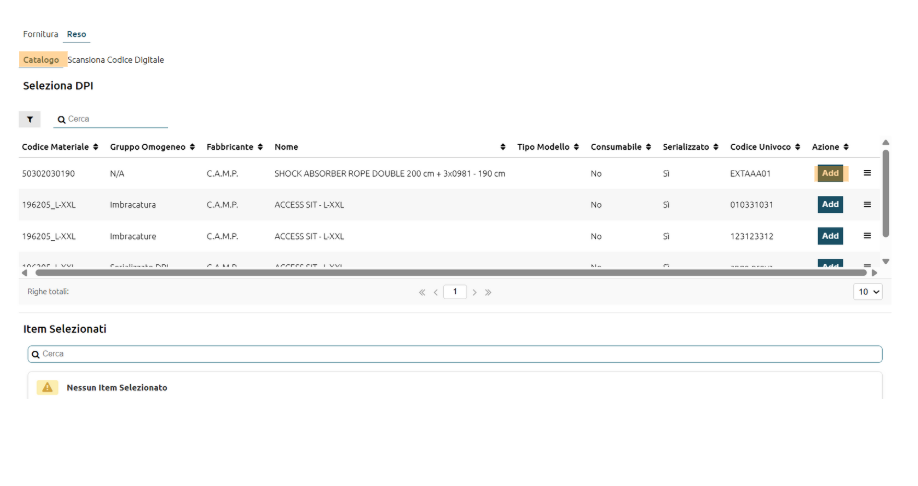
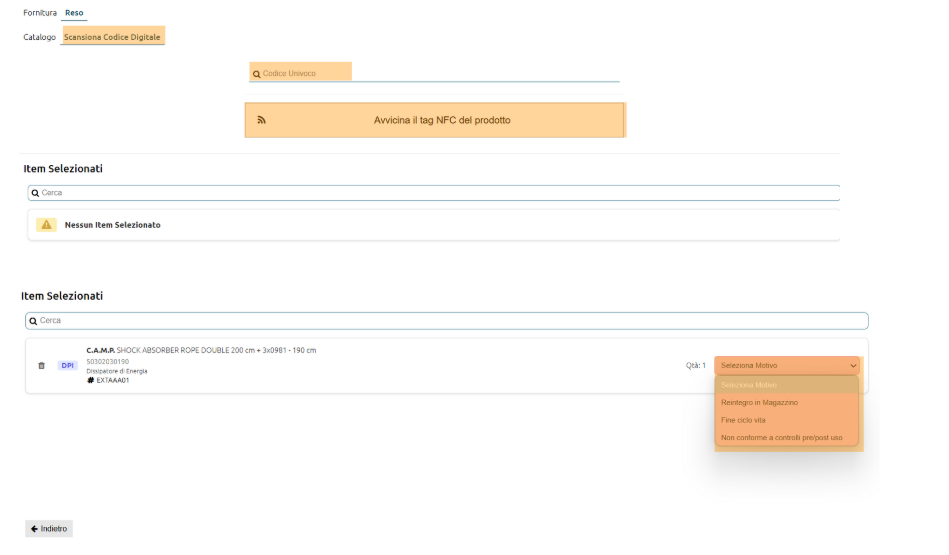
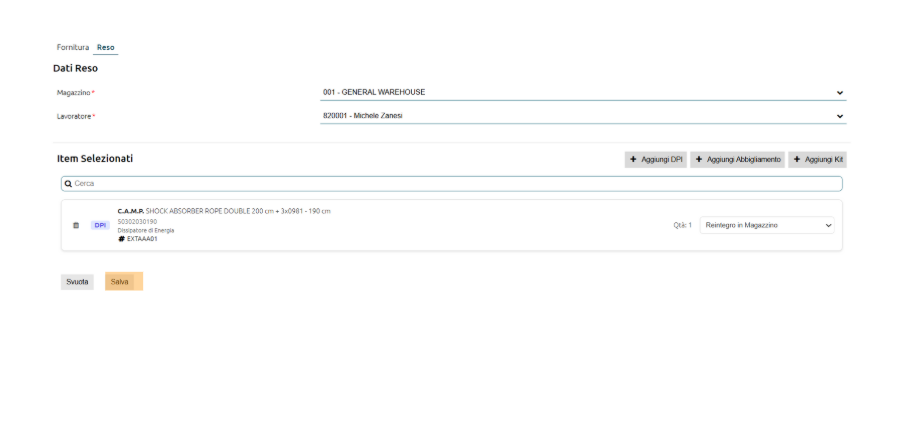
La funzione RESO IN DELEGA permette al singolo lavoratore di poter controllare la lista di eventuali dispositivi da dover rendere mediante la delega affidata ad un’altra lavoratore e contestualmente poter firmare il report di reso relativo.
Ogni qual volta che viene definito un reso in delega di uno o più dispositivi (vedi apposita funzione nel paragrafo 6.5 DISPOSITIVI-RESO), questo potrà essere visualizzata all’interno della tabella con i dati relativi alla Data del reso in delega, il nominativo del delegato e lo status di attività.
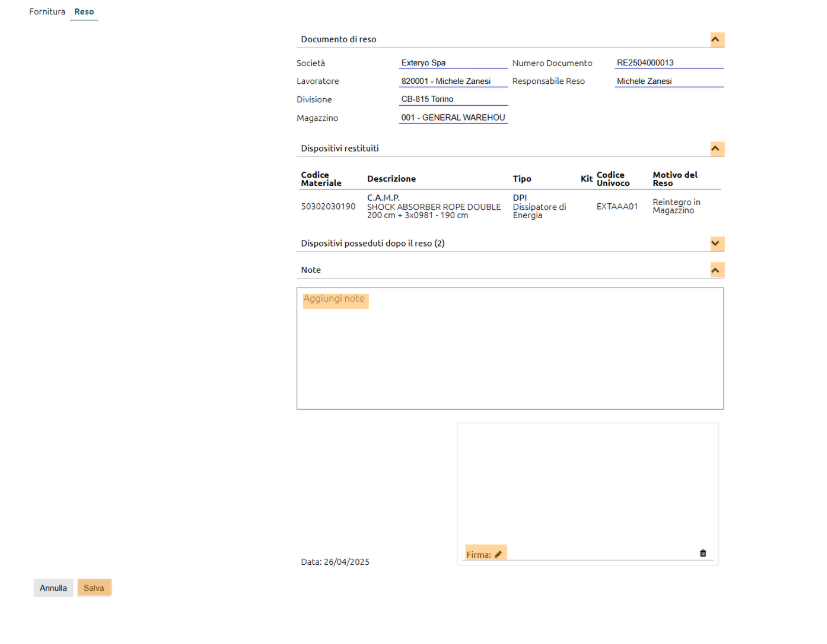
Cliccando il tasto ![]() e selezionando l’opzione GESTISCI RESO verrà visualizzato il report di reso finale che il lavoratore dovrà firmare mediante la modalità (calligrafica o badge) definita dall’azienda.
e selezionando l’opzione GESTISCI RESO verrà visualizzato il report di reso finale che il lavoratore dovrà firmare mediante la modalità (calligrafica o badge) definita dall’azienda.